

Golden Layers Pistachio Kunafa
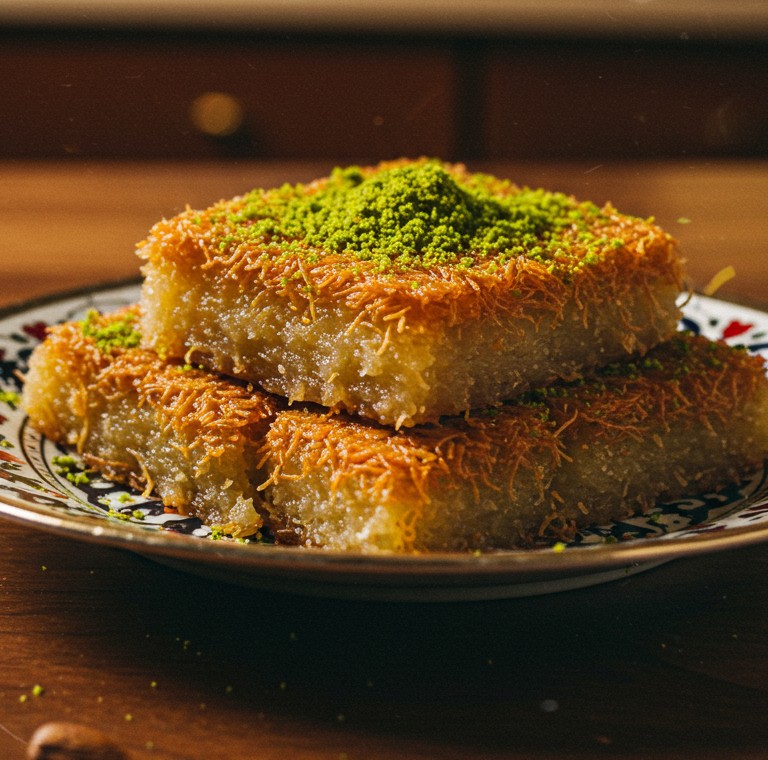
This guide walks through preparing the stunning Kunafa dessert featured in the image. Notice the rich, golden-brown layers of finely shredded pastry, glistening slightly from a sweet syrup, and generously topped with vibrant green ground pistachios. Achieving this delightful balance of textures and flavors at home is entirely possible, offering a rewarding experience for any aspiring baker. This recipe focuses on replicating the specific appearance shown, resulting in beautiful square portions perfect for sharing.
Gathering the Essentials
Success begins with the right components and tools. Here’s what is needed:
Halal Ingredients Needed
- 🧈 250g Unsalted Butter (halal), melted
- 🍝 500g Shredded Phyllo Dough (Kataifi/Kadaif)
- 🍬 2 cups Granulated Sugar
- 💧 1.5 cups Water
- 🍋 1 teaspoon Lemon Juice
- 💚 1/2 cup Finely Ground Pistachios (for garnish)
Kitchen Tools Required
- ⬜️ 1 Square or Rectangular Baking Pan (approx. 9×9 inch or similar)
- 🍳 1 Medium Saucepan (for syrup)
- 🥣 2 Large Mixing Bowls
- 🥄 Measuring Cups and Spoons
- 🥄 Whisk or Spoon
- 🖌️ Pastry Brush (helpful for buttering the pan)
- 🔪 Sharp Knife (for cutting)
- 🍽️ Serving Plate (a patterned one like in the image adds a lovely touch!)
Preparing the Golden Kunafa Layers
This stage focuses on getting that distinct texture and color seen in the image.
Step 1: Prepare the Kataifi Dough
First, handle the shredded phyllo dough. It often comes tightly packed. Gently pull the strands apart in a large mixing bowl, working to separate them into fine, loose threads. Avoid breaking them too much, aiming for the texture visible in the image. Pour the melted butter over the separated strands. Using hands, gently toss and massage the butter into the kataifi, ensuring every strand is evenly coated. This thorough coating is essential for achieving the uniform, deep golden-brown color during baking, just like the Kunafa pictured.
Step 2: Assemble the Kunafa Base
Lightly grease the bottom and sides of the baking pan with a little melted butter, using a pastry brush if available. Take about half of the buttered kataifi mixture and press it firmly and evenly into the bottom of the prepared pan. A flat-bottomed glass or measuring cup can help apply even pressure. This firm pressing helps the Kunafa hold its shape once baked and cut into squares. The goal is a compact layer about half an inch thick.
Step 3: Bake to Golden Perfection
Place the pan in a preheated oven at 180°C (350°F). Bake for approximately 35-45 minutes. The Kunafa is ready when the top is a deep, rich golden brown, matching the beautifully baked pastry shown in the photograph. Keep an eye on it towards the end, as oven temperatures can vary.
Making the Sweet Syrup
While the Kunafa bakes, prepare the simple syrup that gives it sweetness and moisture.
Step 4: Combine Syrup Ingredients
In the medium saucepan, combine the sugar and water. Stir them together just until the sugar starts to dissolve.
Step 5: Simmer the Syrup
Place the saucepan over medium heat. Bring the mixture to a gentle boil, then immediately reduce the heat to low. Let it simmer – meaning it should bubble very gently, not boil rapidly – for about 10-12 minutes. Stir occasionally. Add the lemon juice during the last couple of minutes of simmering; this helps prevent the syrup from crystallizing later. The syrup should thicken slightly but remain pourable. Turn off the heat.
Step 6: Cool the Syrup Slightly
Allow the syrup to cool down while the Kunafa finishes baking. The syrup should be warm, not hot, when poured over the Kunafa. Pouring warm syrup over hot Kunafa is crucial for proper absorption without making the pastry soggy.
Finishing and Serving the Kunafa
The final steps bring everything together for that picture-perfect result.
Step 7: Soak the Kunafa
As soon as the Kunafa comes out of the oven, while it is still piping hot and golden brown, slowly and evenly pour the warm syrup all over its surface. Pouring slowly ensures even distribution. Listen for a satisfying sizzle – this indicates the temperature contrast is correct for optimal absorption, leading to the moist yet structured layers visible in the image.
Step 8: Cool and Cut
Let the Kunafa sit at room temperature for at least 30-60 minutes to absorb the syrup fully and cool down slightly. Once it’s manageable, use a sharp knife to cut it into square portions, similar in size to those stacked on the plate in the photo.
Step 9: Garnish with Pistachios
Generously sprinkle the finely ground pistachios over the top surface of the Kunafa squares. The image shows a substantial, even layer of this vibrant green garnish, providing a beautiful color contrast and nutty flavor. Ensure the top piece, if stacking, receives the most prominent layer.
Step 10: Present the Dessert
Arrange the Kunafa squares on a serving plate. Stacking two or three pieces, slightly offset as depicted in the photograph, makes for an appealing presentation. The patterned plate in the image adds a traditional aesthetic. While the image shows a couple of almonds on the table surface nearby, the Kunafa itself is garnished solely with pistachios; the almonds could be served alongside if wished.
A Sweet Accomplishment
Preparing Kunafa is a journey ending in a truly special dessert. The contrast between the slightly crisp, syrup-soaked kataifi and the nutty pistachio topping is delightful. Taking the time to carefully butter the dough and manage the syrup temperature yields the wonderful texture and golden appearance shown. Enjoy the process and the delicious outcome. Perhaps share a picture of the finished Kunafa – seeing homemade results is always inspiring!