

Craft a Charming Crochet Keyring
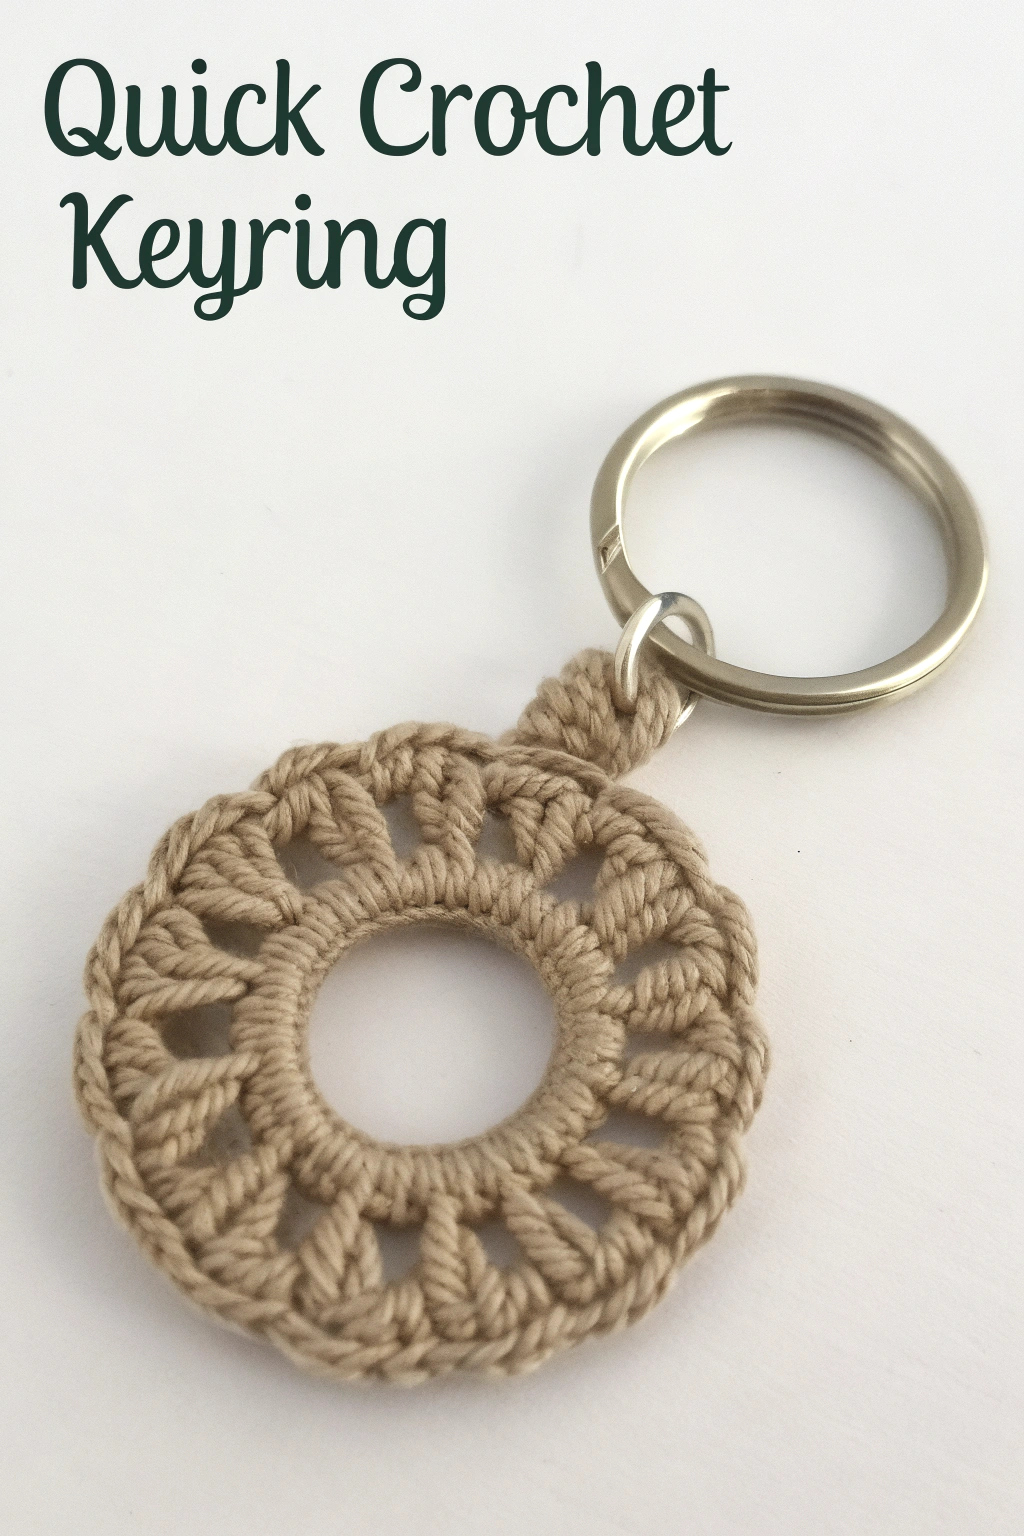
Ever feel that little spark of joy when you make something lovely with your own hands? Well, get ready, because today we’re going to fashion a delightful little accessory: the exact crochet keyring you see in the picture! This project is perfect if you’re just dipping your toes into the world of crochet. It’s quick, satisfying, and results in a super cute, practical piece. Imagine your keys sporting this handmade touch! Let’s get our hooks ready.
What You’ll Need
Gather these simple supplies before you begin:
- 🧶 Yarn: A sturdy yarn, like cotton or a cotton blend, in a neutral beige colour, just like the one pictured. DK or worsted weight works well.
- 🪝 Crochet Hook: Choose a size appropriate for your yarn (e.g., 4mm or 4.5mm). Check the yarn label for recommendations.
- ✂️ Scissors: For snipping the yarn.
- 🪡 Yarn Needle: Sometimes called a tapestry needle, this is for weaving in the ends neatly.
- 🔑 Keyring Hardware: A standard metal split ring with a small jump ring attached, as shown in the image.
Getting Started: Essential Stitches Explained
Don’t worry if these terms are new! They are the basic building blocks of your keyring. We’ll guide you through.
- Slip Knot: This is how you get the yarn onto your hook to begin. Make a loop, twist it, and pull another loop through – tighten gently onto your hook.
- Chain Stitch (ch): Yarn over your hook (wrap yarn from back to front) and pull that yarn through the loop already on your hook. That’s one chain! We often make several in a row, forming a foundation chain or spaces within a pattern.
- Slip Stitch (sl st): This tiny stitch is mainly for joining. Insert your hook into the specified stitch or space, yarn over, and pull the yarn through both the stitch and the loop on your hook in one go.
- Single Crochet (sc): Insert your hook into the stitch, yarn over, pull up a loop (you’ll have two loops on your hook). Yarn over again, and pull through both loops on your hook. One single crochet is complete! This stitch is short and dense.
- Double Crochet (dc): This stitch is taller than a single crochet. Yarn over before inserting your hook into the stitch. Insert hook, yarn over, pull up a loop (three loops on hook). Yarn over, pull through the first two loops only (two loops left on hook). Yarn over again, pull through the remaining two loops. That’s your double crochet! It helps build the lovely openwork pattern you see.
- Magic Ring (Adjustable Ring): A way to start projects worked in the round, leaving no hole in the middle. Alternatively, you can chain 4 and join with a slip stitch to the first chain to form a ring, then work Round 1 into the center of that ring. We’ll use the Magic Ring method here for a tight centre.
Let’s Make Your Keyring!
Follow these rounds step-by-step. Remember to take your time and enjoy the process! The finished keyring is worked in rounds, starting from the centre outwards.
Starting: Make a Magic Ring.
Round 1: The Inner Circle
- Chain 1 (this doesn’t count as a stitch).
- Work 12 single crochet (sc) stitches directly into the Magic Ring.
- Pull the starting tail of the Magic Ring gently but firmly to close the centre hole nice and tight.
- Join the round by making a slip stitch (sl st) into the very first single crochet stitch you made (not the starting chain 1). (You should have 12 sc stitches).
Round 2: Building the Lacy Pattern
- Chain 3 (This counts as your first double crochet stitch here and throughout).
- Work 1 double crochet (dc) into the same stitch you joined into. This forms the first V-shape section.
- Chain 1 (ch 1). This forms the space you see between sections.
- Skip the next single crochet stitch from Round 1.
- *In the next single crochet stitch, work 2 double crochet (dc) stitches. Chain 1 (ch 1). Skip the next single crochet stitch.*
- Repeat the instructions between the asterisks ( * … * ) all the way around. You’ll be working pairs of double crochet stitches into every other stitch from Round 1.
- After the last ch 1, join the round with a slip stitch (sl st) to the top of the starting chain 3. (You should have 12 pairs of dc stitches, separated by 12 ch-1 spaces).
Round 3: The Outer Edge
- Chain 1 (does not count as a stitch).
- Work 1 single crochet (sc) into the same stitch you joined into (the top of the starting ch-3 from Round 2).
- Work 1 sc into the next double crochet stitch.
- Work 1 sc into the next chain-1 space.
- *Work 1 sc into each of the next two double crochet stitches. Work 1 sc into the next chain-1 space.*
- Repeat the instructions between the asterisks ( * … * ) all the way around. You’re basically putting one single crochet into every stitch and every chain space from the previous round.
- Join with a slip stitch (sl st) to the first single crochet of this round. (You should have 36 sc stitches in total). Do not fasten off yet if you want to add the tab directly.
Making the Attachment Tab: This small tab is constructed directly onto the edge you just finished.
- Chain 1.
- Work 1 sc into the same stitch you joined into, and 1 sc into each of the next 2 stitches along the edge (3 sc total for the base of the tab).
- Turn your work. Chain 1. Work 1 sc into each of those 3 stitches.
- Repeat the previous step (Turn, ch 1, sc in each of the 3 sts) for about 2-3 more rows, or until the tab is long enough to fold comfortably through your keyring hardware’s jump ring. Fashion a short, sturdy tab; the one in our example image is about 3-4 rows high in total.
- Cut the yarn, leaving a tail of about 6 inches. Pull the tail through the last loop on your hook to fasten off.
Finishing Touches
Almost there! These final steps give your keyring a professional look.
- Weave in Ends: Thread the starting tail (from the Magic Ring) onto your yarn needle. Weave it back and forth through the stitches on the wrong side of the centre circle a few times, then snip the excess yarn close to the work. Do the same with the final tail from the tab, weaving it securely into the back of the tab stitches.
- Attach Hardware: Take your finished crochet piece. Fold the little tab you made through the small jump ring that is attached to the main split keyring. Use the yarn needle and the tail you would have woven in (or a new piece of yarn if you already wove it in) to securely stitch the end of the tab down to its base on the back side of the keyring motif. Ensure it’s stitched firmly so it won’t come undone.
Your Keyring is Ready!
And there you have it – your very own handmade crochet keyring, fashioned exactly like the one in the picture! How wonderful does it feel to have brought this charming piece into being? Hook it onto your keys, use it as a bag charm, or even gift it to someone special.
We hope you enjoyed this little project. Don’t hesitate to try it again with different colours! We’d love to see the beautiful keyrings you put together – feel free to share photos of your finished pieces! Happy hooking!