

Stitch a Sweet Crochet Envelope
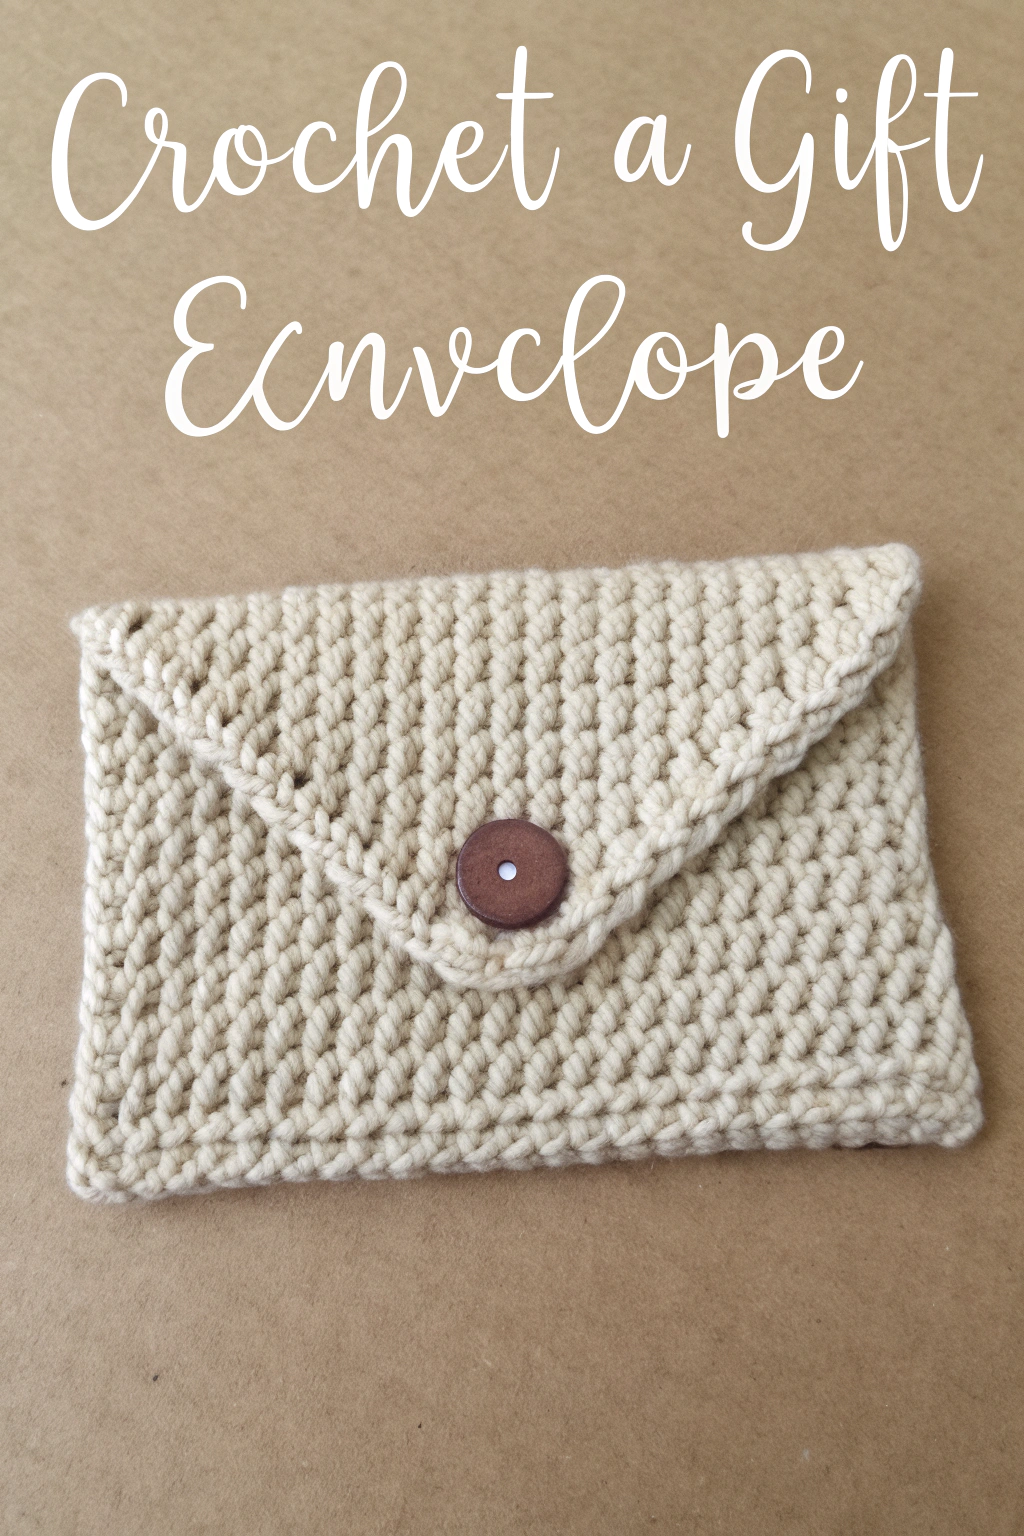
Ever wanted to present a gift card or a thoughtful note in something a little more special than plain paper? Imagine handing over a lovingly made gift nestled inside a cozy, handmade envelope! This project is perfect for adding that personal touch. Looking at this lovely Crochet Gift Envelope, you can see it’s fashioned from a soft, cream-colored yarn, featuring a beautifully textured stitch pattern and a simple button closure. It feels warm and personal, doesn’t it? Let’s walk through how you can assemble your very own, step by step. Even if you’re just starting your crochet journey, we’ll guide you through it gently.
Gathering Your Treasures
Before we begin, let’s gather the supplies you’ll need to produce this charming piece:
- 🧶 Yarn: One skein of Worsted Weight yarn (Weight 4). The pictured envelope uses a neutral cream color, but feel free to choose your favorite!
- 🪝 Crochet Hook: Size H/8 (5.0 mm). Check your yarn label for the recommended hook size, but this is a good starting point for worsted weight.
- 🟤 Button: One button, approximately 0.75 inches (19mm) in diameter.
- 🧵 Yarn Needle: Sometimes called a tapestry needle, for weaving in ends and attaching the button.
- ✂️ Scissors: For snipping yarn.
Understanding the Stitches
This envelope features a wonderfully dense and textured stitch that gives it structure. We’ll primarily use the Waistcoat Stitch, which looks a bit like knitting! Don’t worry, we’ll break it down.
First, let’s understand the basic Single Crochet (sc), as the Waistcoat Stitch is a variation of it:
- Insert your hook into the indicated stitch.
- Yarn over (wrap yarn around your hook).
- Pull up a loop (you’ll have two loops on your hook).
- Yarn over again.
- Pull through both loops on your hook. That’s one single crochet!
Now, for the star of the show, the Waistcoat Stitch (Wst), also known as Center Single Crochet: The only difference from a standard single crochet is where you insert your hook. Instead of going under the top two loops of the stitch from the previous row, you need to insert your hook directly into the center of the ‘V’ of the stitch below, going between the vertical posts of that stitch.
- Identify the ‘V’ shape of the single crochet stitch in the row below where you want to work.
- Carefully insert your hook into the middle of that ‘V’, pushing through to the back of the work. Make sure you’ve gone between the posts, not just under the top loops.
- Complete the stitch as a normal single crochet: Yarn over, pull up a loop (2 loops on hook), yarn over, pull through both loops.
Beginner Tip: The Waistcoat Stitch can feel a bit tight at first. Try to keep your tension relaxed and consistent. Using a slightly larger hook than usual for your yarn weight can sometimes help make hook insertion easier. It’s crucial to insert the hook in the correct spot for the stitch definition to appear.
We will also use a Slip Stitch (sl st) for joining/finishing:
- Insert your hook into the indicated stitch.
- Yarn over.
- Pull the yarn through both the stitch and the loop already on your hook in one motion.
Crafting Your Envelope
We’ll make the envelope body as one flat rectangle first, then fold and seam it. The size will be roughly 4.5 inches wide and designed to fold into a final height of about 3 inches (plus the flap).
Building the Main Body
- Starting Chain: Chain (ch) 18. (This determines the width. To make a wider envelope, add more chains; for narrower, use fewer.)
- Row 1 (Foundation Row): Turn your chain over. Starting in the second chain from the hook, work 1 Single Crochet (sc) into the ‘back bump’ of each chain across. Working into the back bump gives a neater starting edge. You should have 17 sc stitches. Chain 1, turn. (The chain 1 at the end of the row is a turning chain and does not count as a stitch).
- Row 2: Work 1 Waistcoat Stitch (Wst) in each single crochet stitch across. (17 Wst). Chain 1, turn. Remember: Insert hook into the center ‘V’ of the stitch from Row 1.
- Row 3 onwards: Repeat Row 2, working 1 Wst into each Wst from the previous row, until your rectangle measures approximately 7.5 inches long. Always Chain 1 and turn at the end of each row. Keep checking your hook placement for that characteristic Waistcoat Stitch texture!
Troubleshooting Tip: If your edges are uneven, double-check that you have exactly 17 stitches in every row. If the fabric is too stiff, try loosening your tension slightly or going up half a hook size.
Shaping the Flap
Now we need to form the triangular flap directly onto one end of the rectangle. We’ll do this by decreasing stitches at the beginning and end of the next few rows. A simple way to decrease with Wst is to work two Wst stitches together (Wst2tog): Insert hook into the center ‘V’ of the first stitch, yarn over, pull up a loop. Insert hook into the center ‘V’ of the next stitch, yarn over, pull up a loop (3 loops on hook). Yarn over, pull through all 3 loops.
- Flap Row 1: Chain 1, turn. Wst2tog over the first 2 stitches. Work 1 Wst in each stitch across until 2 stitches remain. Wst2tog over the last 2 stitches. (15 stitches). Chain 1, turn.
- Flap Row 2: Repeat Flap Row 1. (13 stitches). Chain 1, turn.
- Flap Row 3: Repeat Flap Row 1. (11 stitches). Chain 1, turn.
- Flap Row 4: Repeat Flap Row 1. (9 stitches). Chain 1, turn.
- Flap Row 5: Repeat Flap Row 1. (7 stitches). Chain 1, turn.
- Flap Row 6: Repeat Flap Row 1. (5 stitches). Chain 1, turn.
- Flap Row 7: Repeat Flap Row 1. (3 stitches). Chain 1, turn.
- Flap Row 8: Wst2tog over the first 2 stitches, 1 Wst in the last stitch. (2 stitches). Chain 1, turn. Note: The image shows a slightly rounded point; this decrease method approximates that shape.
- Flap Row 9: Wst2tog over the final 2 stitches. (1 stitch).
Do not fasten off yet.
Finishing Touches
- Edging (Optional but Recommended): Chain 1, turn. Work one round of Single Crochet (sc) evenly around the entire perimeter of the piece (rectangle + flap). Work 1 sc in the end of each row down the sides, 1 sc in each stitch along the bottom edge, 1 sc in the end of each row up the other side, and 1 sc in each stitch/decrease across the flap edges. Work 3 sc stitches into the very tip of the flap to help it lay flat. When you get back to the start, Slip Stitch (sl st) to the first sc to join. Now fasten off, leaving a long tail (about 15-20 inches) for seaming.
- Folding and Seaming: Lay the piece flat with the flap at the top. Fold the bottom edge (the starting edge without the flap) up about 2.75 – 3 inches, ensuring the sides line up neatly. Thread the long yarn tail onto your yarn needle. Using a whip stitch or mattress stitch, sew the side seams closed, connecting the folded front layer to the back layer. Stop sewing where the flap begins. Repeat for the other side using a new piece of yarn or carefully carrying the yarn across if preferred (though a new piece is often neater).
- Button Loop: With the flap folded down, determine where the point naturally rests on the envelope body. This is where your button loop needs to be positioned relative to the button. Attach your yarn near the tip of the flap (you might do this discreetly on the underside). Chain a small number of stitches (try 4-6, depending on your button size) to build a loop just large enough to fit snugly over your button. Slip Stitch (sl st) back into the base near where you started the chain loop to secure it. Fasten off.
- Attaching the Button: Using a length of yarn (or sewing thread for a less bulky finish) and your yarn needle, sew the button securely onto the front of the envelope body, positioned so the loop from the flap fits over it.
- Weaving Ends: Use your yarn needle to weave in all remaining loose yarn ends securely into the back of the stitches. Trim any excess yarn.
Your Handmade Treasure is Ready!
And there you have it! A beautiful, textured Crochet Gift Envelope, prepared entirely by you. Feel that lovely weight and texture – it’s so much more special than paper, holding not just a gift card or note, but also the warmth of your effort. This little pouch is perfect for birthdays, holidays, or just because.
Don’t hesitate to try different yarn colors or even add small embellishments. The joy is in making something unique! We hope you found this guide helpful and encouraging. We’d absolutely love to see the wonderful gift envelopes you put together – feel free to share pictures! Happy stitching!