
Your Cozy Cobblestone Soap Pouch
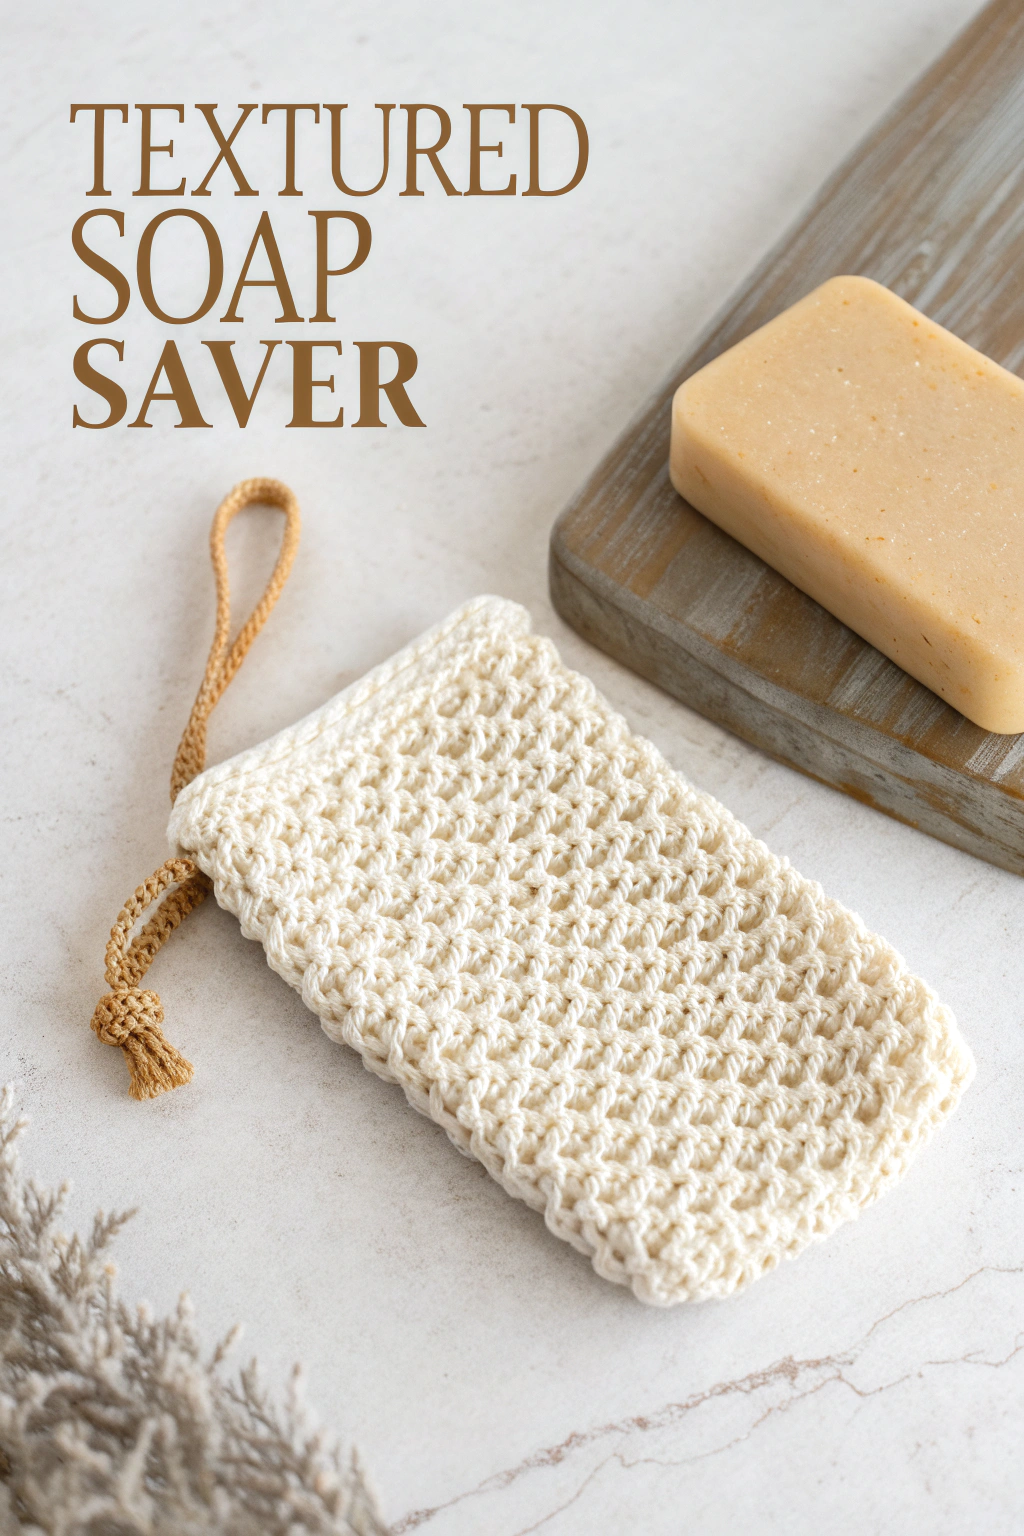
Have you ever wanted to add a touch of handmade charm to your bathroom while doing something practical? Today, we’re going to guide you through fashioning the exact Textured Soap Saver you see in the picture. This isn’t just a lovely little pouch; it’s a wonderfully functional piece that helps your soap last longer and provides gentle exfoliation. The pouch has a dense, bumpy texture in a natural off-white color, perfect for generating a rich lather. It features a simple drawstring closure, made from a contrasting tan cord with a neat knot, allowing you to hang it up to dry. Get ready to feel the pride of producing something useful and beautiful with your own two hands!
What You’ll Need
Gather these simple supplies before you begin:
- 🧶 Yarn: 1 skein of worsted weight (Category 4) cotton yarn in an off-white or natural color. Cotton is the best choice for absorbency and durability in water. You’ll also need a small amount of similar weight yarn in tan/brown for the drawstring.
- 🪝 Crochet Hook: Size H/8 (5.0 mm). (Check your yarn label for recommendations, but this size works well for the pictured texture with worsted cotton).
- ✂️ Scissors: For trimming yarn ends.
- 🪡 Yarn Needle: (Also called a tapestry needle) with an eye large enough for your yarn, used for weaving in ends and seaming.
Stitch Guidance for New Crocheters
Don’t worry if you’re just starting! We’ll walk through the stitches needed. Remember to practice these a few times before starting the main project.
- Chain (ch): This is the foundation of most crochet projects. Make a slip knot on your hook. Yarn over (wrap yarn over your hook from back to front), and pull the yarn through the loop already on your hook. That’s one chain! Repeat for the required number.
- Slip Stitch (sl st): This stitch is used for joining or moving yarn across stitches without adding height. Insert your hook into the indicated stitch, yarn over, and pull the yarn through both the stitch and the loop on your hook in one motion.
- Single Crochet (sc): This is a basic, short stitch. Insert your hook into the stitch, yarn over, pull up a loop (you’ll have two loops on your hook). Yarn over again, and pull through both loops on the hook. One single crochet is complete.
- Double Crochet (dc): This stitch is taller than a single crochet. Yarn over before inserting your hook into the stitch. Insert hook, yarn over, pull up a loop (three loops on hook). Yarn over, pull through the first two loops on the hook (two loops remaining). Yarn over again, pull through the last two loops on the hook. One double crochet is complete.
- Working Flat: This means you work back and forth in rows, turning your work at the end of each row.
Fashioning Your Soap Saver Pouch
This pouch is worked as a flat rectangle and then seamed. The distinctive bumpy texture comes from alternating single and double crochet stitches worked together. Let’s call it the Cobble Stitch for this guide.
Main Body Panel:
- Using your off-white cotton yarn, Chain (ch) 15. (This will determine the width. Adjust slightly if needed for your specific soap bar size, using an odd number of chains).
- Row 1: Single Crochet (sc) in the 2nd chain from the hook, and then sc in each chain across. You should have 14 sc stitches. Ch 1, turn. (The turning ch 1 does not count as a stitch here and throughout).
- Row 2 (Begin Cobble Stitch): (Sc, dc) all in the very first sc stitch. Skip the next sc. Repeat this pattern
*(sc, dc) in next st, skip next st*across the row. Your last group of (sc, dc) will be in the final stitch. Ch 1, turn. (You should have 7 (sc, dc) pairs). - Row 3: (Sc, dc) all in the first sc stitch (ignoring the dc right next to it from the row below). Skip the next dc stitch. Repeat this pattern
*(sc, dc) in next sc, skip next dc*across the row. Your last group will be worked into the last sc of the previous row. Ch 1, turn. - Repeat Row 3 until your rectangle measures approximately 8-9 inches long (or long enough to fold comfortably over your soap bar with a little room). Tip: Count your stitch pairs occasionally to make sure you still have 7 pairs – it’s easy to accidentally add or lose stitches at the ends of rows.
- Fasten Off: Once your rectangle reaches the desired length, cut the yarn, leaving a long tail (about 15-20 inches) for sewing the seam. Pull the tail through the last loop on your hook to secure it.
Assembling the Pouch:
- Fold: Lay your rectangle flat. Fold it in half widthwise, bringing the starting chain edge up to meet the last row edge. The textured side (right side) should be facing outwards.
- Seam: Thread the long yarn tail onto your yarn needle. Starting at the bottom corner (the fold), begin sewing the side edge closed. A whip stitch is simple for beginners: Insert your needle from front to back through both layers of fabric along the edge, loop the yarn over, and repeat evenly up the side. Once you reach the top corner, continue sewing across the bottom edge (the foundation chain edge). Secure the end firmly and weave in the remaining tail. Weave in the starting tail as well.
Top Edging:
- Join Yarn: With the right side still facing you, attach your off-white yarn with a slip stitch to any stitch along the top opening edge.
- Round 1: Ch 1 (does not count as a stitch). Work one round of sc evenly spaced around the entire top opening. Aim for roughly 2 sc stitches for every row-end along the sides, and 1 sc in each stitch across the front/back top edges. Join the round with a sl st to the first sc.
- (Optional) Round 2: For a slightly sturdier edge, ch 1 and work one more round of sc in each stitch around. Join with a sl st to the first sc.
- Fasten Off: Cut yarn and weave in the end securely.
Making the Drawstring:
- Using your contrasting tan/brown yarn, leave a 4-inch tail and then make a chain approximately 15-18 inches long. Tip: Ensure it’s long enough to weave through the top and tie a bow or knot easily.
- Fasten Off: Cut the yarn, leaving another 4-inch tail.
- Knot: Tie a secure knot close to each end of the chain. The image shows a more complex knot forming a small tassel; for simplicity, a standard overhand knot is fine, or you can unravel the yarn ply slightly at the ends after knotting for a basic tassel effect.
Threading the Drawstring:
- Attach the yarn needle to one end of the drawstring (or use a small safety pin).
- Starting near the side seam, weave the drawstring in and out through the stitches of the top sc edging round. Go under one or two stitches, then over one or two stitches, all the way around the opening.
- Ensure both ends of the drawstring exit on the outside of the pouch near where you started. Remove the needle/safety pin. Pull the ends to cinch the top slightly.
Enjoy Your Handmade Soap Saver!
There you have it! Your very own Textured Soap Saver, fashioned exactly like the one pictured. Pop your favorite bar of soap inside, pull the drawstring, and enjoy the rich lather and gentle scrub it provides. Hanging it up between uses really helps your soap dry out and last much longer.
Feel that wonderful texture and the satisfaction of knowing you produced this practical little piece yourself. We hope you found joy in the process! Why not make a few more? They make lovely, thoughtful gifts. We’d love to see your finished soap savers – feel free to share your work! Happy stitching!