

Sunlit Hazelnut Chocolate Cookies
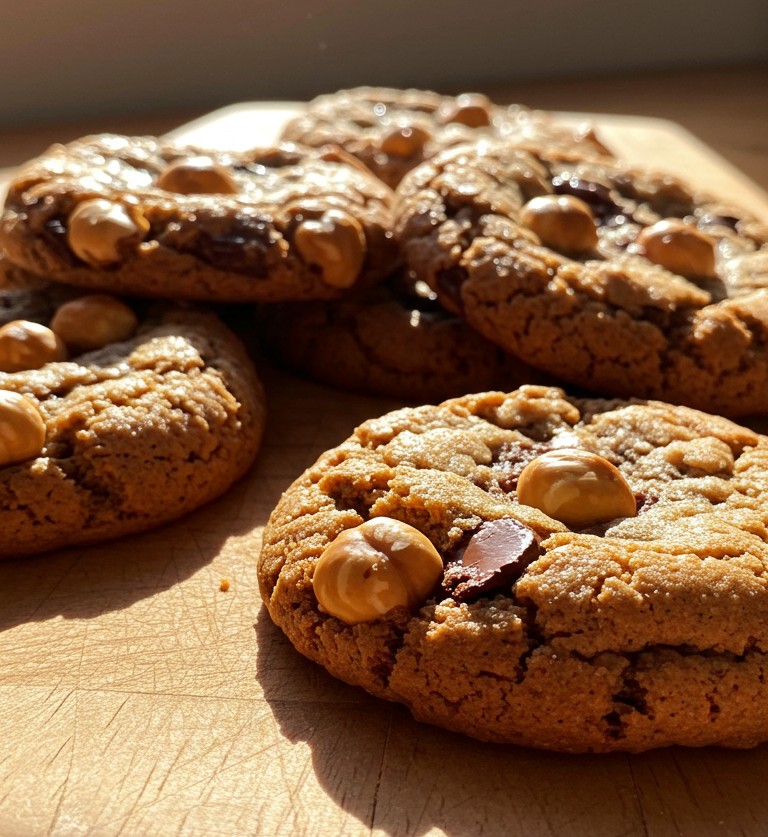
Gazing upon a batch of perfectly baked Hazelnut Chocolate Chunk Cookies, like the ones pictured here, can spark an immediate desire to head to the kitchen. These cookies, with their rich golden-brown surfaces, generous chocolate chunks, and prominent hazelnuts, are a true delight. This guide will walk anyone, even absolute beginners, through the process of preparing these beautiful treats, ensuring a delicious outcome that mirrors the tempting image.
What You’ll Need
To begin this baking adventure, gather these halal ingredients and simple kitchen tools.
Ingredients:
- 🧈 1/2 cup (115g) Unsalted Butter (halal certified), softened to room temperature
- 🍚 3/4 cup (150g) Packed Light Brown Sugar
- 🍙 1/4 cup (50g) Granulated Sugar
- 🥚 1 Large Egg (halal, if applicable in your region for sourcing), at room temperature
- 🍦 1 teaspoon alcohol free Vanilla Extract
- 🌾 1 ½ cups (180g) All-Purpose Flour
- 🥄 1/2 teaspoon Baking Soda
- 🧂 1/4 teaspoon Salt
- 🍫 1 cup (170g) Good Quality Halal Dark or Semi-Sweet Chocolate Chunks (not chips, for that rustic look)
- 🌰 1/2 cup (60g) Whole Hazelnuts, plus extra for topping
Kitchen Equipment:
- 🥣 Large Mixing Bowl
- 🥄 Wooden Spoon or Electric Mixer
- 📏 Measuring Cups and Spoons
- 🍪 Baking Sheets (at least two)
- 📜 Parchment Paper or Silicone Baking Mat
- 🌬️ Wire Cooling Rack
Getting Started: Simple Steps to Perfect Cookies
Preparing these cookies is a straightforward process. Following these steps carefully will help achieve that wonderful texture and appearance seen in the photograph.
Step 1: Prepare the Basics
First, ensure the butter and egg are at room temperature. This is a simple but crucial step for cookie success. Butter at room temperature means it’s soft enough to indent with a finger but not melted. Eggs at room temperature mix more evenly into the batter. Line the baking sheets with parchment paper. This prevents sticking and helps with even baking. Preheat the oven to 350°F (175°C). Position an oven rack in the middle of the oven.
Step 2: Combine Wet Ingredients
In the large mixing bowl, place the softened unsalted butter, light brown sugar, and granulated sugar. Using a wooden spoon or an electric mixer on low speed, cream these together. “Creaming” means beating the butter and sugars until the mixture is light in color and has a fluffy texture. This process incorporates air, which helps the cookies become tender. This should take about 2-3 minutes with an electric mixer, or a bit longer by hand. Once creamed, add the egg and vanilla extract. Mix again until just combined. Be careful not to overmix at this stage.
Step 3: Add Dry Ingredients
In a separate, smaller bowl, whisk together the all-purpose flour, baking soda, and salt. This helps distribute the baking soda and salt evenly throughout the flour, which is important for the cookies’ rise and flavor. Gradually add this dry mixture to the wet ingredients in the large bowl. Mix on low speed or by hand with the wooden spoon until the flour is just incorporated. It’s very important not to overmix once the flour is added. Overmixing develops gluten, which can make the cookies tough instead of tender and chewy. Stop mixing when there are still a few streaks of flour visible.
Step 4: Fold in the Goodies
Gently fold in the chocolate chunks and 1/2 cup of hazelnuts using a spatula or wooden spoon. “Folding” is a gentle mixing technique where you use the spatula to go down through the middle of the batter, then along the bottom of the bowl, and bring some of the batter up and over the top. Rotate the bowl and repeat until the additions are just distributed. This gentle action keeps the air in the batter.
Step 5: Form the Cookies (The Secret to the Look!)
This is where the cookies begin to take on the appearance seen in the image – rustic, generously studded, and inviting. Using a medium cookie scoop (about 1.5 to 2 tablespoons) or two spoons, drop mounds of dough onto the prepared baking sheets. Leave about 2 inches of space between each cookie, as they will spread during baking. For that extra special touch, like the cookies in the photograph, press a few additional chocolate chunks and some whole or halved hazelnuts onto the tops of each dough ball before baking. This ensures they are prominently visible after baking, just like in the image. The cookies in the image display these additions beautifully, enhancing their visual appeal.
Optional Tip for Chewier Cookies: For an even chewier cookie with less spread, cover the bowl of dough with plastic wrap and refrigerate for at least 30 minutes, or even up to 24 hours. If chilling for longer, allow the dough to sit at room temperature for a few minutes to soften slightly before scooping.
Step 6: Bake to Golden Perfection
Place one baking sheet at a time into the preheated oven. Bake for 10-13 minutes. The cookies are done when the edges are golden brown and set, and the centers still look a little soft. The cookies pictured exhibit this perfect golden-brown hue, a hallmark of ideal baking time and temperature. Every oven is different, so it’s wise to check them around the 10-minute mark.
Step 7: Cooling is Key
Once baked, remove the baking sheet from the oven. Let the cookies cool on the baking sheet for 5 minutes. During this time, they will continue to cook slightly and firm up. This step is important for achieving the slightly crinkled tops visible in the image. Then, carefully transfer the cookies to a wire cooling rack to cool completely. This allows air to circulate around them, preventing soggy bottoms.
Serving and Enjoying Your Homemade Delights
These Hazelnut Chocolate Chunk Cookies are delightful on their own, perhaps with a glass of milk or a warm cup of coffee or tea. The combination of crunchy hazelnuts, rich chocolate, and buttery cookie dough is truly satisfying. Arranging them on a simple wooden board, as shown in the image, adds a touch of rustic charm when sharing.
Share Your Baking Triumphs!
The journey of transforming simple ingredients into such beautiful and tasty cookies is a rewarding one. Don’t hesitate to try this recipe. When those golden, nutty, chocolate-laden cookies emerge from the oven, take a moment to admire the results of your efforts. Feel free to share pictures of your finished Hazelnut Chocolate Chunk Cookies – it’s always wonderful to see homemade goodness spread!
Enjoy the process, and delight in every single bite. Happy baking!