
Simple Halal Chocolate Chip Cake Recipe
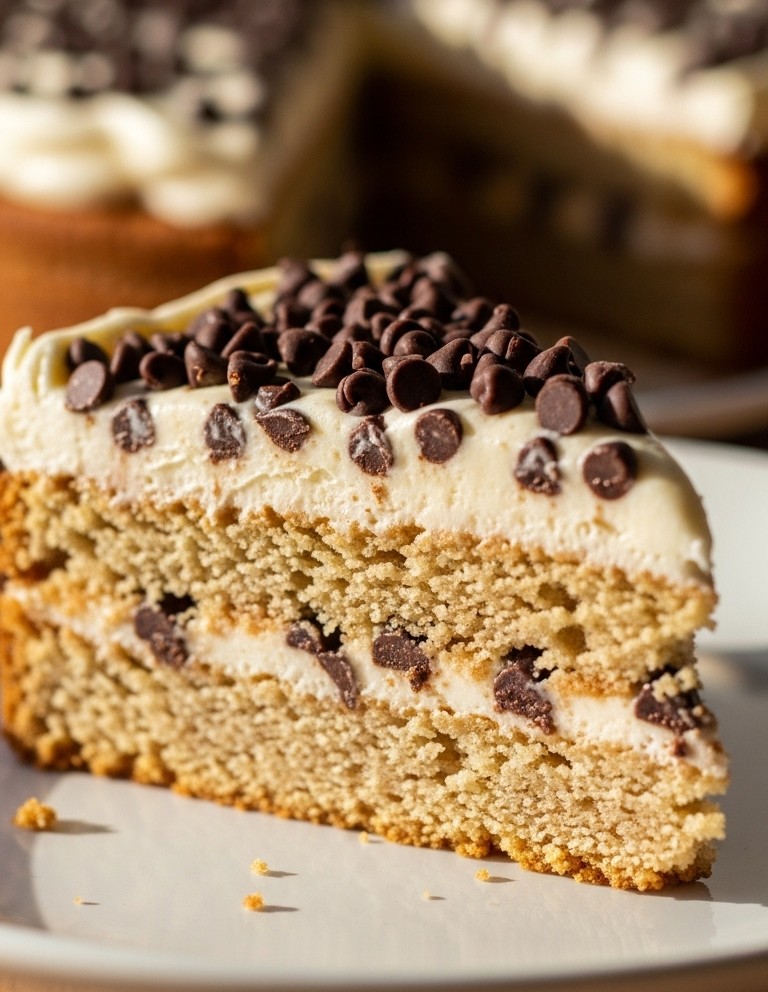
This delightful bake, showcased beautifully in the image, presents a vision of pure homemade comfort. A slice of this magnificent cake reveals layers of joy, promising a truly satisfying experience for anyone who appreciates a well-made dessert. This guide will walk beginners through the process of preparing this exact treat, ensuring every step is clear and achievable.
What This Delicious Bake Embodies
The image displays a generous slice of a two-layer cake. The cake layers possess a warm, light golden-brown hue and a tender, moist crumb, as evidenced by their texture. Throughout these layers, dark chocolate chips are evenly distributed, adding pockets of rich flavor. Nestled between these cake portions, and generously spread across the top, is a thick, smooth, off-white frosting. The crowning glory is an abundant scattering of mini dark chocolate chips over the top frosting, providing both a visual appeal and a delightful textural element. The overall presentation on the simple white plate, with a few stray crumbs, speaks to its irresistible nature.
Essential Tools and Halal Ingredients
To embark on this baking adventure, certain tools and ingredients are necessary. Ensuring all components are halal is key for those following dietary guidelines.
🥣 Kitchen Equipment
- 📏 Measuring cups and spoons
- 🥣 Large mixing bowl
- 🥣 Medium mixing bowl (for dry ingredients)
- 🥄 Whisk
- 🥄 Spatula (rubber or silicone)
- 🎂 Two 8-inch or 9-inch round cake pans
- 📜 Parchment paper
- ✨ Electric mixer (handheld or stand mixer)
- 🌬️ Wire cooling rack
- 🔪 Offset spatula or flat knife (for frosting)
🍪 Halal Ingredients
For the Chocolate Chip Cake Layers:
- 🧈 1 cup (227g) unsalted halal butter, softened to room temperature
- 🍚 1 ¾ cups (350g) granulated sugar
- 🥚 4 large halal eggs, at room temperature
- 🍦 2 teaspoons halal vanilla extract (ensure it’s alcohol-free if preferred)
- 🥛 1 cup (240ml) halal buttermilk (or see tip for homemade version)
- 🌾 3 cups (375g) all-purpose flour
- 🥄 1 tablespoon baking powder
- 🧂 ½ teaspoon salt
- 🍫 1 ½ cups (255g) halal semi-sweet chocolate chips (standard size for inside the cake)
For the Vanilla Frosting:
- 🧈 1 ½ cups (340g) unsalted halal butter, softened
- 🍦 2 teaspoons halal vanilla extract (ensure it’s alcohol-free if preferred)
- 🍚 4 cups (480g) powdered sugar (sifted, if lumpy)
- 🥛 2-4 tablespoons halal milk or cream
- 🍫 ½ cup (85g) halal mini chocolate chips (for topping)
Tip for Buttermilk: If buttermilk is unavailable, a simple substitute can be made. For 1 cup of buttermilk, add 1 tablespoon of white vinegar or lemon juice to a measuring cup. Then, add plain milk until it reaches the 1-cup mark. Let it stand for 5-10 minutes; it will curdle slightly, and it’s ready to use.
Bringing Your Chocolate Chip Dream to Life: Step-by-Step
Follow these instructions carefully to prepare a cake identical to the one in the image, with its enticing layers and rich chocolate chip goodness.
Preparing the Chocolate Chip Cake Layers
- Preheat and Prep: Begin by setting the oven to 350°F (175°C). This is called preheating, and it ensures the oven is at the correct temperature when the cake goes in, which is crucial for proper baking. Grease the two round cake pans with a little butter or cooking spray. Then, line the bottom of each pan with a circle of parchment paper. This paper prevents the cake from sticking and makes removal much easier. Lightly flour the insides of the pans, tapping out any excess.
- Combine Dry Ingredients: In a medium mixing bowl, take the flour, baking powder, and salt. Use a whisk to combine these ingredients thoroughly. This step, known as sifting or whisking dry ingredients, helps to distribute the baking powder and salt evenly, ensuring the cake rises properly and has a consistent flavor. Set this bowl aside.
- Cream Butter and Sugar: In a large mixing bowl, place the softened butter and granulated sugar. Using an electric mixer, beat them together on medium speed for about 3-5 minutes. This process is called creaming. The mixture should become pale, light, and fluffy. This incorporates air, which contributes to a tender cake. Scrape down the sides of the bowl occasionally with a spatula to ensure everything is mixed evenly.
- Add Eggs and Vanilla: Add the eggs one at a time, beating well after each addition until fully incorporated. If an egg is added too quickly, the batter might look curdled, but it will come together. After all eggs are mixed in, stir in the vanilla extract.
- Alternate Wet and Dry Ingredients: Now, the dry ingredients (from step 2) and the buttermilk will be added to the creamed mixture. Add about one-third of the dry ingredients to the wet mixture and mix on low speed until just combined. Then, add half of the buttermilk and mix until just combined. Repeat this process, alternating between dry and wet, ending with the dry ingredients. Be careful not to overmix at this stage; mix only until the flour streaks disappear. Overmixing can develop the gluten in the flour too much, resulting in a tough cake.
- Fold in Chocolate Chips: Gently add the 1 ½ cups of standard-sized chocolate chips to the batter. Using a spatula, fold them in. Folding is a gentle mixing technique where you use the spatula to cut down through the middle of the batter, scrape along the bottom of the bowl, and bring some batter up and over the top. Rotate the bowl and repeat until the chips are evenly distributed. This prevents deflating the air incorporated earlier.
- Divide and Bake: Evenly divide the prepared batter between the two prepared cake pans. Smooth the tops with the spatula. Place the pans in the preheated oven. Bake for 30-35 minutes.
- Check for Doneness: To check if the cakes are baked through, insert a wooden toothpick or a thin skewer into the center of each cake. If it comes out clean, or with a few moist crumbs attached (but no wet batter), the cakes are done. The tops will be golden brown and spring back when lightly touched.
- Cooling the Cakes: Once baked, carefully remove the cake pans from the oven and place them on a wire cooling rack for about 10-15 minutes. This initial cooling in the pan prevents the cakes from breaking. Then, gently invert the cakes onto the wire rack, peel off the parchment paper, and allow them to cool completely. Complete cooling is essential before frosting; warm cakes will melt the frosting.
Whipping Up the Creamy Frosting
The off-white frosting seen in the image is smooth and generous.
- Beat Butter: In a large mixing bowl, place the softened butter. Using an electric mixer, beat the butter on medium-high speed for about 3-5 minutes until it is very pale, light, and fluffy. This step is key to a light frosting.
- Add Powdered Sugar Gradually: With the mixer on low speed, gradually add the sifted powdered sugar, about one cup at a time. Mix well after each addition. Once all the sugar is incorporated, increase the speed to medium-high and beat for another 2-3 minutes until the frosting is very smooth and fluffy.
- Incorporate Vanilla and Liquid: Add the vanilla extract and 2 tablespoons of milk or cream. Beat again until combined. If the frosting is too thick, add more milk or cream, one teaspoon at a time, until it reaches a spreadable consistency, similar to the thick, plush frosting in the image.
Assembling Your Masterpiece
This is where the cake takes on its final, impressive form.
- Prepare the First Layer: If the cake layers have domed tops, they can optionally be levelled using a long serrated knife for a perfectly flat surface, though the cake in the image has a lovely homemade look where perfectly flat layers are not strictly necessary. Place one completely cooled cake layer onto a serving plate or cake stand.
- Frost the First Layer: Take about 1 cup of the prepared vanilla frosting and spread it evenly over the top of the first cake layer using an offset spatula or a flat knife. This forms the central frosting layer visible in the image slice.
- Add the Second Layer: Carefully place the second cake layer on top of the frosted first layer, ensuring it is aligned.
- Frost the Top and Sides: Apply a generous amount of the remaining frosting to the top of the cake. Use the offset spatula to spread it evenly, aiming for the thick, luscious coating seen in the photograph. If desired, also frost the sides of the cake, though the image focuses on a slice where side frosting isn’t fully visible, the priority is the top.
- Decorate with Mini Chocolate Chips: Liberally sprinkle the ½ cup of mini chocolate chips all over the top surface of the frosted cake. The image shows a dense covering of these chips, so don’t be shy! They add that final touch of chocolate intensity and visual appeal.
- Chill (Optional): For neater slices, the assembled cake can be chilled in the refrigerator for about 30 minutes to an hour before serving. This helps the frosting to set.
Showcasing Your Culinary Achievement
Once your Sun-Kissed Chip Layer Delight is ready, it’s time to admire the handiwork. Slicing into it will reveal those beautiful layers of chocolate chip-studded cake and creamy frosting, just as seen in the inviting image. The combination of soft cake, smooth frosting, and bursts of chocolate is truly something special.
This baking journey, from simple ingredients to a stunning dessert, offers immense satisfaction. Consider sharing a snapshot of your finished bake; observing how others have brought this recipe to life is always a joy. May every bite be a testament to the pleasure of home baking.