

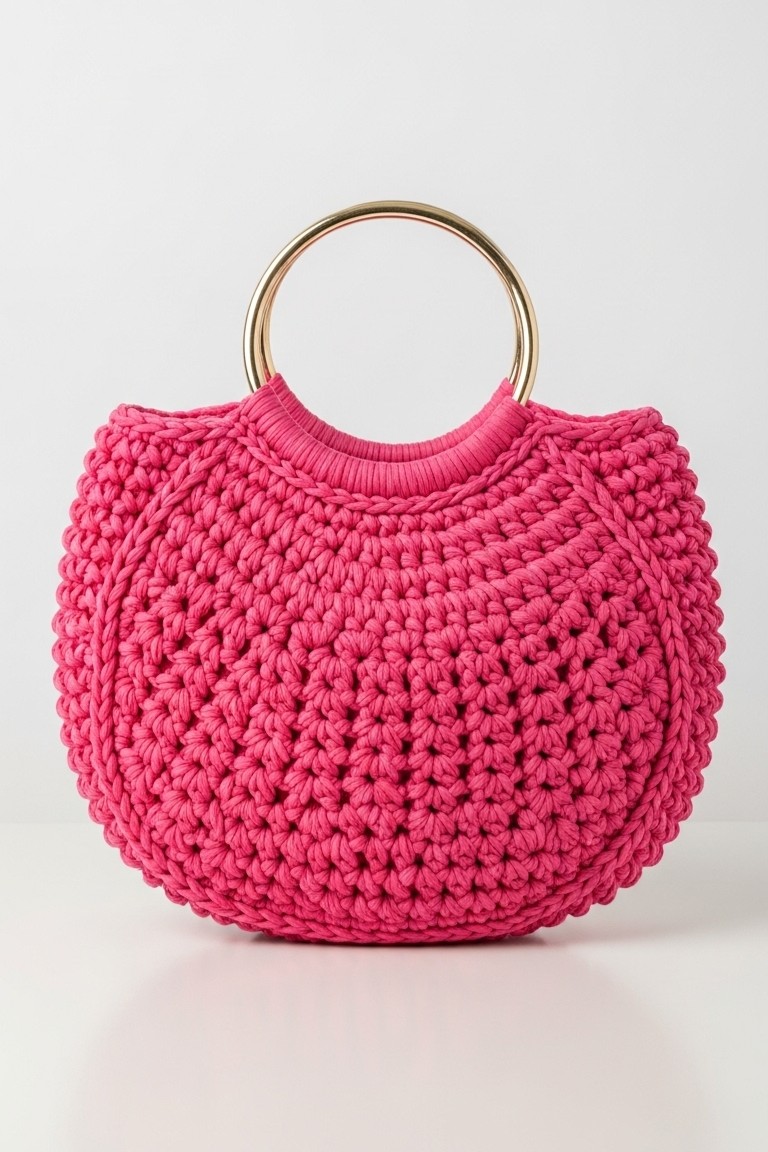
Hello Fuchsia Hoop Bag
Ever spotted a gorgeous handmade accessory and thought, “I wish I could make that”? Well, good news! Today, we’re diving into how to fashion this absolutely stunning Fuchsia Hoop Bag. Its vibrant color and chic gold ring handle make it a real head-turner, and you’ll be beaming with pride when you tell everyone you made it. This project is perfect for getting comfortable with some basic crochet techniques, and the result is a truly useful and stylish piece. Let’s gather our supplies and begin this fun journey!
What You’ll Need
To bring this beautiful bag to life, you’ll want to have these items ready:
- 🧶 Chunky Cotton Cord or T-Shirt Yarn: Approximately 200-250 yards of a bright pink/fuchsia shade. The yarn in the image has excellent stitch definition, typical of these yarn types.
- 🪝 Crochet Hook: A size 8.0mm (L-11) or 9.0mm (M/N-13) hook will work well with chunky yarn. Check your yarn label for the recommended hook size.
- 💍 Metal Ring Handle: One circular gold-toned metal ring, approximately 4-5 inches (10-12.5 cm) in diameter.
- ✂️ Scissors: For cutting yarn.
- 🪡 Large-Eye Tapestry Needle: For weaving in ends.
- ✨ Stitch Marker (Optional but Recommended): To mark the beginning of your rounds.
Getting Started: Essential Stitches & Techniques
Before we jump into the bag itself, let’s go over the basic building blocks. Don’t worry, these are simple to pick up, and we’ll explain them as we go!
- Magic Ring (MR): This is a common way to start crochet projects worked in the round, giving you a tight, closed center.
- To make a magic ring: Loop the yarn around your fingers to form a ring. Insert your hook into the ring, yarn over, and pull up a loop. Yarn over again and pull through the loop on your hook to make a chain stitch (this secures the ring but doesn’t count as a stitch). Now you can work your first round of stitches directly into the center of the ring. Once the first round is complete, you’ll pull the yarn tail to magically cinch the center hole closed!
- Beginner Tip: If the magic ring feels tricky at first, you can alternatively chain 2 (ch 2), and then work your first round of stitches into the second chain from the hook.
- Single Crochet (sc): This is the primary stitch for our bag, producing a lovely, dense fabric.
- To make a single crochet: Insert your hook into the designated stitch. Yarn over (wrap the yarn over your hook from back to front) and pull the yarn through the stitch. You will now have two loops on your hook. Yarn over again, and pull the yarn through both loops on your hook. That’s one single crochet complete!
- Single Crochet in Back Loop Only (sc BLO): This variation creates a textured horizontal ridge.
- To make a single crochet in back loop only: Look at the top of the stitch from the previous row; you’ll see two loops forming a ‘V’. Insert your hook under the back loop only (the loop furthest from you), then complete the single crochet as normal (yarn over, pull up a loop, yarn over, pull through both loops on hook).
- Slip Stitch (sl st): This stitch is used to join rounds or to finish off an edge neatly. It’s very flat.
- To make a slip stitch: Insert your hook into the designated stitch. Yarn over and pull the yarn through the stitch AND through the loop already on your hook in one motion.
- Working in Joined Rounds: For this bag, we will join each round with a slip stitch and then chain 1 to start the new round. This helps keep your stitch counts accurate and the seam (though minimal with this yarn) straight.
- Alternative: Some prefer working in a continuous spiral for projects like this, especially with chunky yarn, as it avoids a seam. If you choose this, use a stitch marker to clearly mark the first stitch of each round and simply continue crocheting into the next stitch without joining.
- Increase (inc): This means working two stitches into the same stitch from the previous round. This is how we make our circle grow for the base. For this pattern, an increase will mean “work 2 single crochet stitches into the next stitch.”
Let’s Make Your Bag! Step-by-Step Guide
We’re going to build this bag from the bottom up, starting with a flat circle, then forming the sides, and finally attaching that gorgeous handle.
Forming the Base
The base of the bag is a flat circle. The key is to distribute your increases evenly.
Round 1: Start with a magic ring. Work 6 sc into the MR. Pull the tail to close the ring. Join with a sl st to the first sc. Chain 1 (ch 1 – this ch 1 does not count as a stitch here or throughout). (6 stitches) Round 2: Work 2 sc in each stitch around (this is an increase in every stitch). Join with a sl st to the first sc. Ch 1. (12 stitches) Round 3: [Sc in the next stitch, 2 sc in the next stitch (inc)] repeat around. Join with a sl st to the first sc. Ch 1. (18 stitches) Round 4: [Sc in the next 2 stitches, 2 sc in the next stitch (inc)] repeat around. Join with a sl st to the first sc. Ch 1. (24 stitches) Round 5: [Sc in the next 3 stitches, 2 sc in the next stitch (inc)] repeat around. Join with a sl st to the first sc. Ch 1. (30 stitches)
Continue this pattern of increasing the number of single crochets between increases by one each round:
- Round 6: [Sc in next 4 sts, inc] repeat around. (36 sts)
- Round 7: [Sc in next 5 sts, inc] repeat around. (42 sts)
- Round 8: [Sc in next 6 sts, inc] repeat around. (48 sts)
- Round 9: [Sc in next 7 sts, inc] repeat around. (54 sts)
- Round 10: [Sc in next 8 sts, inc] repeat around. (60 sts)
Tip: Your circle should be lying flat. If it starts to ruffle, you might have too many increases. If it starts to cup or form a bowl too early, you might need more increases or looser tension. The chunky yarn is quite forgiving. For this bag, the base circle is substantial before the sides begin.
Building the Body
Now we stop increasing, and the bag will start to take its characteristic rounded, spherical shape.
Round 11 – 22 (or until desired height): Sc in each stitch around. Join with a sl st to the first sc. Ch 1. (60 stitches per round)
Work these rounds of plain single crochet. As you progress, you will see the sides of your bag begin to form and curve upwards. The image shows the bag has a good depth, so aim for at least 10-12 rounds here, or until the height of the body (before it significantly curves inwards at the top) is roughly 5-6 inches.
Shaping the Top Opening and Preparing the Edge
The bag in the image has a neat, firm top edge with a subtle texture where the handle is attached. The opening is slightly narrower than the widest part of the bag, naturally following the spherical contour. These next rounds create that specific edge.
Round 23: Sc in each stitch around. Join with a sl st to the first sc. Ch 1. (60 stitches) Round 24: Working in the back loop only (BLO), sc in each stitch around. Join with a sl st to the first sc. Ch 1. (60 stitches) This creates the visible textured ridge seen in the photo. Round 25: Sc in each stitch around (working through both loops as normal). Join with a sl st to the first sc. Ch 1. (60 stitches)
At the end of Round 25, do not chain 1. We will proceed directly to attaching the handle.
Attaching the Handle
This is where your bag truly comes together! The yarn is worked directly around the metal ring handle to secure it. This process encases part of the ring within a band of crochet.
- Position the Ring: Hold the metal ring against the outside of the top edge of your bag. You will be working your stitches around the metal ring and into the stitches of the last round of the bag. The image shows the handle is attached across roughly half the bag’s opening on one side, then the process is repeated on the other.
- Determine Attachment Points: You have 60 stitches in your final round. You will attach one side of the handle over approximately 28-30 stitches, leave a gap for the bag opening, and then attach the other side. For simplicity, let’s aim to cover 28 stitches with the handle attachment on each side, leaving 2 stitches on each side of the handle unworked to form the bag’s opening. So, you’ll work across 28 stitches for the first handle attachment, skip 2 stitches, work across the next 28 stitches for the second handle attachment, and skip the final 2 stitches.
- Crocheting Around the Ring – First Side:
- Insert your hook into the next stitch of Round 25 (the first of your 28 stitches for this side).
- Position the metal ring so your hook also goes under the ring.
- Yarn over, and pull up a loop through the stitch and from under the ring. You now have 2 loops on your hook.
- Yarn over and pull through both loops on your hook. This completes one sc around the ring and into the bag.
- Continue working sc stitches in this manner – into the next stitch of the bag and around the ring – for a total of 28 stitches. Ensure your stitches are snug and cover the ring neatly and densely. You are essentially sandwiching the ring between your hook and the fabric of the bag as you make each stitch.
- Forming the Gap: After your 28th sc attaching the handle, skip the next 2 stitches on the bag’s edge. Do not work into these stitches. This creates the side opening of the bag.
- Crocheting Around the Ring – Second Side:
- Now, you will attach the same ring handle to the opposite side of the bag opening. Re-position the ring if necessary.
- Insert your hook into the next unworked stitch of Round 25 (this will be the 3rd stitch after the 28 you just worked, so effectively stitch #31 of the round).
- Again, work your sc stitches around the metal ring and into the stitches of the bag for the next 28 stitches.
- Finalizing: After the 28th sc on the second side, you should have 2 stitches remaining unworked on the bag’s edge from Round 25. Slip stitch (sl st) into the very first sc you made around the handle (on the first side) to join.
- Fasten off your yarn, leaving a tail of about 6-8 inches.
Finishing Touches
The final step is to make sure all your yarn tails are securely and invisibly tucked away.
- Thread the yarn tail from fastening off onto your tapestry needle.
- Weave the tail back and forth through the inside of your crochet stitches, near the handle attachment, for a few inches. Try to go in different directions to secure it well.
- Snip any remaining yarn close to your work.
- Do the same for the starting tail from your magic ring (if you haven’t already woven it in).
Your Radiant Ring-Handle Bag!
And there you have it! A stunning, handcrafted Fuchsia Hoop Bag, fashioned by your own two hands. Feel that incredible sense of accomplishment? That’s the magic of making something yourself. This bag is perfect for adding a pop of color to any outfit, whether you’re heading to a brunch or a summer evening out.
We’d be thrilled to see your finished bags! Share a photo of your handiwork – perhaps you chose a different vibrant color or a unique ring? Every piece tells a story. Happy crocheting, and enjoy your beautiful new accessory!