

Knit Your Darling Daisy Bag
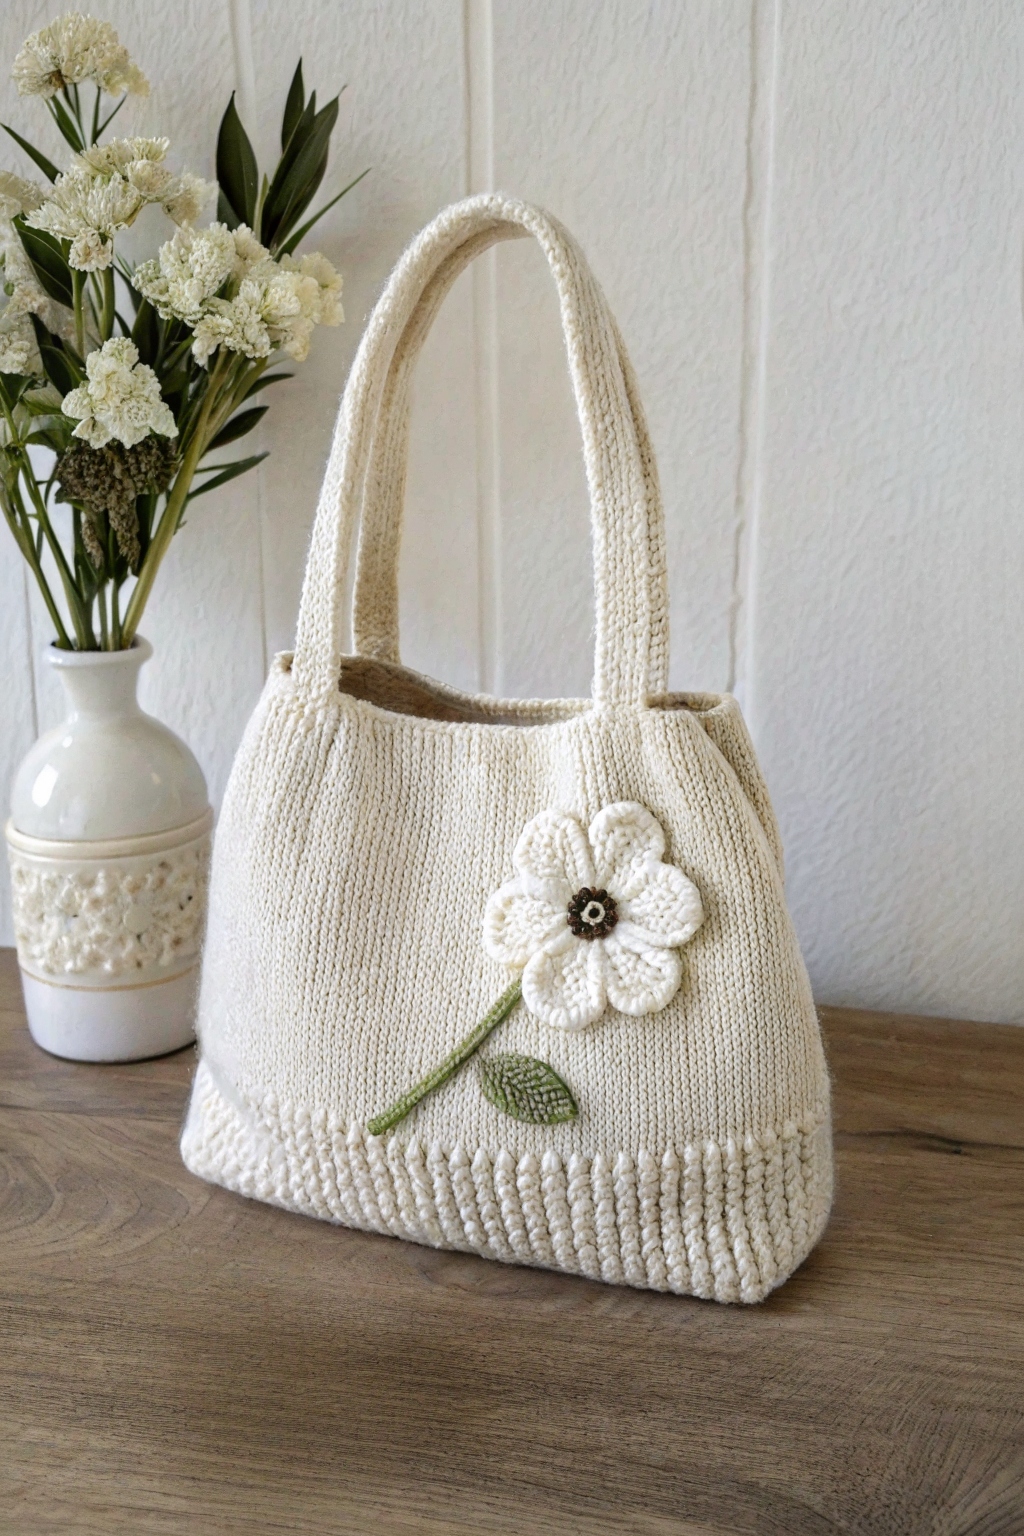
Isn’t this knitted handbag an absolute picture of sweetness? Imagine the quiet joy of carrying your essentials in a beautiful bag you’ve fashioned with your very own hands. This project is a wonderful way to practice your knitting skills and end up with a truly special accessory. Let’s walk through how to bring this charming daisy bag to life, piece by piece.
What You’ll Need
Before we begin, gather your supplies. Having everything ready makes the process so much smoother!
- 🧶 Yarn:
- Worsted weight yarn in Cream (approx. 200-250 yards for the bag body and flower)
- Worsted weight yarn in a soft Green (small amount for stem and leaf)
- Worsted weight yarn or embroidery floss in Dark Brown (tiny amount for flower center)
- 🥢 Knitting Needles:
- Size US 7 (4.5mm) or US 8 (5.0mm) straight or circular needles (use the size that helps you get a firm fabric)
- 🪡 Crochet Hook:
- Size G/6 (4.0mm) (optional, for flower center or stem if you prefer crochet)
- ✂️ Scissors
- 🧵 Tapestry Needle: For seaming and weaving in ends.
- 📏 Measuring Tape
- ✨ Optional: Fabric for lining (approx. 1/2 yard of light brown or beige cotton, as seen inside the bag in the image), sewing needle, and thread.
Understanding the Basics
If you’re new to knitting, welcome! Let’s go over the simple techniques we’ll use.
- Casting On: This is how you get your first row of loops, called stitches, onto your knitting needle. It’s the starting point of any knitted piece.
- Knit Stitch (k): The most fundamental stitch. You’ll insert your right needle from front to back into the first loop on your left needle, wrap the yarn around the tip of the right needle, and pull a new loop through. The old loop slips off the left needle.
- Purl Stitch (p): The companion to the knit stitch. For this one, keep your yarn at the front of your work. Insert your right needle from back to front into the first loop on your left needle, wrap the yarn around the tip, and push a new loop through to the back.
- Stockinette Stitch: This produces a smooth fabric with “V” shapes on one side (the knit side) and bumpy ridges on the other (the purl side). When knitting flat (back and forth), you knit one row, then purl the next row, and repeat. The main body of the bag is made with this stitch.
- 1×1 Ribbing (k1, p1 rib): This stitch pattern makes a stretchy, textured fabric. You knit one stitch, then purl one stitch, repeating this sequence across your row. On the next row, you knit the stitches that look like V’s (knit stitches from the previous row) and purl the stitches that look like bumps (purl stitches from the previous row). The prominent base of the bag uses this ribbing.
- Garter Stitch: The simplest texture! You just knit every stitch of every row. This forms horizontal ridges. The handles of the bag have this sturdy texture.
- Binding Off (Casting Off): This secures your stitches when you’ve finished a piece, so it doesn’t unravel.
- Increasing (inc): Making more stitches in a row to make your knitting wider. A common way is to knit into the front and back of the same stitch (kfb).
- Decreasing (dec): Making fewer stitches in a row to make your knitting narrower. A common way is to knit two stitches together (k2tog).
- Crochet Chain Stitch (ch): (For flower stem if crocheting) Make a slip knot on your hook, yarn over, and pull through the loop on the hook. Repeat for desired length.
- Embroidered Stem Stitch: (For flower stem if embroidering) A simple embroidery stitch that forms a rope-like line.
Making Your Knitted Bag
This bag is assembled from several pieces: two main body panels (front and back), two handle strips, six flower petals, one flower center, and one leaf.
1. The Bag Base and Body (Make 2 Identical Panels)
The bag has a sturdy, deep ribbed base and a smooth body.
- Step 1: Cast On for the Base Using your cream yarn and knitting needles, cast on 60 stitches. (This is an estimate; you can adjust for a wider or narrower bag, but aim for a base width of about 10-12 inches).
- Step 2: Work the Ribbed Base Row 1: Knit 1, purl 1; repeat from * to end of row. Row 2: Knit 1, purl 1; repeat from * to end of row. (You are knitting the knit stitches and purling the purl stitches as they face you). Repeat Row 2 for the 1×1 Ribbing. Continue until this ribbed section measures about 3 inches deep. This forms the strong bottom edge visible in the image.
- Step 3: Transition to Stockinette Stitch for the Body Next Row (Right Side – RS): Knit all stitches. Following Row (Wrong Side – WS): Purl all stitches. Repeat these two rows for Stockinette Stitch.
- Step 4: Shape the Bag Body Continue in Stockinette Stitch until the entire panel (from cast-on edge) measures about 5 inches. Now, we’ll add some gentle shaping to give the bag its curved silhouette. Increase Row (RS): K2, kfb (knit into front and back of stitch – 1 st increased), knit until 3 stitches remain, kfb, k2. (2 stitches increased) Following Row (WS): Purl all stitches. Repeat these two rows (Increase Row and Purl Row) 3 more times. You will have 60 + (2*4) = 68 stitches. Continue in Stockinette Stitch without further increasing until the panel measures approximately 9 inches from the cast-on edge.
- Step 5: Shape the Top Opening To narrow the top slightly, we will decrease. Decrease Row (RS): K2, k2tog (knit two stitches together – 1 st decreased), knit until 4 stitches remain, ssk (slip, slip, knit – another way to decrease that slants left), k2. (2 stitches decreased) Following Row (WS): Purl all stitches. Repeat these two rows (Decrease Row and Purl Row) 1 more time. You will have 68 – (2*2) = 64 stitches.
- Step 6: Top Edge Finish Work 4 rows in Garter Stitch (knit every row). Bind off all stitches. Cut yarn, leaving a long tail for seaming. Repeat Steps 1-6 to make the second identical panel.
2. The Handles (Make 2)
The handles are sturdy and have a simple, clean look.
- Using cream yarn, cast on 8 stitches.
- Work in Garter Stitch (knit every row) until the handle strip measures approximately 15-18 inches, or your desired length. The handles in the image are robust.
- Bind off all stitches. Cut yarn, leaving a tail for attaching.
- Repeat to make the second handle.
3. The Flower Appliqué
This is the lovely focal point! We’ll make the petals, center, stem, and leaf separately.
Flower Petals (Make 6)
Each petal is a small, shaped piece.
- Using cream yarn, cast on 3 stitches. Row 1 (WS): Purl. Row 2 (RS): K1, kfb, k1. (4 sts) Row 3: Purl. Row 4: K1, kfb, kfb, k1. (6 sts) Row 5: Purl. Row 6: Knit. Row 7: Purl. Row 8: K1, k2tog, ssk, k1. (4 sts) Row 9: Purl. Row 10: K2tog, ssk. (2 sts) Row 11: P2tog (purl two stitches together). (1 st) Cut yarn, pull through the last loop to secure. Leave a tail for sewing. Make 5 more petals identically.
Flower Center (Make 1)
The center is a small, dark brown circle.
- Using dark brown yarn and a crochet hook: Make a magic ring (or ch 2). Round 1: Work 6 single crochet (sc) stitches into the ring (or into the 2nd ch from hook). Pull ring tight. Slip stitch to first sc to join. Cut yarn, leaving a tail for sewing. Alternatively, you can knit a tiny circle or use a small dark brown button.
Leaf (Make 1)
The leaf is green with a subtle central line.
- Using green yarn, cast on 3 stitches. Row 1 (WS): Purl. Row 2 (RS): K1, kfb, k1. (4 sts) Row 3: P1, k2, p1 (this starts a garter stitch edge with a stockinette center). Row 4: K1, kfb, kfb, k1. (6 sts) Row 5: P1, k4, p1. Row 6: K1, kfb, k2, kfb, k1. (8 sts) Row 7: P1, k6, p1. Row 8: Knit. Row 9: P1, k6, p1. Row 10: K1, k2tog, k2, ssk, k1. (6 sts) Row 11: P1, k4, p1. Row 12: K1, k2tog, ssk, k1. (4 sts) Row 13: P1, k2, p1. Row 14: K2tog, ssk. (2 sts) Row 15: P2tog. (1 st) Cut yarn, pull through, leaving a tail.
Flower Stem
The stem is a simple green line.
- Option 1 (Crochet): Using green yarn and a crochet hook, make a chain stitch cord about 3-4 inches long.
- Option 2 (Embroidery): Using green yarn and a tapestry needle, embroider a stem onto the bag front panel later using stem stitch or backstitch.
- Option 3 (Knitted I-cord – more advanced): Knit a thin i-cord.
4. Assembling Your Bag
This is where all your pieces come together!
- Step 1: Seam the Bag Body Place your two bag panels with right sides facing each other. Using the long tails and a tapestry needle, sew the side seams and the bottom seam (along the cast-on edge of the ribbing). Turn the bag right side out. The deep ribbing forms the base.
- Step 2: Attach the Handles Position one end of a handle strip on the inside top edge of the bag, about 1.5-2 inches from a side seam. Securely sew it in place using the yarn tail. Repeat for the other end of the same handle on the same side of the bag, creating a loop. Ensure the handle is not twisted. Attach the second handle to the other side of the bag in the same way. The handles are attached to the garter stitch top edge.
- Step 3: Position and Attach the Flower and Leaf Lay the bag flat. Arrange the six flower petals in a circle on the front of the bag, slightly overlapping them to form the daisy shape. Pin them in place. Using their yarn tails, sew each petal securely to the bag. Sew the dark brown flower center onto the middle of the petals. Position the green leaf below and slightly to the side of the flower. Sew it in place. Attach the stem (crocheted chain or embroidered line) so it connects the base of the flower to the top of the leaf.
5. Adding the Lining (Optional, but Recommended)
The image shows a light brown fabric lining, which adds structure and a professional finish.
- Measure the finished interior dimensions of your bag (width and height).
- Cut two pieces of lining fabric, adding about 1/2 inch seam allowance on all sides.
- With right sides together, sew the side and bottom seams of the lining pieces, leaving the top edge open.
- Fold the top raw edge of the lining down by about 1/2 inch towards the wrong side and press.
- Insert the lining pouch into the knitted bag, aligning side seams.
- Hand-sew the folded top edge of the lining to the inside of the bag, just below the garter stitch top edge or handle attachments, using small, neat stitches.
Final Touches
Weave in any remaining loose ends on the inside of your bag or lining. Give your bag a gentle shaping.
And there you have it – your very own hand-knitted daisy bag, just like the one in the picture! This piece, brimming with handmade charm, is ready to be filled with your treasures. Each stitch tells a story of your patience and skill.
We would be absolutely delighted to see your finished bag! Feel free to share a photo of your lovely handiwork. Enjoy your beautiful new accessory!