

Your Go-To Handmade Jute Tote
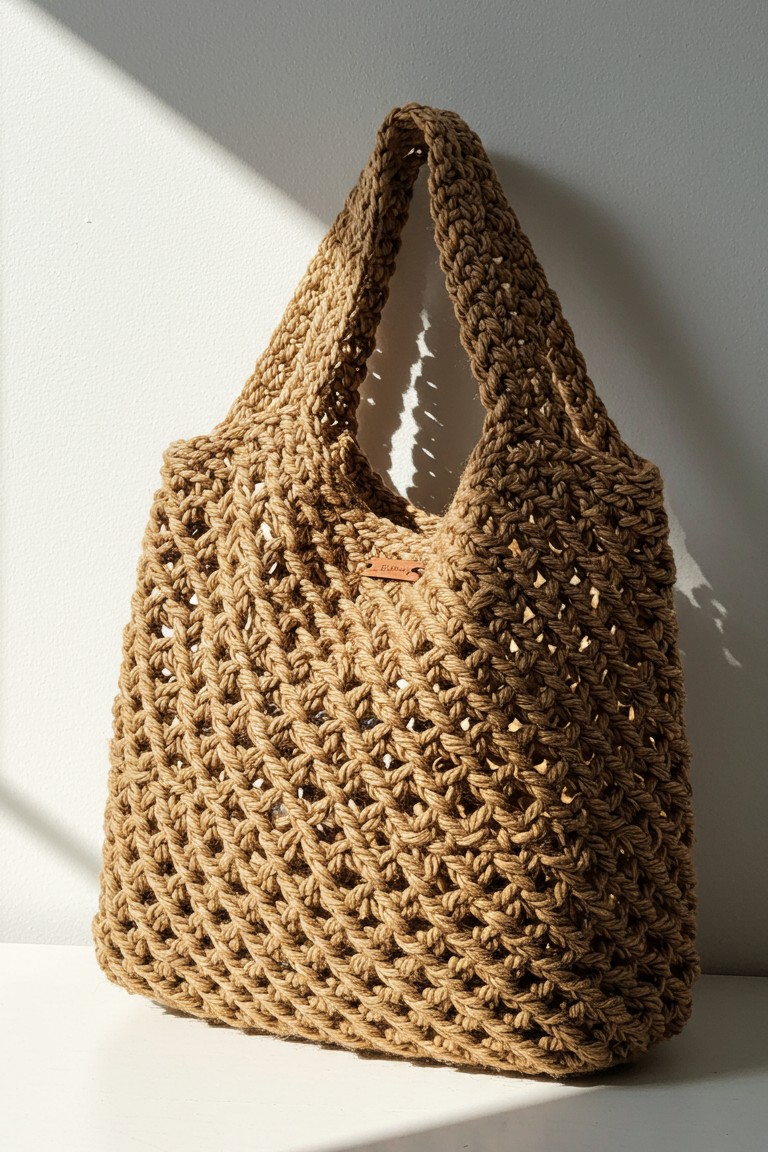
Have you ever seen those appealingly rustic, durable market bags and thought about making one yourself? If so, you’re in the right place! This guide will walk you through making the very same handsome jute-style tote shown in the image. Beyond its practicality, this bag showcases handmade charm, and you’ll find it’s surprisingly straightforward to make, even if you’re new to crochet. So, settle in with your supplies, and let’s start crafting!
What You’ll Need to Get Started
Before we dive in, let’s gather our supplies. Having everything ready makes the process smooth and enjoyable.
- 🧶 Chunky Natural Fiber Yarn: Approximately 250-300 yards (230-275 meters) of a bulky weight yarn. The bag in the image is made from a thick, rope-like natural fiber in a light tan color. This material is jute; heavy hemp or a very thick, unrefined cotton cord are fibers that provide the same distinct rustic texture and sturdiness.
- 🪡 Large Crochet Hook: The very open, airy stitches of the bag in the image are produced using a 10mm (N/P-15) or 12mm (O) crochet hook. While an L/11 (8.00mm) or M/13 (9.00mm) hook is generally suitable for bulky yarn, you will select your hook based on your chosen yarn to achieve these specific large, open stitches.
- ✂️ Sharp Scissors: For snipping yarn.
- 🧵 Tapestry Needle: A large-eye needle is essential for weaving in the yarn ends.
- 🏷️ Optional Embellishment: A small, rectangular leather or faux-leather tag, like the tan one seen on the bag, for a professional touch.
Learning the Lingo: Basic Crochet Stitches
Don’t worry if these terms are new! Crocheting is just a series of simple movements. Here are the foundational stitches we’ll use for this bag, explained in plain language:
- Slip Knot: This is how you get the yarn onto your hook to begin. Make a loop with your yarn, lay the hook over the yarn inside the loop, catch the yarn with the hook, and pull it through the loop. Tighten gently onto the hook. That’s your starting point!
- Chain Stitch (ch): After your slip knot is on the hook, yarn over (wrap the yarn over your hook from back to front) and pull the yarn through the loop already on your hook. That’s one chain stitch! We often make a series of these to start a project or to build spaces in a pattern.
- Single Crochet (sc): This is a short, dense stitch.
- Insert your hook into the indicated stitch or space.
- Yarn over.
- Pull the yarn through the stitch (you’ll have two loops on your hook).
- Yarn over again.
- Pull the yarn through both loops on your hook. One single crochet complete!
- Double Crochet (dc): This is a taller stitch, perfect for making fabric quickly and for open, airy patterns like our bag’s body.
- Yarn over before inserting your hook.
- Insert your hook into the indicated stitch or space.
- Yarn over.
- Pull the yarn through the stitch (you’ll have three loops on your hook).
- Yarn over again.
- Pull the yarn through the first two loops on your hook (two loops will remain).
- Yarn over one last time.
- Pull the yarn through the remaining two loops on your hook. That’s one double crochet!
- Slip Stitch (sl st): This tiny stitch is used to join rounds, move yarn across stitches without adding height, or finish edges.
- Insert your hook into the indicated stitch.
- Yarn over.
- Pull the yarn through both the stitch and the loop already on your hook in one smooth motion.
- Magic Ring (also called Magic Circle or Adjustable Ring): This technique allows you to start a circular piece with a tightly closed center, which is perfect for the base of our bag. There are many great video tutorials online if you search “magic ring crochet”.
- Simple Alternative: If the magic ring feels tricky, you can chain 2 (ch 2), then work your first round of stitches into the second chain from the hook. This will also form a small central hole.
- Working in the Round: Instead of working back and forth in rows, we’ll be working in circles that build outwards to form the bag’s base and then upwards for the body. Each round is typically joined at the end with a slip stitch.
Let’s Make Your Beautiful Market Bag!
This bag is constructed from the bottom up, starting with a solid circular base, transitioning to an open mesh body, and finishing with sturdy, integrated handles.
Part 1: The Solid Circular Base
The base of this bag is a flat, solid circle made with single crochet (sc) stitches. This gives it strength to hold your goodies.
- Start: Make a magic ring (or ch 2, and work Round 1 into the 2nd ch from hook).
- Round 1: Ch 1 (this does not count as a stitch here or throughout the base). Work 6 sc into the magic ring. Pull the ring tail to close the center tightly. Join with a sl st to the first sc of the round. (6 sc)
- Round 2: Ch 1. Work 2 sc in each stitch around. Join with a sl st to the first sc. (12 sc)
- Tip for beginners: “2 sc in each stitch” means you’ll make one single crochet, then another single crochet into that very same stitch before moving to the next one. This is called an increase.
- Round 3: Ch 1. [Sc in the next stitch, 2 sc in the following stitch]. Repeat from * to * around. Join with a sl st to the first sc. (18 sc)
- Round 4: Ch 1. [Sc in the next 2 stitches, 2 sc in the following stitch]. Repeat from * to * around. Join with a sl st to the first sc. (24 sc)
- Round 5: Ch 1. [Sc in the next 3 stitches, 2 sc in the following stitch]. Repeat from * to * around. Join with a sl st to the first sc. (30 sc)
- Continue this pattern: In each round, you will add one more sc between the increases (e.g., Round 6 will be [sc in next 4 sts, 2 sc in next st]). Keep increasing in this manner until your circular base measures approximately 9-10 inches (23-25 cm) in diameter. Ensure your base lies flat. If it starts to ruffle, you might be increasing too much; if it cups, too little.
- Troubleshooting: If your circle starts to look more like a hexagon, try staggering your increases in subsequent rounds. For example, instead of always putting the increase in the last stitch of the repeat, sometimes put it in the middle of the “sc in next X stitches” section.
Part 2: The Open Mesh Body
Now we will transition to the beautiful, airy mesh that forms the main body of the bag. This section uses double crochet (dc) stitches and chain (ch) spaces. The vertical bars of the mesh are aligned.
- Transition Round (Optional but recommended for a clean turn): Ch 1. Sc in the back loop only (BLO) of each stitch around. Join with a sl st to the first sc. Working in the back loop only helps the bag begin to turn upwards from the base.
- Mesh Round 1: Ch 4 (this ch-4 counts as your first dc plus a ch-1 space). Skip the next stitch, dc in the following stitch, ch 1. Repeat from * to * all the way around. To finish the round, join with a sl st to the 3rd chain of your beginning ch-4 (this joins into the “dc” part of the ch-4, leaving the 4th chain as the ch-1 space).
- Counting Check: You should have the same number of dc stitches as half the stitches in your last base round, and an equal number of ch-1 spaces.
- Mesh Round 2: Sl st into the first ch-1 space (this moves your starting point neatly). Ch 4 (counts as dc + ch 1). Work a dc directly into the top of the next dc from the round below, ch 1. Repeat from * to * around. Join with a sl st to the 3rd chain of the beginning ch-4.
- Repeat Mesh Round 2: Continue repeating Mesh Round 2 until the body of your bag, from the base to the current round, measures approximately 12-14 inches (30-35 cm) high, or your desired height. The bag in the image has a generous height.
Part 3: The Top Band and Strap Integration
The top of the bag features a solid band before the straps begin, providing extra stability. The straps are wide, dense, and integrated directly into this band.
- Top Band Round 1: Ch 1. Work 1 sc into each dc stitch and 1 sc into each ch-1 space around the top of the bag. Join with a sl st to the first sc.
- Top Band Round 2: Ch 1. Sc in each stitch around. Join with a sl st to the first sc. Do NOT fasten off if you are ready to start the first strap.
- Stitch Count: Count the total number of stitches you have in this top band. This is important for placing the straps evenly. Let’s say you have 80 stitches for example.
Now, we will fashion the two wide straps. Each strap is worked back and forth in rows from a section of the top band, then its other end is joined to another section of the top band.
- Strap 1:
- Row 1: Continuing from Top Band Round 2 (or join yarn if you fastened off, at any point on the top band). Ch 1. Sc in the same stitch and in the next 11 stitches (or your desired strap width – the image shows very wide straps, so 10-14 scs with bulky yarn is good). This makes a strap base of 12 scs. Leave the remaining stitches of the Top Band unworked for now.
- Row 2: Ch 1, turn your work. Sc in each of the 12 scs across the strap.
- Repeat Row 2: Continue working rows of sc back and forth until your strap measures approximately 20-24 inches (50-60 cm), or your preferred length to comfortably go over your shoulder.
- Attaching Strap 1:
- Do not fasten off. Ensure your strap is not twisted.
- Count along the unworked stitches of the Top Band from where your strap began. Skip a number of stitches for the bag opening (e.g., if you had 80 total stitches and straps are 12 sc wide each, an opening of 28 stitches on each side would work: 12 for strap + 28 for opening + 12 for strap + 28 for opening = 80). So, skip 28 stitches.
- Align the end of your strap with the next 12 stitches on the Top Band.
- You will now join the live end of the strap to these 12 stitches on the bag’s Top Band. You can do this by working slip stitches or single crochet stitches through both the last row of your strap AND the corresponding stitches on the Top Band. Working 12 scs to join will give a very secure attachment.
- Fasten off securely.
- Strap 2:
- Count from where Strap 1 was attached. Skip the same number of stitches for the opening as you did for the first side (e.g., 28 stitches).
- Join your yarn with a sl st to the next stitch on the Top Band.
- Row 1: Ch 1. Sc in the same stitch and in the next 11 stitches (total 12 sc).
- Repeat the process for Strap 1 (Rows 2 and 3 above) until Strap 2 is the same length as Strap 1.
- Attach Strap 2 in the same way, aligning it with the remaining 12 unworked stitches on the Top Band (this should be the section just before where Strap 1 began).
- Fasten off securely.
Finishing Touches: Making it Perfect
You’re almost there! A few final steps will give your bag a polished look.
- Weave in Ends: Using your tapestry needle, carefully weave in all loose yarn tails on the inside of the bag. Try to work them back and forth through the stitches a few times before snipping to ensure they don’t unravel.
- Optional Label: If you have a small leather or faux-leather tag like the one visible on the bag in the image, position it on the upper part of the bag body, just below one of the strap bases. Sew it on neatly with a few small stitches using a sewing needle and thread that matches the label or the yarn.
Tips for a Triumphant Tote
- Consistent Tension: Try to keep your yarn tension (how tightly or loosely you hold your yarn) consistent throughout the project. This results in even stitches and a more professional-looking fabric.
- Stitch Markers are Friends: Especially when working in the round, place a stitch marker in the first stitch of each round. This helps you know where a round begins and ends, preventing accidental gains or losses of stitches.
- Don’t Fear Frogging: “Frogging” is what crocheters call unraveling their work (rip-it, rip-it!). If you notice a mistake a few rows back, it’s often best to unravel to that point and fix it. It’s all part of the learning journey!
- Yarn Choice Matters: The thick, rustic yarn is key to the look of the bag in the image. If you use a thinner yarn, your bag will be smaller and less stiff unless you adjust the pattern (e.g., more stitches/rounds).
Caring for Your Handcrafted Bag
The care for your bag will depend on the fiber content of your yarn.
- Jute or Hemp: These natural fibers are very durable but can be sensitive to too much water. Spot cleaning with a damp cloth is usually best. Avoid machine washing.
- Cotton Cord: Many cotton yarns are machine washable on a gentle cycle, but for a structured bag like this, hand washing in cool water and laying flat to dry is often preferred to maintain its shape. Always check the yarn label for care instructions.
And there you have it – your very own beautifully handcrafted market bag, just like the one in the picture! Imagine the satisfaction of using something you’ve put your time and skill into. This bag is not only a testament to your growing abilities but also a wonderfully practical piece for everyday errands or a trip to the farmer’s market.
We’d absolutely adore seeing your finished bags! Feel free to share photos of your completed pieces. Happy crocheting, and enjoy the wonderful feeling of making something truly special with your own two hands!