

Fashion a Fabulous Floral Bag
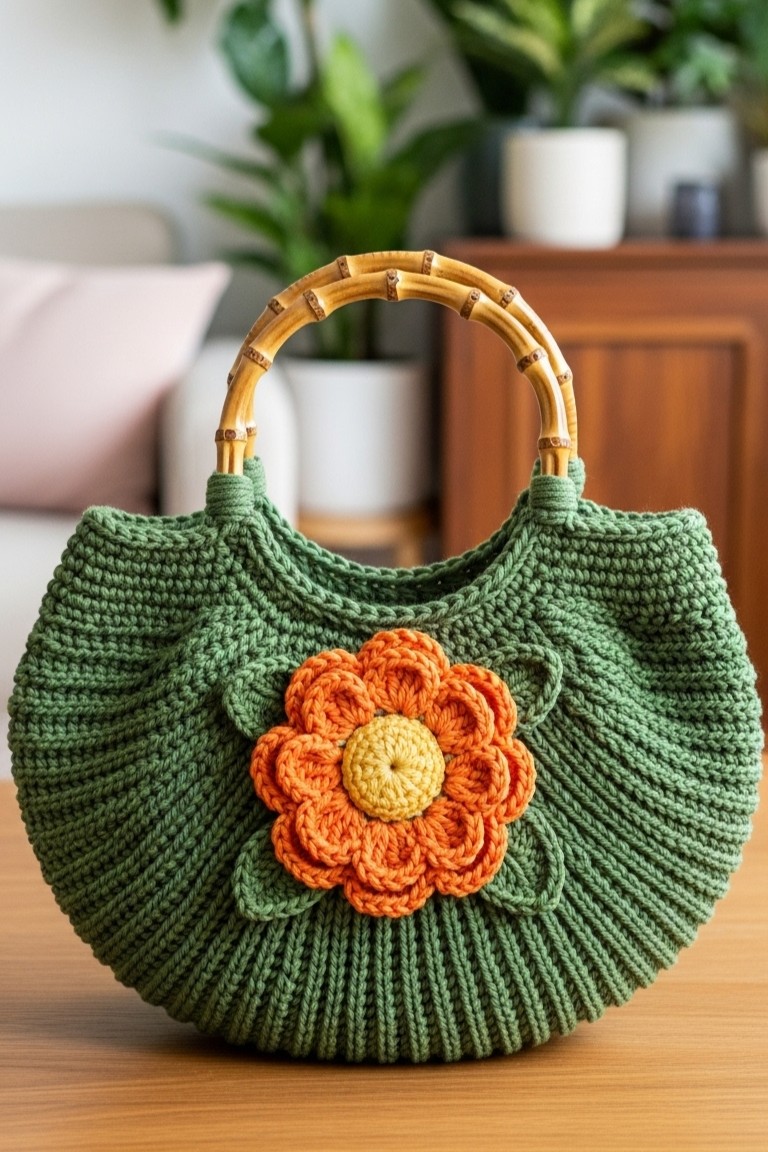
Hello, fellow yarn enthusiasts! Isn’t there something truly special about carrying a handbag that you’ve poured your heart and stitches into? Today, we’re going on a wonderful journey to fashion this absolutely charming crocheted handbag. Look at its rich forest green body, the delightful ribbed texture, and that eye-catching floral embellishment! The sturdy bamboo handles add such a chic, natural touch. This bag is not just an accessory; it’s a statement of your handmade passion. And guess what? Even if you’re newer to crochet, we’ll guide you through every step to help you produce this beautiful piece.
What You’ll Need to Gather
Before we dive into the stitches, let’s get our supplies ready. Having everything on hand makes the process so much smoother!
- 🧶 Yarn:
- Worsted weight cotton yarn in Forest Green (approx. 300-400g for the bag body and leaves)
- Worsted weight cotton yarn in Bright Orange (small amount for flower petals)
- Worsted weight cotton yarn in Sunny Yellow (small amount for flower center)
- 🪝 Crochet Hook: 4.5mm (US size 7) or a size that matches your yarn to get a firm fabric.
- 🎋 Bamboo Handles: Two circular bamboo handles, approximately 6-7 inches in diameter.
- ✂️ Scissors: For snipping yarn.
- 🧵 Tapestry Needle: For weaving in ends and assembling the flower.
Understanding the Basic Stitches & Techniques
Don’t worry if some of these terms are new! We’ll go through them. For this bag, the main body utilizes a lovely ribbed effect. This is achieved by working into only one loop of the stitch from the row below.
- Magic Ring (MR): This is a way to start crocheting in the round without leaving a hole in the center. You’ll loop yarn around your fingers, then work your first stitches into that loop, which you can then pull tight.
- Chain (ch): The foundation of many crochet projects! It’s simply pulling a loop of yarn through the loop already on your hook.
- Slip Stitch (sl st): This stitch is used to join rounds, move yarn across stitches without adding height, or finish edges. Insert hook, yarn over, pull through stitch AND loop on hook.
- Single Crochet (sc): A basic, short stitch. Insert hook into stitch, yarn over, pull up a loop (2 loops on hook), yarn over, pull through both loops.
- Half Double Crochet (hdc): A stitch that’s taller than a single crochet but shorter than a double crochet. Yarn over, insert hook into stitch, yarn over, pull up a loop (3 loops on hook), yarn over, pull through all three loops. This is the primary stitch for our bag body.
- Double Crochet (dc): A taller stitch, great for petals. Yarn over, insert hook into stitch, yarn over, pull up a loop (3 loops on hook), yarn over, pull through two loops, yarn over, pull through remaining two loops.
- Working in the Back Loop Only (BLO): Instead of inserting your hook under both top loops of a stitch from the previous round, you’ll insert it only under the loop that is furthest away from you (the back loop). This pushes the front loop forward, forming the distinct ribbing you see on the bag.
- Increase (inc): To make your fabric wider, you’ll work two stitches into the same stitch from the round below. For this bag, it will be “2 hdc blo in next st”.
- Decrease (dec): To make your fabric narrower, you’ll join two stitches into one. A common way is “hdc2tog” (half double crochet two together).
- Working in Continuous Rounds (Spiral): For the bag body, we won’t join each round with a slip stitch. We’ll just continue crocheting into the next stitch. This avoids a visible seam. Use a stitch marker in the first stitch of each round to keep track!
Making the Bag Body: That Lush Green Ribbing!
The main body of the bag is worked from the bottom up in continuous rounds of Half Double Crochet in the Back Loop Only (hdc blo). This technique gives the bag its beautiful, pronounced vertical ribbing and a sturdy yet flexible fabric.
The Base (Worked in continuous rounds of hdc blo):
- Start with your Forest Green yarn and form a Magic Ring (MR).
- Round 1: Work 8 hdc into the MR. Pull the ring tight. (8 stitches)
- Tip for beginners: Don’t pull the magic ring completely closed until you’ve made a few stitches, it’s easier to work into. Place a stitch marker in the first hdc to mark the beginning of your round. Move it up with each round.
- Round 2: Work 2 hdc blo in each stitch around. (16 stitches)
- Round 3: [1 hdc blo in the next stitch, 2 hdc blo in the next stitch] repeat 8 times. (24 stitches)
- Round 4: [1 hdc blo in each of the next 2 stitches, 2 hdc blo in the next stitch] repeat 8 times. (32 stitches)
- Round 5: [1 hdc blo in each of the next 3 stitches, 2 hdc blo in the next stitch] repeat 8 times. (40 stitches)
- Continue this pattern of increasing: In each round, you’ll add one more hdc blo between the increases.
- For example, Round 6 will be [1 hdc blo in next 4 sts, 2 hdc blo in next st] repeated.
- Keep increasing in this manner until your circular base measures approximately 9-10 inches in diameter. This will form the sturdy bottom of your bag. The bag in the image has a generously sized base.
The Sides (Still in continuous rounds of hdc blo):
Now we’ll start to build up the height and shape of the bag. The bag has a lovely rounded silhouette that expands slightly from the base before coming in a little at the top.
- Gentle Expansion Rounds: For the next 5-7 rounds, you will still increase, but less frequently to encourage the sides to curve outwards. Instead of 8 increases per round, you’ll make 6 evenly spaced increases.
- Example Round after base is complete: [1 hdc blo in each of the next (X) stitches, 2 hdc blo in the next stitch] repeat 6 times around. (Adjust ‘X’ based on your stitch count from the last base round to distribute increases evenly).
- Straight Sides: Once you’re happy with the gentle outward curve, work even in hdc blo (meaning 1 hdc blo in each stitch around, no increases or decreases) until the bag reaches your desired height from the base. A good height might be around 10-12 inches, but you can adjust this. The bag in the image is quite deep.
- Slight Tapering (Optional): To bring the top opening in slightly, like the bag shown, you can work 2-3 rounds with decreases.
- Example Decrease Round: [1 hdc blo in each of the next 10 stitches (or similar number for even spacing), hdc2tog blo (half double crochet two together in the back loop only)] repeat around. This joins two stitches into one.
- Finishing the Top Edge: Once the desired height and opening size are achieved, work 1 round of sc (single crochet) in each stitch around. Then, sl st (slip stitch) into the first sc to join. Fasten off your green yarn and weave in the end.
Fashioning the Gorgeous Flower Appliqué
This flower is the star of the show! It consists of a sunny yellow center, two layers of vibrant orange petals, and some lovely green leaves peeking out from behind.
Sunny Yellow Center (Work in joined rounds):
- With Yellow yarn, form a MR.
- Round 1: Ch 1 (does not count as a stitch here and throughout flower instructions), work 6 sc into the MR. Sl st to the first sc to join. (6 sc)
- Round 2: Ch 1, work 2 sc in each stitch around. Sl st to the first sc to join. (12 sc)
- Fasten off yellow yarn, leaving a short tail to weave in.
Orange Petals – First Layer (Work in joined rounds, attached to yellow center):
- Join Orange yarn with a sl st in any sc of Round 2 of the yellow center.
- Round 1: Ch 1. In the same stitch as join: (sl st, ch 2, 2 dc, ch 2, sl st). Skip the next sc. Repeat from * to * 5 more times. You will have 6 small, rounded petals.
- Sl st to the very first sl st of the round to finish. Fasten off orange yarn, leaving a long tail for sewing this layer down later if needed, or weave it in carefully now.
Orange Petals – Second, Larger Layer (Worked behind the first layer):
This layer gives the flower its fullness. The petals are larger and sit behind and between the first layer of petals.
- Turn your flower so the wrong side (back) of the first petal layer is facing you.
- Join Orange yarn with a sl st to one of the “skipped sc” stitches from Round 2 of the yellow center (these are the stitches between your first layer petals).
- Round 1 (Forming petal bases): Ch 3, sl st into the next “skipped sc” stitch from the yellow center (this will be between the next two petals of the first layer). Repeat from * to * 5 more times, forming 6 ch-3 loops on the back of the flower. Sl st to the base of the first ch-3 loop.
- Round 2 (Making the petals): Turn your work so the right side is facing you again. Into each ch-3 loop, work the following: (1 sc, 1 hdc, 3 dc, 1 hdc, 1 sc).
- After working into all 6 ch-3 loops, sl st to the first sc of the round to finish.
- Fasten off orange yarn, leaving a long tail for sewing.
Forest Green Leaves (Make 3 or 4):
These pointed leaves add a lovely natural touch.
- With Forest Green yarn, ch 10.
- Row 1 (Working down one side of the chain): Sl st in the 2nd ch from the hook, 1 sc in the next ch, 1 hdc in the next ch, 1 dc in each of the next 2 chs, 1 hdc in the next ch, 1 sc in each of the next 2 chs. You should be at the last chain. In this last chain, work (1 sc, ch 1, 1 sc) – this ch-1 point forms the tip of the leaf.
- Row 1 Continued (Working up the other side of the foundation chain): Now working into the unworked loops of the foundation chains: 1 sc in each of the next 2 chs (these will be opposite the scs you just made), 1 hdc in the next ch, 1 dc in each of the next 2 chs, 1 hdc in the next ch, 1 sc in the next ch. Sl st to the first sl st you made at the beginning of the row.
- Fasten off, leaving a long tail for sewing.
- Repeat to make 3 or 4 leaves.
Attaching the Bamboo Handles
The light-toned bamboo handles are attached with sturdy crocheted straps.
Handle Straps (Make 2 with Forest Green yarn):
- Ch 7 (or a width that looks sturdy and proportional to your handles, about 1.5-2 inches wide).
- Row 1: Hdc in the 3rd ch from the hook (the skipped 2 chs count as the first hdc) and in each ch across. Turn. (6 hdc, if you started with ch 7)
- Row 2: Ch 2 (counts as first hdc), hdc in each stitch across. Turn.
- Repeat Row 2 until the strap is long enough to wrap comfortably around your bamboo handle and overlap onto the inside top edge of the bag by about 1-1.5 inches for secure sewing. This might be around 4-5 inches long.
- Fasten off, leaving a very long tail for sewing the strap to the bag. Make a second strap identically.
Securing the Handles:
- Position one bamboo handle against the outside top edge of your bag, centering it on one side.
- Take one crocheted strap, wrap it over the bamboo handle, so the ends of the strap are on the inside of the bag.
- Using the long yarn tail and your tapestry needle, securely sew the ends of the strap to the inside top edge of the bag. Make sure your stitches are strong and go through both the strap and the bag fabric.
- Repeat for the second handle on the other side of the bag, ensuring it’s aligned with the first.
Assembling Your Floral Masterpiece
Now for the truly rewarding part – bringing all the elements together!
- Flower Assembly:
- If you haven’t already, use the yarn tails to subtly tack the layers of the orange petals together so they sit nicely.
- Arrange your green leaves attractively behind the orange flower, perhaps peeking out from between the larger petals. Use the yarn tails on the leaves to sew them securely to the back of the orange flower.
- Attaching the Flower to the Bag:
- Position the completed flower appliqué onto the front of your green bag. The image shows it centered horizontally and slightly below the top edge.
- Using the remaining long tail from the flower (or a new piece of green yarn if needed for better blending on the back of the flower), carefully sew the entire flower unit to the bag. Stitch around the edges of the yellow center and discretely tack down some of the outer petals and leaves so it sits flat but still has dimension.
- Weave in All Ends: This is the magic step that makes everything look professional! Use your tapestry needle to weave all remaining yarn tails into the backside of your work. Trim any excess.
Your Beautiful Bag is Ready!
Take a moment to admire your handiwork! You’ve just fashioned a truly unique and stylish handbag. The combination of the ribbed green texture, the vibrant flower, and the natural bamboo handles results in such an elegant piece. Imagine the compliments you’ll receive!
Don’t hesitate to play with colors if you wish for future versions, though this forest green and orange combination is undeniably stunning. We’d absolutely love to see your finished blossom bags! Share a picture and tag us, or let us know how your making journey went in the comments below. Happy stitching!