

Stitch a Sweet Striped Baby Vest
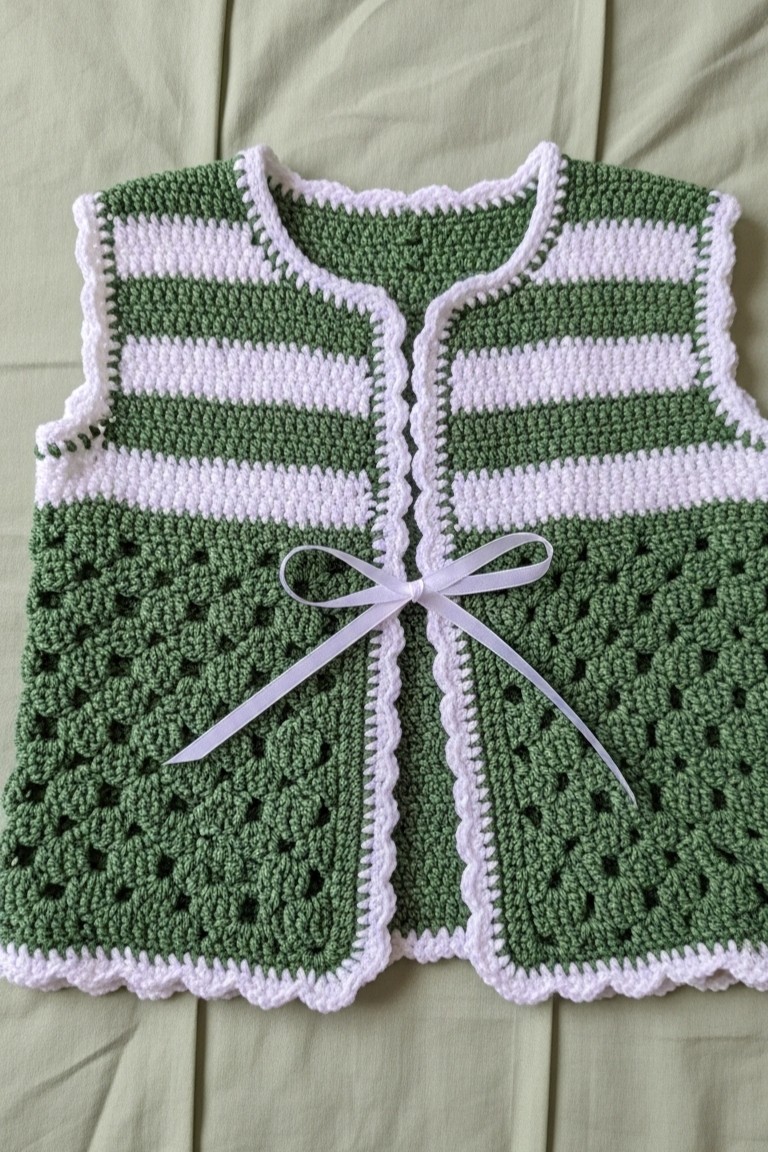
There’s a special kind of warmth that comes from a handmade gift, especially one for a tiny new person. This beautiful little crocheted vest is the perfect project to pour your affection into. With its classic green and white stripes and a lovely textured bottom, it’s a piece that feels both traditional and fresh. The open, lacy lower half makes it light and breathable, while the solid yoke provides a bit of cozy structure.
This guide will walk you through every step of making this exact vest. Don’t worry if you’re just starting your crochet journey! We’ll go over everything in simple terms, so you can confidently pick up your hook and get going.
What You’ll Need
Before we begin, let’s gather our supplies. For a soft and washable baby garment, a cotton or acrylic blend yarn is a fantastic choice.
- Yarn: DK or Worsted weight yarn in two colors: Sage Green and White.
- Crochet Hook: A 4.0mm (G-6) hook is a good match for DK yarn.
- Ribbon: About 24 inches (60 cm) of thin white satin ribbon.
- Scissors: For trimming your yarn.
- Yarn Needle: A blunt-tipped needle for neatly weaving in the ends.
A Quick Guide to the Stitches
Every crochet project is just a combination of a few basic movements. Here are the ones we’ll use for this vest, explained for absolute beginners.
- Chain (ch): This is the foundation. You’ll make a slipknot, put it on your hook, and then use the hook to pull a loop of yarn through the loop already on your hook. That’s one chain!
- Slip Stitch (sl st): This is a tiny stitch used for joining. You’ll insert your hook into a stitch, yarn over, and pull the yarn through both the stitch and the loop on your hook in one smooth motion.
- Single Crochet (sc): A short, sturdy stitch we’ll use for creating a clean base and a simple edge. Insert your hook into a stitch, yarn over and pull up a loop (two loops on hook). Yarn over again and pull through both loops.
- Half Double Crochet (hdc): This stitch gives us the solid, striped upper part of the vest. To make one, yarn over, insert your hook into a stitch, yarn over and pull up a loop (you’ll have three loops on your hook). Then, yarn over one more time and pull through all three loops at once.
- Double Crochet (dc): This taller stitch is what we’ll use for the lacy bottom section and the scalloped edges. Yarn over, insert your hook into a stitch, yarn over and pull up a loop (three loops on your hook). Yarn over and pull through the first two loops. Yarn over again and pull through the last two loops.
- Granny Cluster: This isn’t a separate stitch, but a set. For this pattern, a Granny Cluster is simply 3 double crochet stitches all worked into the same space.
- Shell: This is what forms the pretty, large scallops. For this vest, a Shell is 5 double crochet stitches all worked into the same stitch.
- Simple Scallop: This creates the more delicate edge along the bottom hem. A Simple Scallop is 3 double crochet stitches all worked into the same stitch or space.
Assembling Your Vest Step-by-Step
We will be working this vest from the bottom hem upwards in one piece, then splitting the panel to form the armholes and front/back sections.
Part 1: The Lacy Lower Body
We’ll start with the lovely green, openwork section.
Using your Sage Green yarn, chain 92. This will form the width of the vest for a size around 6-12 months.
- Row 1: Work a Granny Cluster in the 4th chain from the hook (the first 3 skipped chains count as your first dc). Skip the next 2 chains, then work a Granny Cluster in the next chain. Repeat this pattern (*) all the way across your foundation chain. You should end with a Granny Cluster in the last chain. Ch 3 and turn your work.
- Row 2: That ch-3 you just made counts as your first dc. Now, look for the spaces between the Granny Clusters from the row below. Work a Granny Cluster in the very first space. Continue working one Granny Cluster in each space across the row. To finish the row, work 1 dc in the top of the turning chain from the previous row. Ch 3 and turn.
- Rows 3-9: Repeat Row 2. This will build the green, lacy portion of the vest for a total of 9 rows. Fasten off your green yarn at the end of Row 9.
Part 2: The Striped Yoke
Now it’s time to switch to the solid upper body and begin our stripes!
- Row 10 (White): Join your White yarn. Ch 2 (this counts as your first hdc). Work 1 hdc in each and every stitch across the row. It’s important to work into the top of each dc from the clusters below, not the spaces, to get a solid fabric. Ch 2 and turn.
- Row 11 (Green): Switch back to your Sage Green yarn. Ch 2, and work 1 hdc in every stitch across. Ch 2 and turn.
- Row 12 (White): Switch to White yarn. Ch 2, and work 1 hdc in every stitch across. Ch 2 and turn.
- Row 13 (Green): Switch to Sage Green yarn. Ch 2, and work 1 hdc in every stitch across. At the end of this row, we will split the piece to form the armholes.
Part 3: Shaping the Armholes and Neckline
Now we work the two front panels and the back panel separately.
First Front Panel:
- Row 14 (White): Switch to White yarn. Ch 2, and work 1 hdc in the first 20 stitches only. Ch 2 and turn, leaving the rest of the row unworked.
- Row 15 (Green): Switch to Sage Green yarn. Ch 2, and work 1 hdc in all 20 stitches. Fasten off.
Back Panel:
- Go back to the end of Row 13. Count in 20 stitches from where you just finished the front panel, and skip the next 6 stitches (this forms the armhole gap).
- Join your White yarn in the next stitch. Ch 2, and work 1 hdc in that stitch and the next 39 stitches. You should have 6 unworked stitches at the other end for the second armhole. Ch 2 and turn.
- Row 15 (Green): Switch to Sage Green yarn. Ch 2, and work 1 hdc in every stitch across. Fasten off.
Second Front Panel:
- Go to the remaining 20 unworked stitches at the end of Row 13. Join your White yarn at the outer edge.
- Work this panel for 2 rows in the same stripe pattern as the first front panel (1 white, 1 green), working over these 20 stitches. Fasten off.
You should now have three distinct panels at the top. Use your yarn needle and a length of sage green yarn to neatly stitch the tops of the front panels to the tops of the back panel at the shoulders.
Part 4: The Finishing Edges
This beautiful white border brings the whole piece together.
1. Front & Neckline Border:
- Join your White yarn at the bottom right corner of the front opening.
- Foundation Row: Ch 1. Work sc stitches evenly all the way up the right front edge, around the entire neckline, and down the left front edge. Do not work across the bottom. Aim for about 2 sc for every hdc row-end and 1 sc for each stitch along the neck. Do not turn.
- Scallop Row: Now, working back along the sc row you just made, create the scallop. Skip 1 sc, work a Shell (5 dc) in the next sc, skip 1 sc, sl st in the next sc. Repeat this pattern (*) all the way around the front opening and neck. When you reach the end, sl st to join, fasten off, and weave in the end.
2. Bottom Hem Border:
- Join your White yarn at one of the bottom corners.
- Ch 1, and work a Simple Scallop (3 dc) into each Granny Cluster space across the entire bottom hem. Work a sc in each corner. Fasten off and weave in the ends.
3. Armhole Edging:
- Join your White yarn at the bottom of one armhole.
- Ch 1 (does not count as a stitch). Work a simple, clean round of sc stitches evenly around the entire armhole opening. (A good guide is to place 1 sc in the end of each hdc row).
- Join with a sl st to the first sc. Fasten off, and repeat for the second armhole.
Finally, take your white satin ribbon, weave it through the stitches of the uppermost white stripe on the yoke, just below the neck edging, and tie it in a sweet bow.
As anyone who crochets knows, tiny differences in our tension can appear between projects. This isn’t a mistake; on the contrary, it’s a warm detail that shows your piece is truly handmade. That’s your signature!
This vest is more than just yarn and stitches; it’s a hug you can give from afar. Take your time, enjoy the rhythm of the hook, and know that you are making something truly special. We’d love to see the little vest you bring to life.
After row 5 do I do 5 more rows of Granny cluster? Doesn’t see right to switch to white after juatb5 rows of green? Can you help?
Thank you so much for your question! It’s an excellent point and highlights a detail worth clarifying for everyone.
To achieve the same proportions as the vest in the photo, you are correct to be questioning that step. You should indeed continue with the green yarn. Please work a total of 9 rows of the green Granny Cluster section before switching to the white yarn for the striped yoke.
After that, the rest of the pattern for the yoke and the finishing edges continues exactly as written.
We appreciate you reaching out for this clarification. Happy crocheting, and we’d love to see your beautiful finished vest!