

The Ultimate Nanaimo Bar Tart
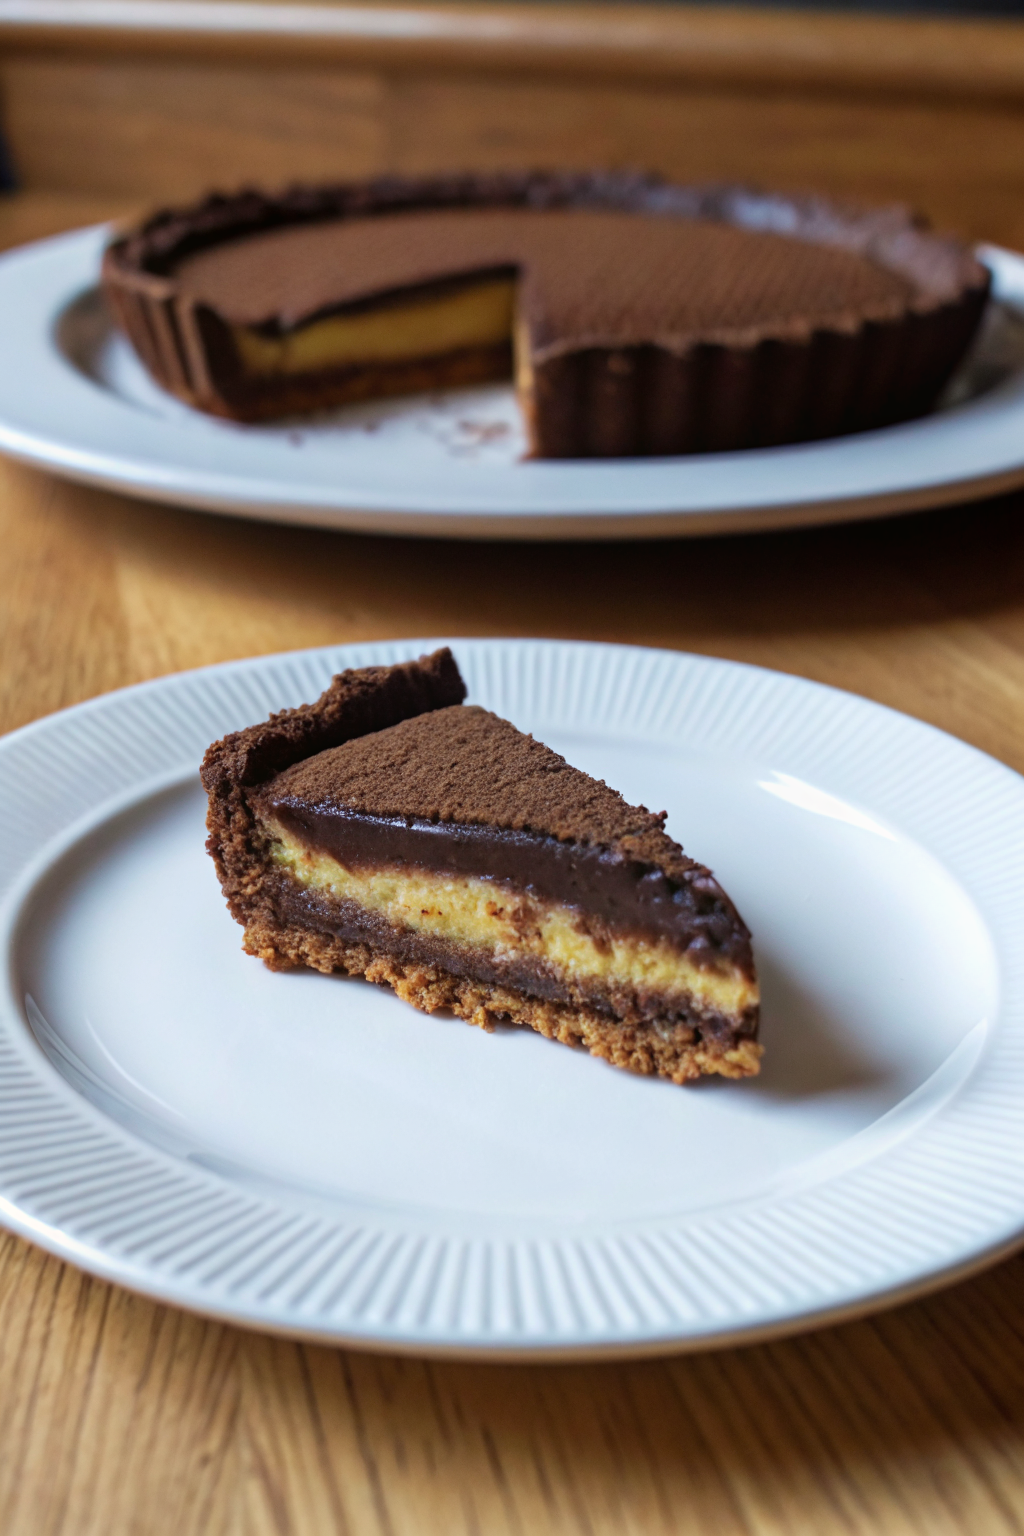
Here is a dessert that brings pure delight with every single bite. This Nanaimo Bar Tart is a stunning composition of textures and flavors, featuring three distinct, harmonious layers. A crisp, dark chocolate crust holds a soft, creamy vanilla custard, all finished with a smooth, rich chocolate ganache. The final dusting of cocoa powder on top provides a beautiful matte finish and a hint of bittersweet flavor, just as shown in the picture. This guide offers everything a beginner baker needs to successfully put together this impressive dessert at home.
Kitchen Essentials
Getting your tools and ingredients ready before you start is the first step to a smooth and enjoyable baking experience.
Equipment You’ll Need
- 🥧 9-inch (23 cm) tart pan with a removable bottom
- 🥣 A few mixing bowls (small, medium, and large)
- 🥄 Measuring cups and spoons
- ⚖️ Kitchen scale (for best accuracy)
- ⚡️ Electric mixer (handheld or stand mixer)
- Spatula
- Saucepan
- 🔪 Sharp knife for slicing
- Fine-mesh sieve
Halal Ingredients for Your Tart
- For the Chocolate Crust:
- 🧈 1/2 cup (113g) unsalted halal butter, softened
- 🍚 1/4 cup (50g) granulated sugar
- 🌾 1 1/4 cups (150g) all-purpose flour
- 🍫 1/4 cup (25g) unsweetened cocoa powder
- 🧂 1/4 teaspoon salt
- For the Custard Filling:
- 🥛 1/2 cup (120ml) halal whole milk
- 🍦 1/2 cup (120ml) halal heavy cream
- 🥚 2 large halal egg yolks
- 🍚 1/3 cup (67g) granulated sugar
- 🌽 2 tablespoons cornstarch
- 🍮 2 tablespoons vanilla custard powder (for flavor and the lovely yellow color)
- 🧈 2 tablespoons (28g) unsalted halal butter, cut into small pieces
- 💧 1 teaspoon vanilla extract
- For the Ganache Topping & Garnish:
- 🍫 4 oz (115g) halal semi-sweet or dark chocolate, finely chopped
- 🍦 1/2 cup (120ml) halal heavy cream
- 🍫 1 tablespoon unsweetened cocoa powder, for dusting
Bringing Your Tart to Life: Step-by-Step
This recipe is assembled in parts, allowing each layer to set perfectly. Follow these instructions closely for a flawless result.
Part 1: The Perfect Chocolate Crust
This press-in crust is wonderfully simple and results in the crisp, dark chocolate base seen in the photo.
- Preheat the oven to 375°F (190°C). Have the 9-inch tart pan ready.
- In a medium bowl, use an electric mixer to beat the softened butter and sugar together until the mixture is light and fluffy. This technique is called creaming, and it helps make the crust tender.
- In a separate bowl, whisk together the all-purpose flour, cocoa powder, and salt.
- Add the dry ingredients to the creamed butter mixture and mix on low speed until a crumbly, dark dough forms.
- Tip the dough crumbs into the tart pan. Use your fingers and the flat bottom of a measuring cup to press the dough evenly across the bottom and up the sides of the pan. Make sure the thickness is consistent.
- Prick the bottom of the crust a few times with a fork. This stops it from puffing up during baking.
- Bake the crust for 15-18 minutes. This step is blind baking—baking the crust by itself so it becomes firm and won’t get soggy from the filling. The crust should look dry and be fragrant. Let it cool completely in the pan on a wire rack.
Part 2: The Creamy Custard Filling
This layer is a classic cooked custard that gives the tart its soft, yielding center.
- In a small saucepan, gently heat the milk and heavy cream over medium-low heat until it just begins to simmer around the edges. Do not let it boil.
- While the milk is warming, whisk the egg yolks, sugar, cornstarch, and vanilla custard powder together in a medium bowl until the mixture is pale and smooth.
- Very slowly, pour about half of the hot milk mixture into the egg yolk mixture while whisking constantly. This is called tempering and it gently warms the eggs to prevent them from scrambling.
- Pour the tempered egg mixture back into the saucepan with the rest of the milk.
- Return the saucepan to medium-low heat and cook, whisking constantly, until the custard thickens significantly. This should take about 3-5 minutes. It’s ready when it can coat the back of a spoon.
- Remove the pan from the heat and stir in the butter pieces and vanilla extract until the butter is fully melted and the custard is smooth.
- Pour the warm custard into the cooled chocolate crust and use a spatula to spread it into an even layer.
- Let the tart cool at room temperature for about 30 minutes, then transfer it to the refrigerator to chill and set completely, for at least 2 hours. The custard must be cold before adding the ganache.
Part 3: The Rich Chocolate Ganache Topping
This simple two-ingredient topping provides the decadent, silky chocolate layer. A ganache is a mixture of chocolate and cream.
- Place the finely chopped chocolate in a heatproof bowl.
- Heat the heavy cream in a small saucepan over medium heat until it’s steaming and bubbles are forming at the edges.
- Pour the hot cream directly over the chopped chocolate. Let it sit, untouched, for 5 minutes. This allows the hot cream to melt the chocolate gently.
- After 5 minutes, stir the mixture slowly with a spatula until it comes together into a smooth, glossy ganache.
- Let the ganache cool for about 10-15 minutes, stirring occasionally. It should still be pourable but not hot.
- Retrieve the chilled tart from the refrigerator. Gently pour the ganache over the set custard layer, tilting the tart pan to guide the ganache into a perfectly even surface that covers the custard from edge to edge.
Part 4: The Finishing Touches
The final steps are what make this tart a true showstopper.
- Return the tart to the refrigerator and chill for another 1-2 hours, or until the ganache is firm to the touch.
- Just before serving, take the fine-mesh sieve and add the tablespoon of cocoa powder. Gently tap the side of the sieve to dust a fine, even layer of cocoa over the entire surface of the tart, including the top edge of the crust. This is how you achieve that beautiful, velvety finish.
- Carefully remove the outer ring of the tart pan. To slice, use a large, sharp knife, wiping it clean between each cut for neat, picture-perfect slices.
There is immense satisfaction in watching these simple, high-quality ingredients transform into such an elegant and delicious dessert. Don’t hesitate to take on this baking project; the reward is a beautiful tart, ready to be shared and admired. Everyone who tries it will appreciate the effort and love baked into every layer.