

Dreamy Cocoa Swirl Chocolate Tart
Get ready to meet a new favorite! This incredible Chocolate Tiramisu-style Tart is a true showstopper. Picture this: a deep, fudgy chocolate base that’s unbelievably rich, all topped off with a fluffy cloud of the lightest, most velvety cream. And the best part? It looks so impressive, but it’s actually a complete joy to put together using simple, wholesome ingredients.
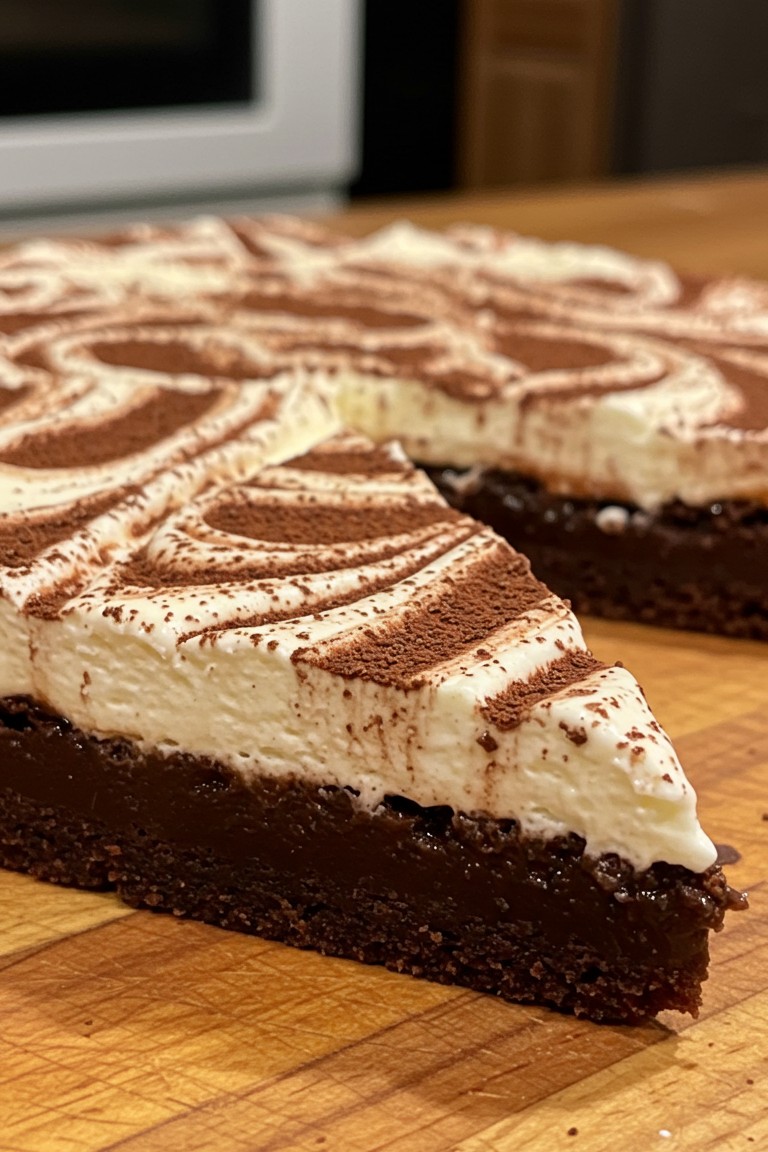
Setting aside an afternoon to prepare this tart is such a rewarding and happy experience. The journey from a few pantry staples to this beautiful dessert is what home baking is all about. That amazing contrast between the intense, dark chocolate and the gentle, airy cream, finished with those lovely cocoa swirls, makes every single bite a moment to savor. It’s the perfect dessert to share and make any occasion feel a little more special.
Kitchen Essentials
Before beginning, it’s a good idea to gather all the necessary ingredients and equipment. This makes the whole process smooth and enjoyable.
📋 Halal Ingredients Needed
- 🍫 200g good-quality dark chocolate (at least 70% cocoa)
- 🧈 125g unsalted butter, cubed
- 🥚 3 large free-range eggs
- 🍚 150g caster sugar
- 🥄 1 tsp halal vanilla extract
- 🌾 50g plain flour
- 🤎 30g unsweetened cocoa powder, plus extra for dusting
- 🧂 1/4 tsp salt
- 🍦 250ml heavy whipping cream, cold
- 🧀 250g mascarpone cheese, at room temperature
- 🍬 60g icing sugar
🍴 Equipment Checklist
- 🥧 23cm (9-inch) round loose-bottomed tart pan
- 🥣 Several mixing bowls
- A saucepan and a heatproof bowl (for a water bath)
- 🔪 A whisk
- 🔳 A rubber spatula
- ⚡ An electric mixer (handheld or stand)
- ⚖️ A fine-mesh sieve
- 🍢 A wooden skewer or toothpick
Bringing the Tart to Life: A Step-by-Step Guide
This recipe is broken down into simple parts. Follow along to assemble this stunning dessert.
Part 1: The Rich Chocolate Base
The foundation of this tart is its deep, fudgy chocolate layer. The key is to bake it just enough so it sets but remains gooey in the center, which gives the tart its signature dense texture seen in the photograph.
- Preheat the oven to 180°C (160°C Fan / 350°F). Lightly grease the tart pan and line the bottom with parchment paper.
- Set up a bain-marie, also known as a water bath. This is a gentle way to melt ingredients without scorching them. Simply fill a small saucepan with about an inch of water and bring it to a simmer. Place a heatproof bowl on top of the saucepan, ensuring the bottom of the bowl does not touch the water.
- Add the dark chocolate and cubed butter to the heatproof bowl. Let them melt slowly over the simmering water, stirring occasionally until smooth and glossy. Once melted, remove the bowl from the heat and set it aside to cool slightly.
- In a separate large bowl, whisk the eggs and caster sugar together for about 3-4 minutes until the mixture is pale, thick, and has increased in volume. Whisk in the vanilla extract.
- Gently pour the cooled chocolate mixture into the egg mixture. Now, it’s time to fold them together. Folding is a technique used to combine ingredients without losing air. Use a spatula to cut down through the center of the mixture, scrape along the bottom of the bowl, and lift the batter up and over itself. Rotate the bowl and repeat until just combined.
- Sift the flour, cocoa powder, and salt directly into the bowl. Fold again, just until no dry streaks remain. Be careful not to overmix, as this can make the base tough.
- Pour the batter into the prepared tart pan and smooth the top with the spatula.
- Bake for 20-25 minutes. The edges should look set, but the center will still have a slight wobble. This is crucial for achieving that fudgy interior. Let the tart cool completely in the pan on a wire rack.
Part 2: The Luscious Mascarpone Cream
This topping is light, airy, and delicately sweet, providing a perfect contrast to the rich base.
- In a chilled mixing bowl, pour in the cold heavy whipping cream. Using an electric mixer, whip the cream starting on low speed and gradually increasing to high. Continue until it forms stiff peaks. You’ll know it’s ready when you lift the beaters out and the cream peak holds its shape without drooping.
- In another bowl, gently stir the room-temperature mascarpone with the icing sugar until just combined and smooth. It’s important that the mascarpone isn’t too cold, or it can become lumpy.
- Add a large dollop of the whipped cream to the mascarpone mixture and gently fold it in to lighten the cheese. Then, add the rest of the whipped cream and fold until everything is uniformly mixed. The final texture should be thick, smooth, and spreadable.
Part 3: Assembling Your Masterpiece
With the components ready, the final assembly is where the tart truly comes together.
- Ensure the chocolate base is completely cool to the touch. If it’s even slightly warm, it will melt the cream.
- Spoon the mascarpone cream onto the center of the cooled chocolate base.
- Using an offset spatula or the back of a spoon, gently spread the cream evenly across the surface, all the way to the edges of the tart.
Part 4: The Signature Cocoa Swirl
This final touch is what gives the tart its elegant, marbled appearance, just as seen in the picture.
- Hold a fine-mesh sieve over the tart and generously dust the top with a full, even layer of unsweetened cocoa powder.
- Take a wooden skewer or the tip of a knife. Gently drag it through the cream in a swirling or back-and-forth motion. The skewer will pull the white cream up through the cocoa powder, forming the beautiful brown-and-white patterns. There’s no wrong way to do this—have fun making your own unique design!
- For the cleanest slices, chill the finished tart in the refrigerator for at least 1-2 hours before serving. This allows the layers to set firmly.
There’s nothing quite like the feeling of slicing into a dessert and seeing those perfect layers. This tart is a celebration of texture and flavor, and a wonderful testament to the joy of home baking. We hope you’ll give it a go and share your beautiful results.