

Vibrant Rainbow Fruit Mousse Cake
Discover the joy of assembling a truly stunning dessert right in your own kitchen. This Rainbow Fruit Mousse Cake is a masterpiece of colorful, creamy layers and a fresh, fruity topping. With its distinct vibrant yellow, a delicate green, a rich pink, and a light creamy-green section resting on a golden biscuit crust, it’s a celebration in every slice. Following these steps, anyone can put together this beautiful, halal-friendly dessert, perfect for sharing with family and friends.
What You’ll Need
Before beginning, it’s a good idea to gather all the necessary tools and ingredients. Having everything ready makes the process smooth and enjoyable.
Kitchen Essentials
- 🥣 4 Medium mixing bowls
- 🥄 A spatula
- 🌪️ An electric hand mixer or stand mixer
- 📏 Measuring cups and spoons
- 🍳 A small saucepan
- 🎂 A 9-inch (23 cm) springform pan (This is a special pan with sides that unclip, making it easy to remove the cake without damage.)
- 🔪 A sharp knife
Ingredients for the Cake
- 🍪 200g Digestive biscuits
- 🧈 100g Unsalted butter, melted
- 🐮 4 teaspoons Halal powdered gelatin
- 💧 6 tablespoons Cold water
- 🧀 600g Cream cheese, softened to room temperature
- 🍚 200g Granulated sugar
- 🥛 600ml Heavy whipping cream, very cold
- 🍋 A few drops of lemon essence
- 🍓 A few drops of strawberry essence
- 🟢 A few drops of pistachio essence
- 🥝 A few drops of lime or kiwi essence
- 💛 Yellow food coloring
- 💚 Green food coloring
- 🔴 Pink or red food coloring
- 🍏 Light green food coloring (for the very light top layer)
- 🥝 2 Kiwis, peeled and sliced
- 🍊 1 can (approx. 300g) Mandarin oranges, drained
- 🍓 5-6 Fresh strawberries, hulled and sliced
Step-by-Step Instructions
This recipe is built in layers. The key to perfect, distinct layers is patience, allowing each one to set before adding the next.
Part 1: Form the Biscuit Crust
The foundation of this cake is a simple, buttery biscuit crust.
- Place the digestive biscuits in a sealed plastic bag and use a rolling pin to crush them into fine crumbs. Alternatively, pulse them in a food processor. The goal is a texture like coarse sand.
- Pour the crumbs into a mixing bowl and add the melted butter. Stir with a fork until all the crumbs are evenly moistened.
- Tip the buttery crumbs into the bottom of your springform pan. Use the back of a spoon or the bottom of a glass to press the mixture down firmly and evenly across the base.
- Place the pan in the refrigerator to chill and firm up while you prepare the mousse filling.
Part 2: Whip Up the Mousse Layers
Now for the truly fun part! A single, large batch of mousse filling is prepared and then divided to become the colorful layers.
- Bloom the gelatin. To bloom means to soften the gelatin so it dissolves smoothly. Sprinkle the powdered gelatin over the 6 tablespoons of cold water in a small bowl. Let it sit for 5-10 minutes. It will absorb the water and become thick and jiggly.
- In a large mixing bowl, beat the softened cream cheese with the granulated sugar using an electric mixer on medium speed until completely smooth and free of lumps. This prevents a gritty texture later.
- In a separate, chilled bowl, whip the cold heavy cream on high speed until it forms stiff peaks. Stiff peaks are a sign the cream is ready; when you lift the beaters out, the cream on them will stand straight up without flopping over.
- Gently warm the bloomed gelatin in the microwave for 5-10 seconds or over a small pot of simmering water until it becomes a smooth liquid. Do not let it boil.
- Pour the liquid gelatin into the cream cheese mixture and beat on low speed just until it’s combined.
- Now, fold the whipped cream into the cream cheese mixture. Folding is a gentle technique to keep the mixture light and airy. Use a spatula to scoop from the bottom of the bowl, bring it up over the top, and turn your wrist. Repeat until just combined. Be careful not to overmix, as this will deflate the mousse.
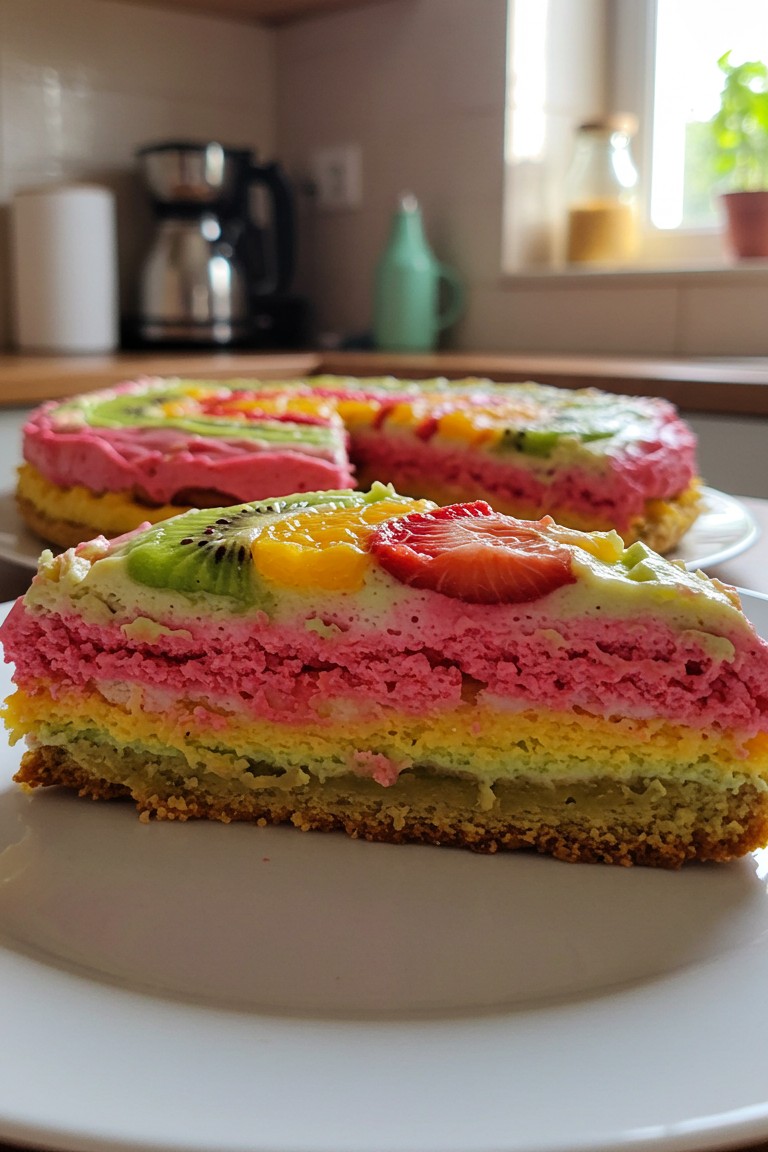
- Divide the mousse mixture into four separate bowls. To match the photo, divide it as follows: Put two larger, roughly equal amounts into two bowls (for the yellow and pink layers). Put a smaller amount into a third bowl (for the top light-green layer). Put a very small amount into the fourth bowl (for the thin green layer).
- For the vibrant yellow layer (bottom layer), take one of the two larger bowls of mousse. Add a few drops of yellow food coloring and the lemon essence. Gently fold until you have an even, bright yellow color.
- For the thin green layer, take the very small bowl of mousse. Add a few drops of green food coloring and the pistachio essence. Fold until evenly colored.
- For the vibrant pink layer, take the other large bowl of mousse. Add pink food coloring and the strawberry essence. To get the white swirls seen in the cake, fold the color in gently, stopping just before it’s perfectly uniform. This leaves behind beautiful marbled streaks.
- For the very light green layer (top layer), take the small bowl of mousse. Add the lime or kiwi essence and just a tiny drop of light green food coloring for a subtle, creamy-green tint. Fold until combined.
Part 3: Assemble the Rainbow Cake
With all the components ready, it’s time to build the cake.
- Retrieve the chilled crust from the fridge. Gently pour the vibrant yellow mousse over the crust and spread it into an even layer with your spatula. Return the pan to the refrigerator for at least 30-40 minutes, or until the top is firm to a light touch. This step is crucial for preventing the colors from bleeding into each other.
- Once the yellow layer is set, carefully pour the thin green mousse on top. Spread it gently into a very thin, even layer. Back into the refrigerator it goes for another 30-40 minutes.
- Next, carefully pour the vibrant pink mousse over the set green layer. Spread it evenly, being gentle so you don’t disturb the layer below. Refrigerate for another 30-40 minutes.
- Finally, pour the very light green mousse over the set pink layer. Spread it evenly. This will be the final mousse layer.
- Refrigerate the entire cake for at least 6 hours, but overnight is best. This long chill time ensures the cake is fully set and firm enough to slice cleanly.
Part 4: Add the Finishing Touches
The beautiful fruit topping is the final step that makes this dessert a true showstopper.
- Once the cake is completely firm, carefully run a thin knife around the inside edge of the springform pan to loosen it. Unclip and lift away the sides of the pan.
- Arrange the sliced fruit on top of the cake. A lovely pattern of sliced kiwis, mandarin orange segments, and sliced strawberries covering the surface works beautifully.
- For the cleanest slices, dip a large, sharp knife in hot water and wipe it dry before each cut.
This beautiful Rainbow Fruit Mousse Cake is now ready to be served. The sight of those vibrant, distinct layers is a wonderful reward for your efforts. Enjoy every light, creamy, and fruity bite, and be ready for everyone to ask for the recipe.