

Golden Two-Layer Custard Cake
Imagine a dessert that offers two perfect textures in one slice: a light, tender sponge cake base and a rich, velvety custard topping. What’s truly remarkable is that both layers—the cake and the custard—emerge from one single, straightforward batter during the baking process. It’s a wonderful bit of kitchen science that yields a stunning and delicious result.
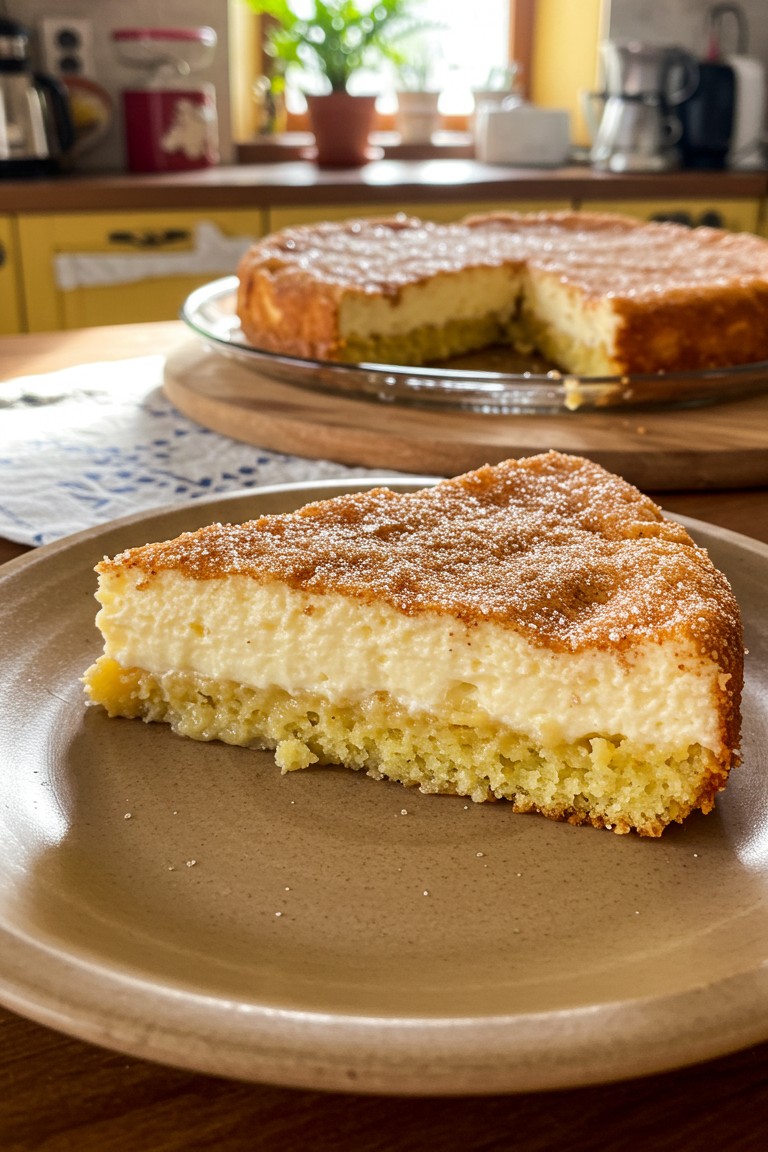
This guide walks through the simple steps to assemble this unique cake. The finished dessert, just like the one pictured, has a beautiful cinnamon-sugar crust that adds a delicate sparkle and warm spice to every bite. Perfect for anyone new to baking, this recipe is a rewarding project with a truly impressive outcome.
What You’ll Need
For the Cake
- 🥚 4 large eggs, separated
- 🧈 ½ cup (113g) unsalted butter (halal), melted and cooled slightly
- 🥛 2 cups (480ml) whole milk, warmed
- 🍚 ¾ cup (150g) granulated sugar
- 💧 1 teaspoon vanilla extract (halal)
- 🌾 ¾ cup (90g) all-purpose flour
- 🍋 ¼ teaspoon cream of tartar
For the Topping
- 🍚 2 tablespoons granulated sugar
- 🍂 ½ teaspoon ground cinnamon
Kitchen Tools
- 🥣 2 medium-to-large mixing bowls
- ⚡️ Electric hand mixer (or a stand mixer)
- 🥄 Rubber spatula
- 🍳 Small saucepan
- 🧀 Fine-mesh sieve or flour sifter
- 🎂 9-inch (23 cm) round glass pie plate or cake pan
Assembling Your Custard Cake
- First, let’s get the kitchen set up for a smooth baking experience. Adjust an oven rack to the middle position and preheat the oven to 325°F (160°C). Prepare the 9-inch round baking dish by lightly greasing it with butter.
- The journey begins with separating the eggs. The yolks go into one large mixing bowl, and the whites go into another. Be extra careful to ensure no trace of yolk gets into the whites, as this can prevent them from whipping up properly later.
- Add the ¾ cup of granulated sugar to the bowl with the egg yolks. Using an electric mixer on medium-high speed, beat them together for 2-3 minutes. You’ll know it’s ready when the mixture becomes thick, pale yellow, and falls from the beaters in a slow, continuous ribbon that sits on the surface for a moment before dissolving.
- Turn the mixer speed down to low. Slowly stream in the melted butter and the vanilla extract, mixing just until everything is combined.
- Now, it’s time to introduce the flour. To keep the batter light, pass the flour through a sieve directly into the yolk mixture. This aerates the flour and removes any lumps. Switch to a spatula and use a technique called folding. Gently cut the spatula through the center of the batter, scrape along the bottom of the bowl, and lift the mixture up and over itself. Continue this motion just until you no longer see streaks of dry flour.
- While mixing on low, gradually pour the warm milk into the batter. The batter will become very thin and liquidy. This thin consistency is intentional and absolutely correct; it’s the very feature that allows the batter to separate into its distinct layers while it bakes.
- Set the batter aside for a moment. In the second bowl containing the egg whites, add the cream of tartar. This ingredient helps the egg whites hold their shape. Using clean beaters, whip the whites on high speed until they form stiff peaks. This means that when you lift the beaters out of the bowl, the peaks that form stand tall and don’t curl over.
- Take about a third of the whipped egg whites and whisk them into the thin batter. This lightens the batter, making it much easier to incorporate the rest of the whites without deflating them. Add the remaining whites and gently fold them in with a spatula until just combined. It’s okay if a few small white fluffs remain.
- Pour the final batter into the prepared glass pie plate. In a small bowl, stir the 2 tablespoons of sugar and the cinnamon together. Evenly sprinkle this mixture over the entire surface of the batter. This will give the cake its beautiful, sparkling top and a hint of warmth.
- Bake for 40-50 minutes. The cake is ready when the top is golden-brown and feels set to the touch, while the center will still have a slight wobble, similar to a set custard.
- Patience at this stage is essential. Allow the cake to cool completely on a wire rack at room temperature. Afterward, transfer it to the refrigerator to chill for at least 2-3 hours. This chilling time is crucial for the custard layer to firm up perfectly.
Serving and Enjoying
Once fully chilled, the cake is ready to be sliced and served. The cross-section will reveal the two beautiful layers that formed in the oven—the golden sponge below and the creamy custard above. A slice of this cake is presented beautifully on a simple brown stoneware plate, allowing its homemade charm to shine through.
There’s a special satisfaction in following these steps and seeing the wonderful result. Enjoy the process and the delicious cake you’ve prepared.