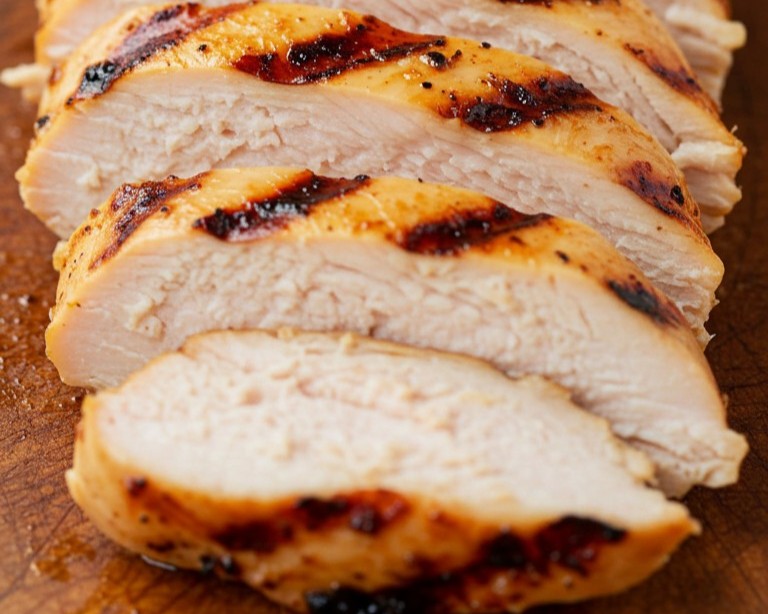
Let’s be real, is there anything better than a perfectly grilled piece of chicken? We’re talking about chicken that’s unbelievably juicy on the inside, with those beautiful, dark grill marks on a golden-brown outside. This guide is here to show you a simple, no-fail way to get that exact result every time. Get ready for tender, mouthwatering chicken that’s a total joy to make and eat.
With this method, we’ll turn a simple chicken breast into the hero of your dinner plate. It’s proof that making incredible homemade food is something every single one of us can do!
Essential Components
Before beginning, gather all the necessary ingredients and tools. Having everything ready makes the entire cooking process smooth and enjoyable.
Ingredients
- 🍗 2 large (about 6-8 ounces each) boneless, skinless halal chicken breasts
- 🫒 2 tablespoons olive oil
- 🍯 1 tablespoon honey
- ✨ 1 tablespoon soy sauce or tamari
- 🧄 2 cloves garlic, finely minced
- 🧂 ½ teaspoon black pepper
- 🤏 ¼ teaspoon salt
Kitchen Tools
- 🥣 A shallow dish or a zip-top bag for marinating
- 🔨 A meat mallet or rolling pin
- 🔥 A grill (either an outdoor grill or an indoor grill pan)
- 🤏 Tongs
- 🌡️ An instant-read meat thermometer
- 🪵 A cutting board
- 🔪 A sharp knife
Step-by-Step Guide to Perfection
Following these steps in order will lead to the flawless grilled chicken pictured, which is moist, tender, and beautifully marked.
1. Prepare the Chicken
The first step to a juicy, evenly cooked chicken breast is to make sure it has an even thickness.
Place the chicken breasts on a cutting board and cover them with a piece of plastic wrap. Using a meat mallet or a rolling pin, gently pound the thicker end of each breast until it’s about ½ to ¾ inch thick, matching the thinner end. This simple action ensures the entire piece of chicken cooks at the same rate, preventing parts from becoming dry while others are still cooking.
2. Mix the Flavorful Marinade
A good marinade does two things: it infuses the meat with flavor and it helps with browning. This marinade is what gives the chicken its golden-brown color and deep, savory taste.
In the shallow dish, whisk together the olive oil, honey, soy sauce, minced garlic, black pepper, and salt. The honey is especially important, as its sugars will caramelize on the hot grill, forming the deep, dark char lines seen on the finished chicken.
3. Let the Flavors Mingle
Add the prepared chicken breasts to the marinade. Turn them over a few times to make sure every surface is completely coated.
Cover the dish or seal the bag and let the chicken marinate in the refrigerator for at least 30 minutes, or up to 4 hours. This period allows the flavors to penetrate the meat, making it more tender and delicious. Do not marinate it for longer than 4 hours, as the ingredients can start to change the texture of the meat too much.
4. Master the Grilling Process
Achieving perfect grill marks and a juicy interior is all about heat management and patience.
First, preheat the grill or grill pan over medium-high heat for about 5-10 minutes. A hot grill is essential for a good sear. Once hot, use tongs to place the marinated chicken breasts onto the grill, laying them down away from the body to avoid any splashes. Discard any leftover marinade.
Cook for about 5-7 minutes on the first side. It’s important to resist the urge to move the chicken during this time; leaving it in place is how those clean, defined grill marks are formed.
Flip the chicken and cook for another 5-7 minutes on the second side. The chicken is done when it is opaque all the way through and the internal temperature reaches 165°F (74°C). The most reliable way to check for doneness is with an instant-read thermometer inserted into the thickest part of the breast. This guarantees the chicken is cooked safely without being overdone and dry.
5. The All-Important Rest
Once the chicken is cooked, remove it from the grill and place it on a clean cutting board. This next step is absolutely vital for a juicy result.
Let the chicken rest for at least 5 to 10 minutes before slicing. During this time, the juices inside the chicken, which moved to the center during cooking, will redistribute throughout the meat. Cutting into it too soon will cause all that wonderful moisture to spill out onto the board. This patience is rewarded with the perfectly moist texture of the sliced chicken in the photograph.
6. Slice and Serve
After the rest period, the chicken is ready. Notice the direction of the muscle fibers in the meat. Position a sharp knife to cut across, or “against,” these fibers.
Slice the chicken into thick, even pieces as shown in the image. Slicing against the grain shortens the muscle fibers, making each bite exceptionally tender. The result is beautifully presented, succulent grilled chicken, ready to be enjoyed.
The satisfaction of this accomplishment is a dish that is not only delicious but also a feast for the eyes. Feel free to showcase the finished plates and share the delicious results of this wonderful cooking journey.


