

Radiant Citrus Berry Mousse Cake
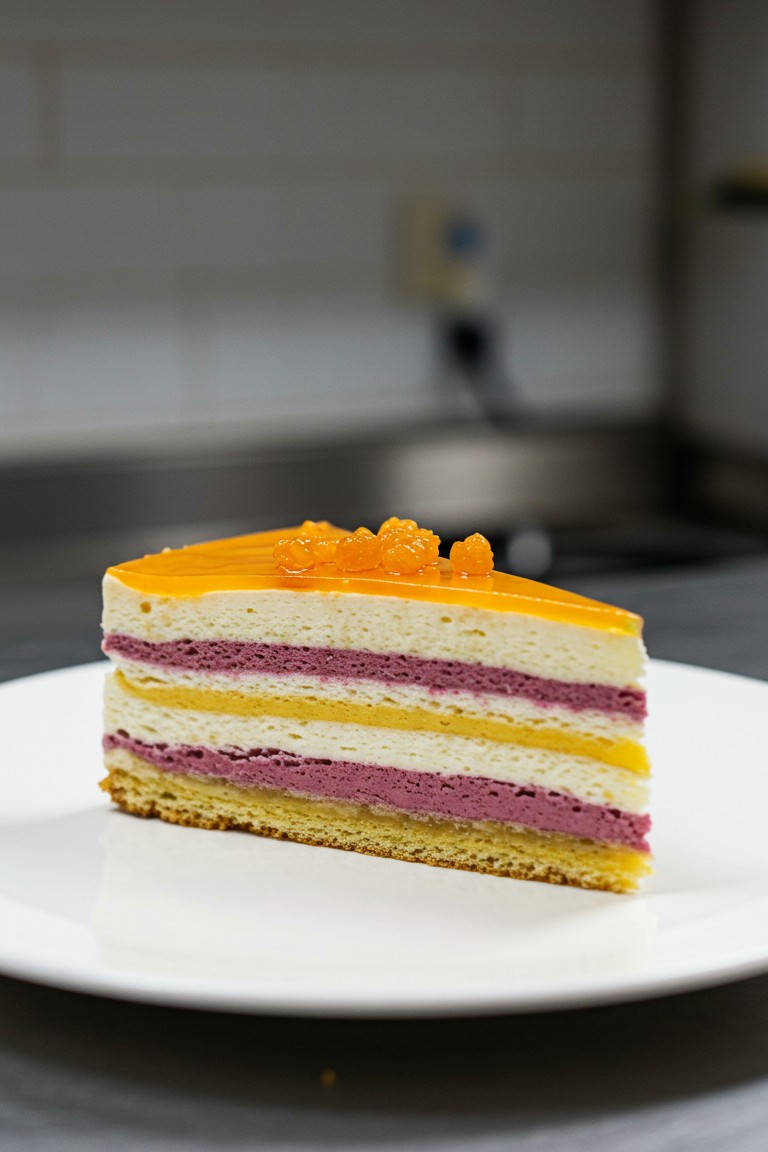
This stunning dessert is a true showstopper, with its vibrant, distinct layers and a glossy, sun-kissed top. A delicate sponge cake provides the perfect base for alternating waves of velvety berry and vanilla mousse, all separated by a bright ribbon of tangy passion fruit. The whole confection is finished with a brilliant orange glaze and a delicate garnish. While it looks like it came straight from a Parisian patisserie, assembling this beautiful cake at home is a rewarding journey. It’s all about patience and following the steps, one beautiful layer at a time.
Kitchen Essentials
Before beginning, gather the necessary tools and ingredients. Having everything ready makes the process smooth and enjoyable.
Equipment
- 🎂 8-inch (20cm) square or round cake ring/frame
- 📜 Acetate cake collar/sheets
- 🥣 Several mixing bowls (small, medium, and large)
- 🍳 Small saucepan
- ⚖️ Kitchen scale
- 🌬️ Mixer with whisk attachment (stand or hand-held)
- 🥄 Spatula
- 🔪 Sharp knife
- 🌡️ Cooking thermometer (recommended)
Ingredients
- For the Sponge Cake Base:
- 🥚 2 large eggs, at room temperature
- 🍚 60g (1/3 cup) granulated sugar
- 🌾 60g (1/2 cup) all-purpose flour, sifted
- 🧈 15g (1 tablespoon) unsalted butter, melted
- For the Blackcurrant Mousse (Purple Layers):
- 🍇 250g blackcurrant purée (from fresh or frozen blackcurrants)
- 🍚 80g (a little less than 1/2 cup) granulated sugar
- 🐄 8g (about 2.5 teaspoons) halal beef gelatin powder
- 💧 40ml cold water
- 🥛 250ml heavy whipping cream, very cold
- For the Vanilla Mousse (White Layers):
- 🥛 250ml whole milk
- 🌿 1 vanilla bean, split lengthwise, or 1 tsp vanilla extract
- 💛 3 egg yolks
- 🍚 60g (1/3 cup) granulated sugar
- 🐄 8g (about 2.5 teaspoons) halal beef gelatin powder
- 💧 40ml cold water
- 🥛 250ml heavy whipping cream, very cold
- For the Passion Fruit Insert (Yellow Layer):
- 🍊 100g passion fruit purée (strained to remove seeds)
- 🍚 25g (2 tablespoons) granulated sugar
- 🐄 3g (1 teaspoon) halal beef gelatin powder
- 💧 15ml cold water
- For the Orange Glaze & Garnish:
- 🍊 150g orange juice (freshly squeezed is best)
- 🍚 50g (1/4 cup) granulated sugar
- 🐄 4g (about 1.5 teaspoons) halal beef gelatin powder
- 💧 20ml cold water
- ✨ A small amount of candied orange peel, finely diced
The Step-by-Step Journey
This cake is built in stages, with chilling time in between. It’s a perfect weekend project!
Phase 1: Preparing the Foundation – The Sponge Cake
- Preheat the oven to 180°C (350°F). Lightly grease and flour a baking sheet.
- In a large heatproof bowl, whisk the eggs and sugar together. Place this bowl over a saucepan of simmering water (this is called a bain-marie or water bath), making sure the bottom of the bowl doesn’t touch the water.
- Whisk continuously until the mixture is pale, warm to the touch, and has tripled in volume.
- Remove the bowl from the heat. Using an electric mixer, whip the egg mixture on high speed for 5-7 minutes, until it’s very thick and forms a ribbon-like trail when the whisk is lifted.
- Gently fold in the sifted flour in two additions.
- Gently fold in the melted butter. Be careful not to overmix.
- Pour the batter onto the prepared baking sheet and spread it into a thin, even layer larger than your cake frame.
- Bake for 8-10 minutes, or until the sponge is golden and springs back when touched. Let it cool completely. Once cool, use your cake ring to cut out a perfect base.
Phase 2: Building the First Two Mousse Layers
- Place your cake ring on a flat platter lined with parchment paper. Place the sponge cake base inside. Line the inside wall of the ring with an acetate sheet.
- First, make the blackcurrant mousse. In a small bowl, bloom the gelatin in cold water. Heat the blackcurrant purée and sugar, then remove from heat and dissolve the bloomed gelatin in it. Let it cool. Whip the heavy cream to soft peaks and fold it into the cooled purée.
- Pour half of this blackcurrant mousse over the sponge base. Level it and place in the freezer for 20-30 minutes until set.
- While that sets, make the vanilla mousse. Follow the same process: bloom the gelatin. Heat the milk (with vanilla bean if using), sugar, and egg yolks, then add the bloomed gelatin to dissolve. Let it cool. Whip the heavy cream and fold it into the cooled vanilla mixture.
- Pour half of the vanilla mousse over the set blackcurrant layer. Level it carefully and return to the freezer for 20-30 minutes until set.
Phase 3: The Sunny Center – Passion Fruit Insert
- Prepare the passion fruit insert. Bloom the gelatin in cold water.
- Gently warm the passion fruit purée and sugar. Remove from heat and stir in the bloomed gelatin until dissolved.
- Let it cool until it’s barely warm. Pour it carefully over the set vanilla mousse layer. It should form a thin, even, yellow layer.
- Freeze for 15-20 minutes until firm.
Phase 4: Completing the Top Layers
- Retrieve the remaining blackcurrant mousse. If it has firmed up, whisk gently to loosen. Pour it over the set passion fruit layer. Level and freeze for 20-30 minutes.
- Take the remaining vanilla mousse. Pour it over the set blackcurrant layer to form the final mousse layer.
- Level the top perfectly. Let the entire cake chill in the refrigerator for at least 6 hours, or preferably overnight, to set completely.
Phase 5: The Glossy Finish – The Orange Glaze
- Bloom the gelatin in cold water.
- In a saucepan, heat the orange juice and sugar until the sugar dissolves.
- Remove from heat and stir in the bloomed gelatin until dissolved.
- Let the glaze cool down until it is just slightly warm to the touch. Pouring a hot glaze will melt the mousse.
- Slowly and evenly pour the glaze over the top of the chilled, set cake.
- Return the cake to the refrigerator for at least 1 hour for the glaze to set.
Phase 6: The Final Touch – Garnishing
- Carefully remove the cake ring and peel away the acetate collar.
- Arrange the small pieces of candied orange peel in a neat cluster in the center of the cake.
- To get a clean slice, dip a large, sharp knife in hot water and wipe it dry before each cut.
And there you have it—a slice of edible art! Each layer tells a story of flavor, from the rich berry to the bright, tangy citrus. We hope you enjoy every moment of creating and, of course, savoring this magnificent dessert. Let us know how yours turned out in the comments below.