

Dreamy No-Bake Mango Cheesecake
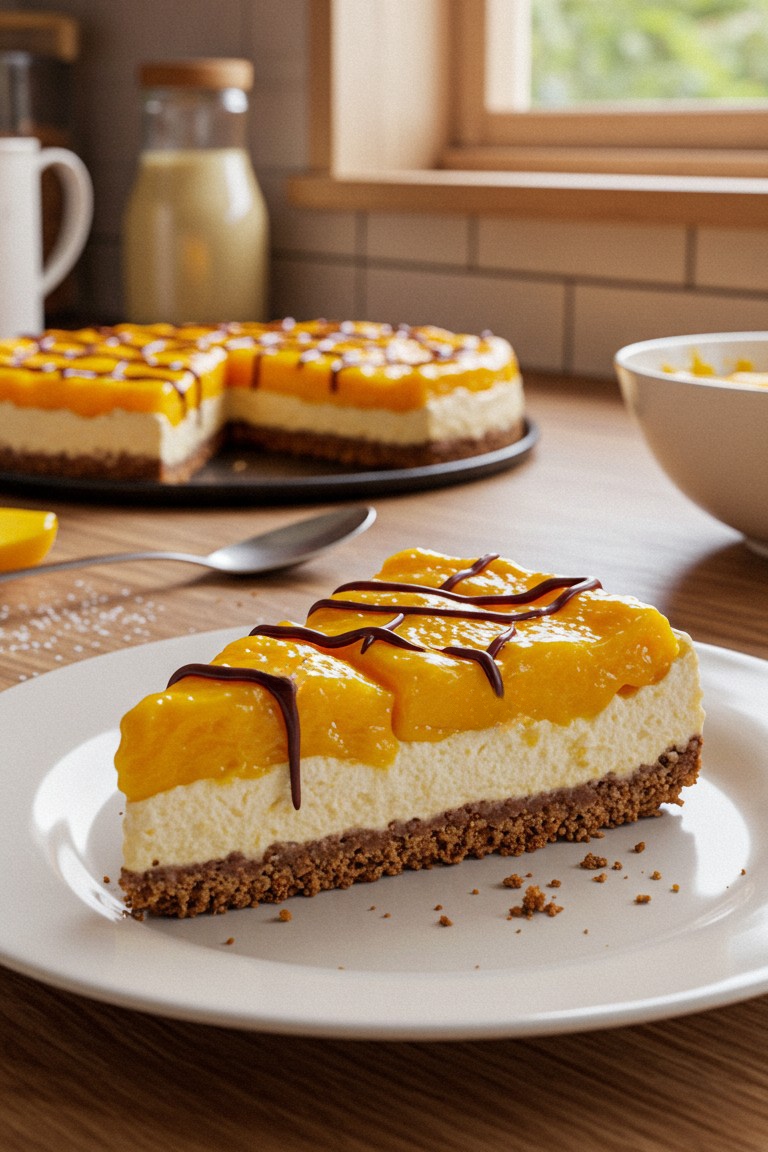
Imagine the smiles when you bring this gorgeous, homemade mango cheesecake to the table! It’s a true showstopper, with its delicious chocolate base, a velvety smooth cream cheese filling, and a topping that’s bursting with sunny mango. A simple swirl of chocolate finishes it off perfectly, making every spoonful a little piece of heaven. We’ll guide you through the easy steps to put this beautiful dessert together, so it looks just as stunning as the photo.
Kitchen Tools
- 🥣 A few mixing bowls (small, medium, and large)
- 🥄 A sturdy spatula
- ⚡ An electric mixer (handheld or stand mixer)
- 🎂 A 9-inch (23 cm) springform pan (This is a special pan with a latch on the side that allows the ring to be removed, which is essential for a perfect presentation.)
- 🔪 A sharp knife and cutting board
- 🥘 A small saucepan
- 📏 Measuring cups and spoons
Ingredients for a Picture-Perfect Cheesecake
- 🍪 250g chocolate digestive biscuits or cream-less chocolate sandwich cookies (like Oreos)
- 🧈 125g unsalted butter, melted
- 🧀 500g full-fat cream cheese, softened to room temperature
- 🍬 150g powdered sugar
- 🍦 1 teaspoon vanilla extract
- 🥛 300ml heavy whipping cream
- 🥭 3 large, ripe mangoes
- 🍋 1 tablespoon fresh lemon juice
- ✨ 2 teaspoons powdered gelatin
- 🍫 50g dark chocolate, finely chopped
Bringing the Cheesecake to Life: A Step-by-Step Guide
Follow these steps carefully to build a cheesecake that has the exact layers and textures seen in the picture.
Step 1: Building the Perfect Chocolate Crumb Crust
The foundation of this cheesecake is its dark, rich, and delicious chocolate crust, which provides a beautiful contrast to the filling.
- Place the chocolate biscuits into a large, sealed plastic bag and use a rolling pin to crush them into fine crumbs. Alternatively, a food processor makes quick work of this. The goal is to have a sandy texture with no large lumps.
- Transfer the crumbs to a medium bowl. Pour the melted butter over the crumbs and mix thoroughly with a spatula until every crumb is coated. The mixture should resemble wet sand.
- Tip the buttery crumbs into the springform pan. Use the back of a spoon or the flat bottom of a glass to press the mixture down firmly and evenly across the base of the pan. The goal is a tightly packed, dark chocolate crust that holds its shape perfectly when sliced, just as seen in the photograph.
- Place the pan in the refrigerator to chill and firm up while the filling is prepared.
Step 2: Whipping Up the Creamy Cheesecake Filling
The key to the cheesecake’s luxurious, smooth white layer is using softened cream cheese and a gentle mixing technique.
- First, ensure the cream cheese is at room temperature. This is a very important step. Cold cream cheese will result in a lumpy filling, but softened cream cheese whips up into a perfectly smooth consistency.
- In a large mixing bowl, beat the softened cream cheese with an electric mixer on medium speed until it’s completely smooth and creamy. Add the powdered sugar and vanilla extract, and continue to beat until well combined and silky.
- In a separate, clean bowl, whip the heavy cream on high speed until it forms stiff peaks. This means that when the beaters are lifted, the cream holds its shape.
- Now, it’s time to combine the two mixtures using a technique called folding. Add about one-third of the whipped cream to the cream cheese mixture and gently fold it in with a spatula. Folding means using the spatula to cut down through the center of the mixture, scrape along the bottom, and bring that mixture up and over the top. Turn the bowl a quarter turn and repeat. This method keeps the filling light and airy. Continue gently folding in the rest of the whipped cream in two more additions until just combined. Do not overmix, as this will deflate the filling.
- Retrieve the chilled crust from the fridge. Pour the airy cheesecake filling over the crust and use the spatula to spread it into an even, level layer. This process forms that flawlessly smooth, pristine white layer that provides the perfect creamy contrast to the fruit.
- Return the cheesecake to the refrigerator for at least 4-6 hours, or preferably overnight, to set completely. It must be firm to the touch before adding the topping.
Step 3: Assembling the Luscious Mango Topping
This topping is what makes the cheesecake so vibrant. It’s made with chunks of fresh mango held in a glossy mango glaze.
- Peel the mangoes. Dice the flesh of two of the mangoes into small, neat cubes. Puree the flesh of the third mango in a blender until completely smooth.
- In a small bowl, sprinkle the gelatin over 3 tablespoons of cold water and let it sit for 5 minutes to bloom, or soften.
- Gently warm the mango puree and lemon juice in a small saucepan over low heat. Once it is warm (not boiling), remove it from the heat. Add the bloomed gelatin and stir until it has completely dissolved.
- Let the puree mixture cool down for about 10-15 minutes, until it’s at room temperature but still liquid. Then, gently stir in the diced mango cubes. This method ensures the topping is a glorious layer of real fruit chunks suspended in a glossy glaze, giving it that vibrant, jewel-like appearance from the picture.
- Carefully spoon the mango topping over the set cheesecake filling, spreading it evenly to the edges. Place the cheesecake back in the refrigerator for at least 2 more hours for the topping to set fully.
Step 4: The Final Flourish: The Chocolate Drizzle
That fine, professional-looking chocolate detail is the finishing touch.
- Place the chopped dark chocolate in a small, microwave-safe bowl. Microwave in 15-second intervals, stirring in between, until it is just melted and smooth. Be careful not to overheat it.
- Let the chocolate cool slightly so it’s not hot. Transfer the melted chocolate to a small piping bag or a zip-top plastic bag. Snip a tiny piece off one corner.
- With a steady hand, drizzle the chocolate back and forth over the top of the mango layer to form the elegant zigzag pattern shown in the image.
- Return the cheesecake to the fridge for 15 minutes to allow the chocolate to harden.
Once fully set, run a thin knife around the edge of the cheesecake before carefully unlatching and removing the ring of the springform pan. For a perfectly clean slice, dip a large, sharp knife in hot water and wipe it dry before each cut.
This beautiful dessert is now ready to be served. It’s an invitation to gather friends and family and share in the pleasure of something truly special, made right at home. Enjoy!