
A Perfect Homemade Carrot Cake
Embarking on a baking adventure can be wonderfully rewarding, and what better way to start than with a classic, spiced carrot cake? This guide will walk anyone, even complete beginners, through the simple process of preparing a moist, flavorful carrot cake topped with luscious cream cheese frosting, just like the delightful slice pictured. Get ready to fill the kitchen with warm, inviting aromas!
Getting Your Kitchen Ready: Ingredients & Tools
Before diving into the baking fun, it’s good to gather everything needed. This ensures a smooth and enjoyable process from start to finish.
🥕 Essential Halal Ingredients
- For the Cake:
- 🍚 2 cups all-purpose flour
- 🥄 2 teaspoons baking soda (this helps the cake rise and become fluffy)
- 🧂 ½ teaspoon salt
- 🍂 2 teaspoons ground cinnamon (halal certified, if concerned about alcohol-based extracts in some ground spices)
- 🌶️ ½ teaspoon ground nutmeg (halal certified)
- 🧡 ¼ teaspoon ground ginger (halal certified)
- 🥚 4 large halal eggs
- 🥛 1 ¼ cups vegetable oil (or other neutral-flavored oil)
- 🍯 2 cups granulated sugar
- 🍦 2 teaspoons pure vanilla extract (halal, alcohol-free)
- 🥕 3 cups finely grated carrots (about 4-5 medium carrots, peeled)
- 🌰 1 cup chopped walnuts (or pecans)
- For the Cream Cheese Frosting:
- 🧱 8 ounces (1 block) full-fat cream cheese (halal, ensure no animal-derived rennet if applicable), softened to room temperature
- 🧈 ½ cup (1 stick) unsalted butter (halal), softened to room temperature
- 🍚 4 cups powdered sugar (confectioners’ sugar), sifted
- 🍦 1 teaspoon pure vanilla extract (halal, alcohol-free)
- 🥛 1-2 tablespoons milk or cream (halal), if needed for consistency
🛠️ Kitchen Helpers You’ll Need
- 🥣 Large mixing bowl
- 🥣 Medium mixing bowl
- 🌪️ Whisk
- 🥄 Rubber spatula or large spoon
- 🥕 Grater (for carrots)
- 📏 Measuring cups and spoons
- 🎂 Two 8-inch or 9-inch round cake pans
- 📜 Parchment paper
- 🔥 Oven
- 🌬️ Wire cooling rack
- ⚡ Electric mixer (handheld or stand mixer, highly recommended for the frosting)
Let’s Bake! Your Step-by-Step Guide to Heavenly Carrot Cake
Follow these steps carefully, and a delicious homemade carrot cake will soon be yours. Remember, baking is a journey, so enjoy each part!
- Prepare the Oven and Pans: First, find the middle rack in the oven and place it there. Then, preheat the oven to 350°F (175°C). Preheating means turning the oven on ahead of time so it reaches the correct temperature before the cake goes in. This is important for the cake to bake evenly. Next, prepare the cake pans. Take a small piece of parchment paper and trace the bottom of one pan. Cut out two circles. Lightly grease the bottom and sides of both cake pans with a little oil or butter. Place one parchment paper circle in the bottom of each pan. This greasing and lining process prevents the cake from sticking, making it much easier to remove later.
- Combine the Dry Ingredients: In the medium mixing bowl, add the flour, baking soda, salt, cinnamon, nutmeg, and ginger. Use the whisk to mix these ingredients together thoroughly for about 30 seconds. Whisking dry ingredients helps to distribute everything evenly, especially the baking soda, which makes the cake rise.
- Mix the Wet Ingredients: In the large mixing bowl, add the eggs, oil, granulated sugar, and vanilla extract. Whisk these together until they are well combined and the mixture looks smooth.
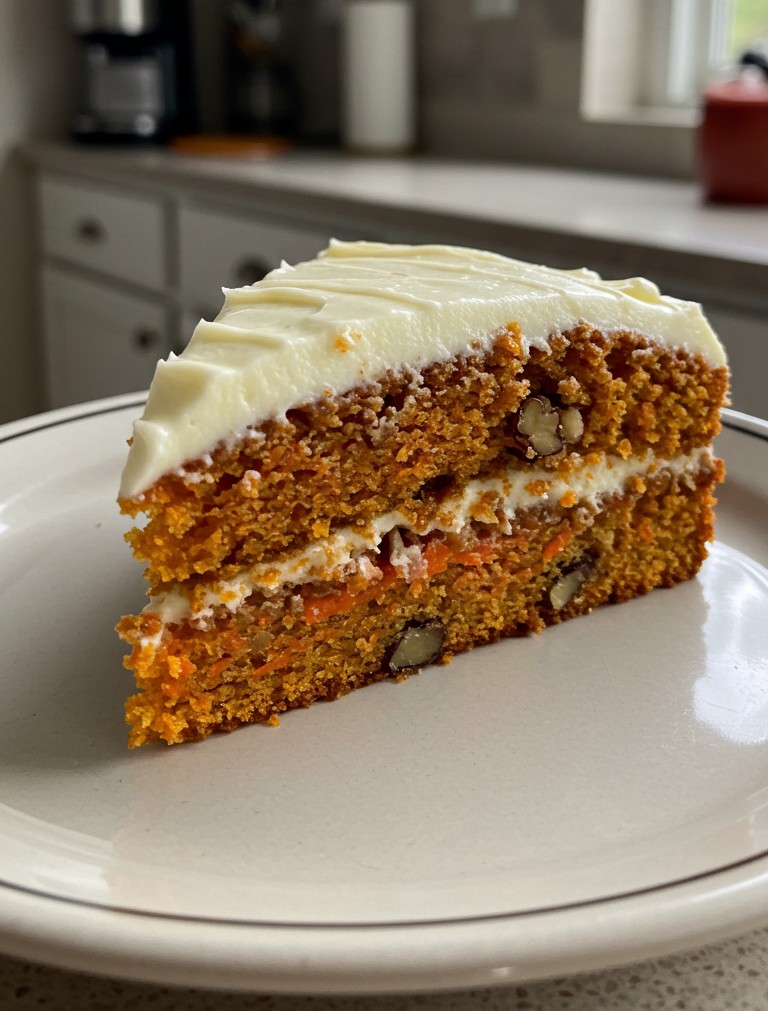
- Bring It All Together: Gradually add the dry ingredient mixture from the medium bowl into the wet ingredient mixture in the large bowl. Mix with the rubber spatula or a spoon until just combined. Be careful not to overmix; mix only until there are no more streaks of dry flour. Overmixing can make the cake tough. Now, gently fold in the grated carrots and chopped walnuts. Folding is a gentle way of mixing. Use the spatula to go down the side of the bowl to the bottom, then sweep across the bottom and up the other side, turning the bowl as you go. Continue until the carrots and nuts are evenly distributed throughout the batter. The batter will be thick and wonderfully orange, just like the cake layers in the image. The walnuts will provide those lovely nutty bits you see.
- Divide Batter and Bake: Carefully divide the batter evenly between the two prepared cake pans. Use the spatula to spread the batter smoothly in each pan. Place the pans in the preheated oven on the middle rack. Bake for 30-35 minutes. The exact time can vary a bit depending on the oven. To check if the cake is done, use the toothpick test. Gently insert a wooden toothpick into the center of one of the cakes. If it comes out clean, or with a few moist crumbs attached (but no wet batter), the cakes are ready. If there’s wet batter, they need a few more minutes.
- Cool the Cakes: Once baked, carefully remove the cake pans from the oven and place them on a wire cooling rack. Let the cakes cool in the pans for about 15-20 minutes. Then, gently run a thin knife around the edge of each cake to loosen it from the pan. Carefully invert each cake onto the wire rack, peel off the parchment paper, and let them cool completely. This can take 1-2 hours. Cooling cakes completely is very important before frosting. If the cakes are warm, the frosting will melt and slide off!
Whipping Up the Perfect Cream Cheese Frosting
This frosting is creamy, tangy, and the perfect partner for carrot cake. The image shows a generous layer of this white frosting.
- Beat Cream Cheese and Butter: Make sure the cream cheese and butter are nicely softened to room temperature. This is key for a smooth, lump-free frosting. In a large bowl (or the bowl of a stand mixer), beat the softened cream cheese and softened butter together with an electric mixer on medium speed until the mixture is smooth and creamy. This might take 2-3 minutes. Scrape down the sides of the bowl with a spatula occasionally.
- Add Sugar and Vanilla: Gradually add the sifted powdered sugar, one cup at a time, beating on low speed until each addition is incorporated. Once all the sugar is added, add the vanilla extract. Then, increase the mixer speed to medium-high and beat for another 2-3 minutes until the frosting is light and fluffy. If the frosting seems too thick, add a tablespoon of milk or cream and beat again until it reaches a nice, spreadable consistency. Don’t make it too thin, though!
Assembling Your Masterpiece
Now for the exciting part – putting the cake together! The cake you’re aiming for has two lovely layers with that delicious frosting in between and all over the top.
- First Layer and Filling: Once the cake layers are completely cool, place one layer, flat side up, on a serving plate or cake stand. Scoop about one-third of the cream cheese frosting onto this layer. Using an offset spatula or a knife, spread the frosting evenly over the top, right to the edges. This will be the yummy filling.
- Add the Second Layer: Carefully place the second cake layer on top of the frosted first layer. You can place it flat side up or down, whichever gives a flatter surface for the top frosting.
- Frost the Top: Spoon the remaining frosting onto the top of the cake. Spread it evenly across the top. The image shows a charming, slightly textured frosting on top. To achieve this, use the back of a spoon or a small spatula to make gentle swoops and swirls. Don’t worry about making it perfectly smooth; a rustic finish is beautiful and very welcoming. You can also frost the sides if you have enough frosting and prefer that look, though the cake in the image showcases its layers with frosting just on top and in between.
A Slice of Happiness
And there it is – a stunning, homemade carrot cake, prepared with care and ready to be enjoyed. That first bite, with its moist, spiced cake, crunchy nuts, and tangy cream cheese frosting, is pure bliss.
This delightful cake is perfect for sharing with family and friends. Feel encouraged to give this recipe a try, and perhaps even share a picture of the wonderful carrot cake that comes out of the kitchen. Happy baking!