

The “Baking Powder” Hack for the Crispiest Baked Chicken Wings: The 2026 Guide
There is something undeniably satisfying about a perfectly cooked chicken wing. The audible crunch as you take that very first bite, followed by the tender, juicy meat inside, is a culinary experience we all crave. However, achieving that classic, shatteringly crisp texture at home usually involves a deep fryer, gallons of oil, and a rather messy kitchen cleanup. But what if the key to the ultimate crunch is already sitting quietly in the pantry?
The baking powder method has completely revolutionized home cooking over the last few years, offering a reliable way to produce restaurant-quality wings straight from a standard home oven. As we dive into the latest culinary updates of 2026, food science has provided us with an even deeper understanding of exactly why this technique is so highly effective, and how we can perfect it. Let us explore the mechanics behind this brilliant technique, gather valuable insights from real cooking communities, and outline the absolute best step-by-step process for flawless, golden wings every single time.
The Chemistry Behind the Crunch
It is remarkably easy to assume that achieving a crispy exterior is simply a matter of applying high heat, but it actually comes down to chemistry. Chicken skin is naturally packed with fat and moisture. When placed directly in a hot oven, that moisture turns to steam, which often results in a soft, rubbery texture rather than a crisp one. This is exactly where baking powder steps in to save the day.
Baking powder is a moderately alkaline mixture. When lightly dusted onto the chicken, it raises the skin’s pH level. This alkaline environment effectively breaks down the peptide bonds in the skin’s proteins, allowing them to degrade much more efficiently. More importantly, this elevated pH accelerates the Maillard reaction—the essential chemical process responsible for browning and developing complex, savory flavors in roasted foods.
Furthermore, baking powder acts as a gentle desiccant. It draws deep-seated moisture from beneath the skin directly to the surface, where the oven’s ambient heat can rapidly evaporate it. The end result is a beautifully blistered, dehydrated skin that crisps up phenomenally well, rivaling anything pulled from a commercial deep fryer.
A Crucial Note on Ingredients: It is absolutely vital to use aluminum-free baking powder. Standard baking powders often contain sodium aluminum sulfate, which reacts with the meat to produce an unpleasant, bitter, metallic aftertaste. Always check the label before starting your prep.
Step-by-Step: Achieving Oven-Baked Perfection
Producing the best possible wings requires a little patience and the right technique. Here is the foolproof method to get it right, balancing the science with practical kitchen wisdom.
Step 1: The Great Dehydration
Moisture is the ultimate enemy of a crispy crust. Before applying any sort of seasoning, take paper towels and thoroughly pat every single wing completely dry. For the absolute best results, arrange the wings on a wire cooling rack set over a baking sheet and leave them uncovered in the refrigerator for at least a few hours, or ideally overnight. The circulating cold air inside the fridge will naturally dry out the skin, setting the perfect stage for maximum crunch.
Step 2: The Perfect Coating Ratio
The general rule of thumb is to use one level teaspoon of aluminum-free baking powder and half a teaspoon of kosher salt per pound of chicken wings. Place the thoroughly dried wings into a large mixing bowl and sprinkle the mixture evenly over them. Toss the wings vigorously until they are lightly coated. A thin, almost invisible layer is all that is needed; excess powder will lead to a chalky texture that dulls the flavor.
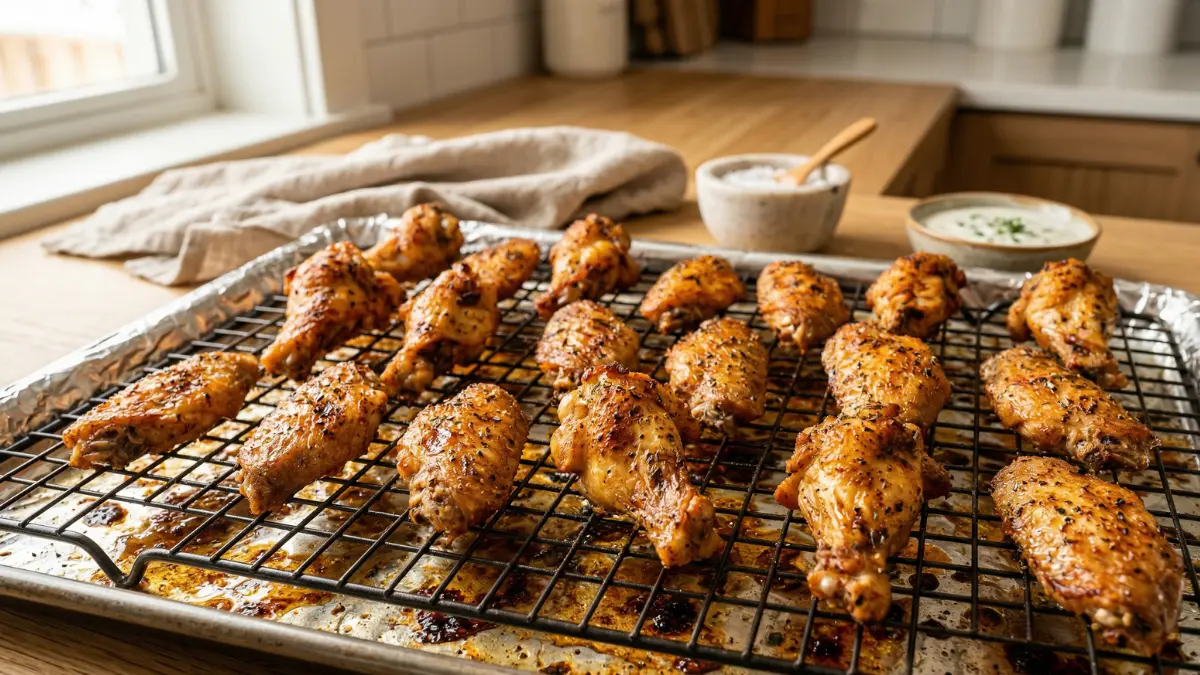
Step 3: The Wire Rack Setup
Never place chicken wings directly on a flat baking pan. As they cook, the fat renders out. If the wings are sitting directly on the pan, they will effectively boil in their own juices, ruining any chance of a crispy bottom. Always use an oven-safe wire rack placed over a foil-lined, rimmed baking sheet. This setup ensures that hot air circulates completely around the meat, providing a beautifully even bake.
Step 4: The Two-Stage Temperature Cook
Cooking the wings at a single high temperature can lead to a burnt exterior and a drastically undercooked interior. Instead, utilize the proven two-stage method:
- Render the Fat: Start by baking the wings at a low temperature of 250°F (120°C) for 30 minutes on the lower-middle oven rack. This gentle heat slowly melts the subcutaneous fat without burning the delicate skin.
- Crisp the Skin: Move the pan to the upper-middle rack and increase the oven temperature to 425°F (220°C). Bake for an additional 40 to 50 minutes. The intense heat flashes the remaining thin skin into a spectacular, golden crust.
Real Community Experiences and Variations
The most reliable tips often come from everyday home cooks who experiment and share their findings. Across various online platforms, the baking powder technique is frequently discussed, tested, and continually optimized.
Over on the r/Wings community, user u/csab123 shared a fantastic flavor-building tip: season the baking powder with a little garlic powder, smoked paprika, salt, and pepper before coating the wings. They noted that the baking powder forms a delicate seal, allowing the wings to steam from within while crisping on the outside, which makes the meat incredibly tender and easy to pull straight from the bone.
Another highly insightful tip comes from u/humoroushaxor on r/smoking, who suggests combining the baking powder with cornstarch. By coating the wings in a mixture of baking powder, cornstarch, and salt before letting them air dry overnight, you achieve a noticeably different, more rigid crunch. Cornstarch has a low gelatinization temperature, which helps form a fragile but intensely satisfying crust alongside the blistering effect of the baking powder.
For those who enjoy diving into deep food science, Serious Eats has long been a champion of this exact method, extensively testing the pH changes and moisture loss to prove why this specific technique outshines traditional flour dredges. As user u/ThatAgainPlease correctly pointed out in a r/Cooking discussion, flour and baking powder serve entirely different purposes. Flour can trap steam and soften the skin, whereas baking powder actively alters the surface chemistry to encourage that sought-after blistering.
Troubleshooting: Common Pitfalls to Avoid
Even with a thoroughly reliable recipe, small missteps can compromise the final texture. Keep these common pitfalls in mind for your next batch:
Confusing Baking Powder with Baking Soda
This is a frequent and highly unfortunate error. Baking soda (sodium bicarbonate) is significantly more alkaline and much stronger than baking powder. If used as a coating, it will give the chicken an aggressively metallic, soapy taste and cause the surface proteins to break down far too quickly, resulting in an unpleasantly stringy texture. Always double-check your pantry to ensure you are holding baking powder.
Overcrowding the Pan
Chicken wings need adequate airflow to roast properly. If the wings are physically touching each other on the wire rack, the moisture they release will simply steam the adjacent wings. Ensure there is at least half an inch of open space between each piece to allow the hot oven air to do its job effectively.
The 90-Second Saucing Rule
You have invested substantial time and effort into building a flawless crust; do not lose it at the finish line. Tossing hot wings in a wet sauce too early allows the liquid to penetrate the crispy exterior, quickly turning it soggy. According to recent culinary discussions and tests, it is best to apply wet sauces (like classic Buffalo, honey garlic, or sticky teriyaki) immediately before serving—ideally within 90 seconds of consumption. If you are serving a crowd or hosting a gathering, consider serving the sauces on the side as dips to maintain the total integrity of the crunch.
Flavor Profiles and Dry Rubs
While the classic Buffalo sauce remains an undeniable staple, the beauty of the baking powder method is that it pairs wonderfully with a massive variety of dry rubs. Since the skin becomes so beautifully textured, a well-balanced dry rub can elevate the entire experience without the need for messy, sticky sauces.
Consider mixing a simple homemade lemon pepper rub using freshly cracked black pepper, granulated garlic, and dehydrated lemon zest. The bright citrus notes cut through the richness of the chicken fat brilliantly. Alternatively, a Nashville-style hot rub featuring cayenne, smoked paprika, and a touch of brown sugar provides a sweet and fiery kick that adheres perfectly to the textured, blistered skin.
When using dry rubs, you can either mix the spices directly into the baking powder coating before the overnight rest, or toss the freshly baked, steaming hot wings in the spice blend right as they come out of the oven. The residual heat and naturally rendered fat will help the spices bloom and stick perfectly to the surface.
Frequently Asked Questions
Can I use an air fryer instead of a conventional oven? Yes, the baking powder technique works wonderfully in an air fryer. Since air fryers circulate heat much more aggressively than a standard oven, you will need to reduce the temperature slightly and monitor the wings closely. Cook them at 360°F (180°C) for 15 minutes, flip them over, and then increase the heat to 400°F (200°C) for a final 5 to 10 minutes until perfectly golden.
Can I prepare these wings ahead of time for a party? Absolutely. The overnight resting period in the refrigerator is actually the best way to prep ahead. You can coat the wings in the baking powder mixture the day before your event, leaving you with nothing to do but pop them in the oven right before your guests arrive.
What if I do not have a wire cooling rack? While a wire rack is highly recommended for the best 360-degree crispness, you can easily improvise. Some home cooks tightly roll up small cylinders of aluminum foil and place them strategically under the wings to elevate them above the rendered fat. Just ensure the pan is not overcrowded and air can still pass underneath.
The Final Verdict
The baking powder technique is much more than just a fleeting internet trend; it is a scientifically sound, heavily tested method that fundamentally changes how we approach cooking poultry at home. By respecting the chemistry of the skin, controlling the moisture levels, and utilizing precise temperature changes, anyone can consistently produce wings that easily rival those from a high-end sports bar. The next time the craving for something savory and crunchy hits, simply leave the deep fryer in the cupboard, reach for the baking powder, and enjoy the perfect bite.