

Craft a Charming Crochet Mouse
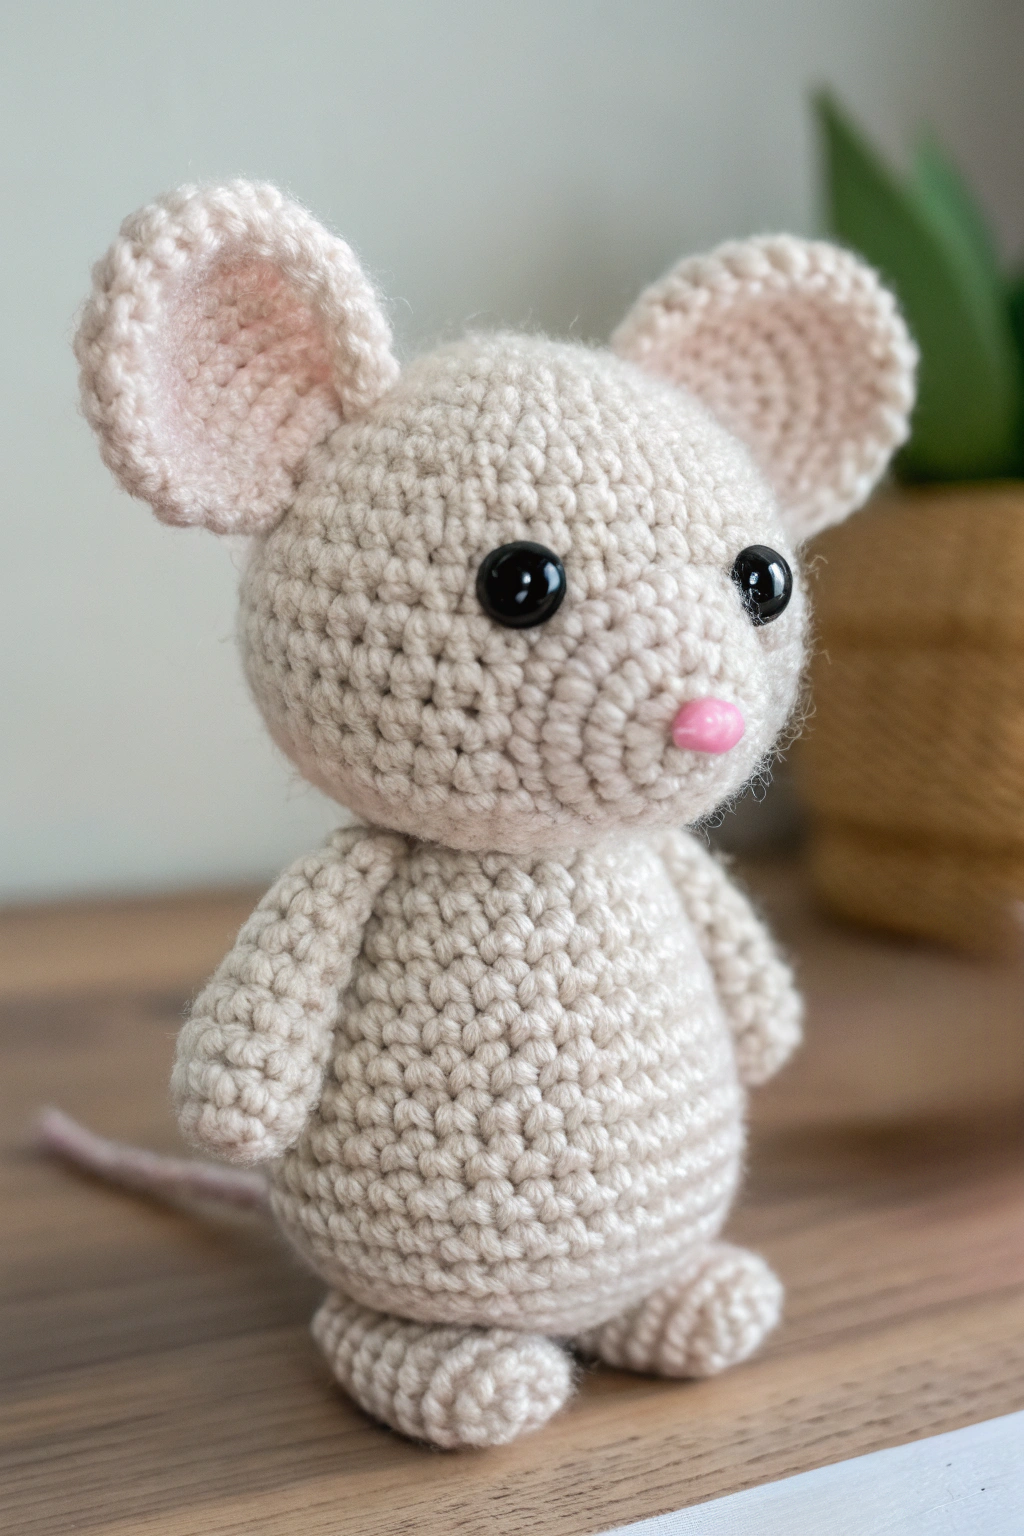
Have you ever looked at a handmade toy and felt a little spark of wonder? There’s something truly special about holding a soft, cuddly friend that was brought to life with just a hook and some yarn. This sweet little mouse, with its big ears and curious expression, is the perfect project to introduce you to the delightful world of amigurumi.
This guide is designed for anyone, even if you’ve never picked up a crochet hook before. We’ll go through every step together, explaining all the basics along the way. Before you know it, you’ll have fashioned your very own adorable mouse, ready for a spot on your shelf or to be given as a heartfelt gift.
What You’ll Need
To replicate the delicate, professional look in the photo, accurate materials are essential.
- 🧶 Yarn: Fine weight cotton yarn (Sport or Fingering weight). Do not use thick acrylic yarn, or the mouse will look clumsy. Colors: Light beige and soft pink.
- 🎀 Felt: A small piece of soft pink felt for the inner ears. This is key to achieving the smooth look in the photo. (Alternatively, you can use pink yarn).
- 🪝 Crochet Hook: A 2.0mm or 2.25mm hook. This small size is the secret to the tight, gap-free fabric seen in the image.
- ⚫ Safety Eyes: Two 8mm or 10mm black safety eyes.
- 👃 Nose: A tiny pink safety nose (or embroider it with pink thread).
- ☁️ Fiberfill Stuffing: High-quality stuffing.
- 🪡 Yarn Needle: For assembly.
- Stitch Marker: To keep track of your rounds.
- ✂️ Scissors
Getting to Grips with the Basics
The mouse in the photo requires specific techniques to achieve that seamless look.
- Working in a Spiral: Always work in continuous rounds. Use a stitch marker.
- Magic Ring (MR): Starts the piece without a hole.
- Yarn Under (The “X” Stitch): To get the texture in the photo, grab the yarn with your hook from underneath when making single crochet stitches. This creates an “X” shape rather than a “V”.
- I-Cord: A technique used for the tail to make a thin, round tube instead of a flat strap.
- Increase (inc) & Decrease (dec): Used to shape the mouse.
Let’s Begin! The Step-by-Step Pattern (Corrected)
We have completely rewritten the pattern below to create the true one-piece, seamless body shown in the photo. We will start at the nose, work up the head, and continue directly into the body without fastening off. This eliminates any sewing line between the head and body.
Head and Body (One-Piece Construction)
Start with Beige yarn.
- R1: Start 6 sc in a Magic Ring. (6)
- R2: [sc in next st, inc in next st] repeat 3 times. (9)
- R3: sc in each stitch around. (9)
- R4: [sc in next 2 st, inc in next st] repeat 3 times. (12)
- R5: sc in each stitch around. (12)
- R6: [sc in next st, inc in next st] repeat 6 times. (18) (Here the snout begins to widen into cheeks)
- R7: [sc in next 2 st, inc in next st] repeat 6 times. (24)
- R8: [sc in next 3 st, inc in next st] repeat 6 times. (30)
- R9: [sc in next 4 st, inc in next st] repeat 6 times. (36)
- R10: [sc in next 5 st, inc in next st] repeat 6 times. (42)
- R11-18: sc in each stitch around (8 rounds). (42)
- Important Step – Face: Insert the pink safety nose into the center of the Magic Ring (R1). Insert safety eyes between R7 and R8, spaced about 8-9 stitches apart.
- R19: [sc in next 5 st, dec] repeat 6 times. (36)
- R20: [sc in next 4 st, dec] repeat 6 times. (30)
- R21: [sc in next 3 st, dec] repeat 6 times. (24)
- R22: [sc in next 2 st, dec] repeat 6 times. (18)
- Stuff the head firmly, especially the snout. Do not fasten off. We now begin the body.
- R23: [sc in next 2 st, inc in next st] repeat 6 times. (24) (Body begins to widen)
- R24: [sc in next 3 st, inc in next st] repeat 6 times. (30)
- R25: [sc in next 4 st, inc in next st] repeat 6 times. (36)
- R26: [sc in next 5 st, inc in next st] repeat 6 times. (42)
- R27-31: sc in each stitch around (5 rounds). (42)
- R32: [sc in next 5 st, dec] repeat 6 times. (36)
- R33-34: sc in each stitch around (2 rounds). (36)
- R35: [sc in next 4 st, dec] repeat 6 times. (30)
- R36-37: sc in each stitch around (2 rounds). (30)
- R38: [sc in next 3 st, dec] repeat 6 times. (24)
- R39: [sc in next 2 st, dec] repeat 6 times. (18)
- Stuff the body firmly.
- R40: [sc in next st, dec] repeat 6 times. (12)
- R41: dec 6 times. (6)
- Fasten off, leaving a tail. Use a yarn needle to weave the tail through the final 6 stitches and pull tight to close the hole. Weave in the end.
The Ears (Corrected Method for Photo Accuracy)
(Make 2)
- R1: With Beige yarn, start 6 sc in a Magic Ring. (6)
- R2: inc in each stitch around. (12)
- R3: [sc, inc] x 6. (18)
- R4: [2 sc, inc] x 6. (24)
- R5: [3 sc, inc] x 6. (30)
- Fasten off, leaving a long tail for sewing. Make two beige pieces.
- Cut two circles from the pink felt that are slightly smaller than your crocheted pieces.
- Attach the felt circles to the center of the beige ears using fabric glue or a few small stitches with matching thread.
The Arms & Feet
Arms (Make 2):
- R1: 5 sc in Magic Ring. (5)
- R2: inc in each stitch around. (10)
- R3-8: sc in each stitch around (6 rounds). (10)
- Stuff lightly. Leave a long tail for sewing.
Feet (Make 2):
- R1: 6 sc in Magic Ring. (6)
- R2: inc in each stitch around. (12)
- R3: [sc, inc] x 6. (18)
- R4-6: sc in each stitch around (3 rounds). (18)
- R7: [sc, dec] x 6. (12)
- Stuff firmly. Leave a long tail for sewing.
The Tail (I-Cord Technique)
The tail in the photo is round and thin. We will use the I-Cord method.
- Leave a starting tail. Chain 3.
- Insert hook into 2nd ch, pull up a loop. Insert into 3rd ch, pull up a loop. (3 loops on hook).
- The Trick: Carefully drop the first 2 loops off the hook (pinch them so they don’t unravel!). Yarn over, pull through the 1 loop on hook. Put the 2nd loop back on hook, yarn over, pull through. Put the 3rd loop back on hook, yarn over, pull through.
- Repeat this process until the tail is the desired length. This creates a tiny knitted tube using a crochet hook.
Bringing Your Mouse to Life
- Assembly: Because the head and body were worked in one piece, the main assembly is already done, giving you that perfect seamless look!
- Ears: Sew the ears on the sides of the head, around R14-R19, giving them a slight curve forward.
- Limbs: Attach the arms to the sides of the body, just below the neck. Attach the feet to the bottom of the body so the mouse can sit up.
- Tail: Attach the delicate I-cord tail to the back of the body, near the bottom.
A Friend for Your Shelf
Take a moment to admire your handiwork. You’ve taken simple materials and transformed them into a charming, tangible character. Every stitch tells the story of the time and care you put in. This little mouse is more than just a toy; it’s a testament to your patience and newfound skill. We hope you enjoyed this journey and feel inspired to continue exploring the wonderful art of crochet.