
DIY Basket Weave Crochet Bag: The Complete Pattern (Just Like the Photo!)
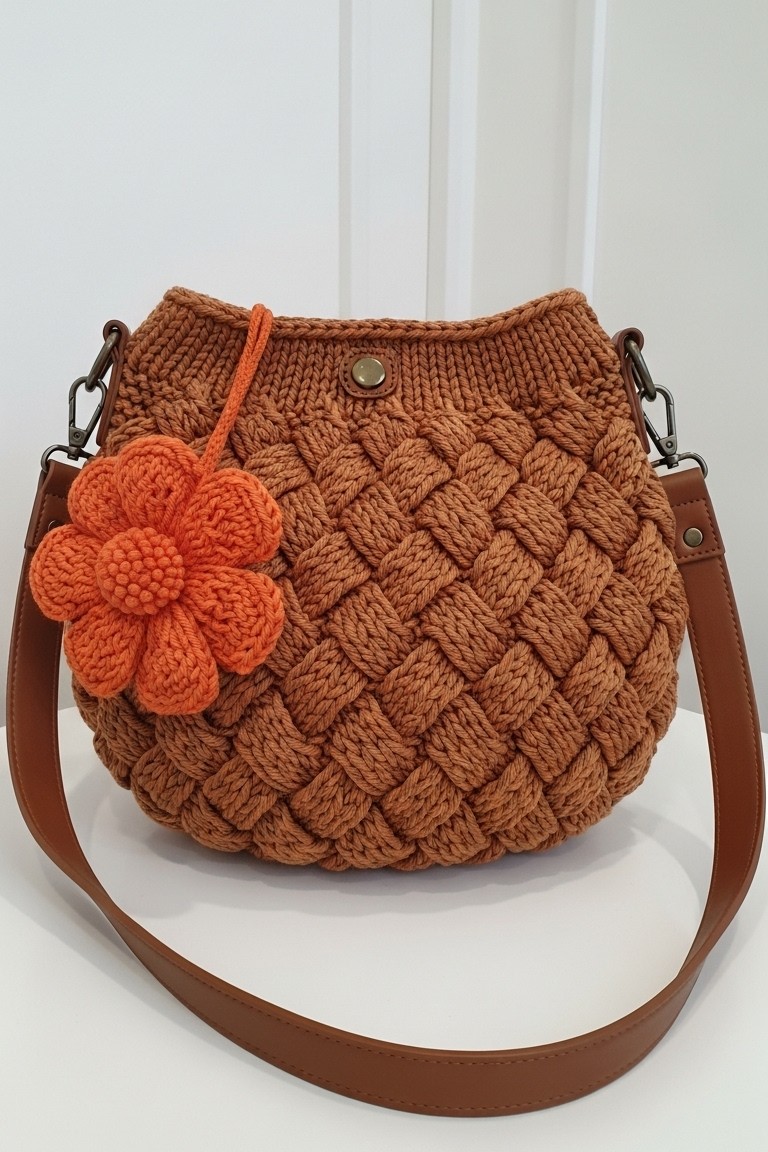
Have you ever spotted a stunning, textured handmade bag and wished you could create one just like it? If so, you’re in luck! This guide will walk you through crafting the exact terracotta brown crocheted bag from the picture, right down to its adorable orange flower detail. It’s an incredibly rewarding project, and our clear, step-by-step instructions ensure that even if you’re new to crochet, you’ll be able to make this beautiful piece. Just imagine the joy of using a gorgeous bag you crocheted yourself!
What You’ll Need to Make Your Bag
Gather these supplies, and you’ll be all set to begin:
- 🧶 Chunky Cotton Cord Yarn (Super Bulky, Category 6):
- Approx. 300-400 yards in a terracotta brown color (for the bag body).
- Approx. 50 yards in a bright orange color (for the flower charm).
- 🪝 Crochet Hook: Size 8.00 mm (L-11) or 9.00 mm (M/N-13) – check yarn label for recommendation, but a slightly larger hook can help with the basket weave texture.
- 🔗 Two D-rings: Approx. 1-1.5 inches wide.
- 👜 One Faux Leather Bag Strap: Brown, with clasps to attach to D-rings (as seen in the image).
- 🔒 One Magnetic Snap Closure: About 0.75 inches (18mm) in diameter.
- ✂️ Scissors
- 🪡 Yarn Needle (Tapestry Needle): For weaving in ends and assembly.
- 🧵 Sewing needle and thread (optional): Matching the bag color, for a very secure snap attachment, though yarn can also be used.
Getting Started: Essential Crochet Stitches
Before we dive into the bag itself, let’s get familiar with the stitches you’ll be using. Don’t worry, we’ll explain each one simply!
- Slip Knot: This is how you get the yarn onto your hook to begin. Make a loop with your yarn, then pull another loop through it with your hook and tighten. That first loop on your hook doesn’t count as a stitch.
- Chain Stitch (ch): Yarn over your hook (wrap the yarn from back to front over the hook) and pull that yarn through the loop already on your hook. That’s one chain stitch! We often make a series of these to start a project, called a foundation chain.
- Slip Stitch (sl st): Insert your hook into the indicated stitch, yarn over, and pull the yarn through both the stitch and the loop on your hook in one motion. It’s used for joining rounds or moving across stitches without adding height.
- Single Crochet (sc): Insert your hook into the stitch, yarn over and pull up a loop (you’ll have two loops on your hook). Yarn over again and pull through both loops on your hook. That’s a single crochet! It’s a short, dense stitch.
- Double Crochet (dc): Yarn over, insert your hook into the stitch, yarn over and pull up a loop (three loops on your hook). Yarn over and pull through the first two loops (two loops left on your hook). Yarn over again and pull through the remaining two loops. That’s a double crochet! It’s taller than a single crochet.
- Front Post Double Crochet (FPdc): Yarn over. Now, instead of inserting your hook into the top of the stitch from the row below, you insert your hook from front to back, then to front again around the vertical post (the body) of the indicated double crochet stitch from the previous row. Then, complete the double crochet as usual: yarn over, pull up a loop (three loops on hook), yarn over, pull through two loops, yarn over, pull through remaining two loops. This makes the stitch pop out on the front of your work.
- Back Post Double Crochet (BPdc): Yarn over. This time, you insert your hook from back to front, then to back again around the vertical post of the indicated double crochet stitch from the previous row. Then, complete the double crochet as usual. This makes the stitch recede to the back of your work.
Working in Rounds: For the bag’s base and body, we’ll be working in continuous rounds without turning our work, unless specified. You’ll typically join the end of a round to the beginning with a slip stitch.
Making the Bag Body: The Basket Weave Magic
The bag in the image has a sturdy, flat circular base and then transitions into the textured basket weave pattern for the sides. The rich terracotta brown yarn gives it a warm, earthy feel.
Bag Base (Worked in Terracotta Brown)
We’ll start with a magic ring for a neat, closed center. If you’re new to the magic ring (also called magic circle): Loop the yarn, insert hook into the loop, pull up a working loop, chain 1 (this ch 1 does not count as a stitch), then work your stitches into the main loop. Pull the tail end to close the circle tightly.
Round 1: Start with a magic ring. Ch 2 (counts as your first dc here and throughout the base). Work 11 dc into the magic ring. Sl st to the top of the beginning ch-2 to join. (12 dc) Round 2: Ch 2 (counts as first dc). Work 1 dc in the same stitch. Work 2 dc in each stitch around. Sl st to the top of the beginning ch-2. (24 dc) Round 3: Ch 2 (counts as first dc). Work 2 dc in the next stitch, 1 dc in the next stitch. Repeat from * to * around. Sl st to the top of the beginning ch-2. (36 dc) Round 4: Ch 2 (counts as first dc). Work 1 dc in the next stitch. Work 2 dc in the next stitch, 1 dc in each of the next 2 stitches. Repeat from * to * around, ending with 2 dc in the last stitch. Sl st to the top of the beginning ch-2. (48 dc) Round 5: Ch 2 (counts as first dc). Work 1 dc in each of the next 2 stitches. Work 2 dc in the next stitch, 1 dc in each of the next 3 stitches. Repeat from * to * around. Sl st to the top of the beginning ch-2. (60 dc)
Tip: Your base should be flat. If it starts to ruffle, you might have too many increases. If it cups, you might need more. The goal is a flat circle, approximately 6-7 inches in diameter. You can add another round of increases (e.g., 2 dc in next st, 1 dc in each of next 4 sts) if you want a wider bag. For the bag in the image, a 60-stitch round provides the ideal base for the basket weave pattern, as this count is perfectly divisible by 4 (for our 4-stitch blocks).
Bag Sides: The Basket Weave Pattern (Worked in Terracotta Brown)
Now for the gorgeous basket weave! This pattern is built using FPdc and BPdc. The body of the bag in the image uses blocks that are 4 stitches wide and appear to be 2 rows high before the pattern alternates.
Round 1 (Transition Round): Ch 2 (counts as first dc). Work 1 dc in each stitch around. Sl st to the top of the beginning ch-2. (60 dc)
Round 2 (Basket Weave Setup): Ch 2 (does not count as a stitch here and for the rest of the basket weave section). This ch-2 just brings the yarn up to height. Work 1 FPdc around each of the next 4 dc. Work 1 BPdc around each of the next 4 dc. Repeat from * to * all the way around. Sl st to the first FPdc of the round to join (not the ch-2). (60 sts: 30 FPdc, 30 BPdc, arranged in blocks of 4) Round 3: Ch 2. Work 1 FPdc around each of the next 4 FPdc. Work 1 BPdc around each of the next 4 BPdc. Repeat from * to * around. Sl st to the first FPdc to join. (60 sts) (You’re essentially working FPdc around the FPdc from the previous round, and BPdc around the BPdc.)
Round 4: Ch 2. Now we switch the blocks! Work 1 BPdc around each of the next 4 FPdc (from the previous round). Work 1 FPdc around each of the next 4 BPdc (from the previous round). Repeat from * to * around. Sl st to the first BPdc to join. (60 sts) Round 5: Ch 2. Work 1 BPdc around each of the next 4 BPdc. Work 1 FPdc around each of the next 4 FPdc. Repeat from * to * around. Sl st to the first BPdc to join. (60 sts)
Repeat Rounds 2-5 to build the basket weave body.
- For a result that closely matches the bag in the image: The photo shows 5 full alternations of the basket weave pattern. One “alternation” consists of Rounds 2-5 (which is 4 rounds total). Therefore, 5 alternations will be 20 rounds of basket weave in total (5 x 4 rounds = 20 rounds).
- This will create 5 distinct ‘raised’ (FPdc-dominant) basket weave block sections visible vertically on your bag.
- This total of 20 basket weave rounds should result in a height similar to the bag in the image, approximately 8-10 inches (20-25 cm) from the base before starting the top rim, depending on your yarn and tension.
- Tip: If you prefer a slightly taller or shorter bag, you can adjust by adding or subtracting one full alternation (4 rounds). However, for the look in the photo, aim for 5 full alternations (20 rounds of basket weave).
Troubleshooting Tip: Keep your tension even. Chunky yarn can be forgiving, but consistent stitches make the basket weave look its best. Count your stitches occasionally to ensure you still have 60.
Shaping the Top and Adding the Rim
The bag in the image has a slight curve inwards at the top and a distinct, dense, ribbed band.
Slight Shaping (Optional)
If you want a slight inward curve like the bag in the image, on your last round of basket weave (e.g., your 20th round if following the image), you can introduce a few subtle decreases. For example, instead of repeating the 4-stitch block 15 times (for 60 sts), you could make two of those blocks into 3-stitch blocks by skipping the last stitch of a BPdc section twice in the round, evenly spaced. This is a subtle change. For absolute simplicity, you can skip this and proceed directly to the rim.
Top Rim (Worked in Terracotta Brown)
The top rim is a dense, ribbed band, achieved by working slip stitch in the back loop only (sl st blo) in rows. This band is then attached to, or worked directly from, the top edge of the bag. We will work it directly.
Round 1 of Rim Prep: Ch 1 (does not count as a stitch). Work 1 sc in each stitch around the top edge of the bag. Sl st to the first sc to join. (60 sc, or slightly fewer if you decreased). This sc round gives a firm edge to work the rim from.
Now, we will work the rim in rows, back and forth, perpendicular to the bag opening. Row 1: Ch 6 (or desired width of the rim – the image shows a rim about 1.5-2 inches wide, so 6-8 chains should be good with chunky yarn). Row 2: Sl st in the 2nd ch from hook and in each ch back towards the bag (5 sl st if you chained 6). Crucially, work these slip stitches loosely, or you won’t be able to get your hook in for the next row! Sl st into the next two sc stitches on the bag top edge. Turn your work. Row 3: Skipping the 2 sl st on the bag edge, work 1 sl st in the back loop only (blo) of each of the 5 sl st from the previous row. Ch 1, turn. Row 4: Work 1 sl st in the blo of each of the 5 sl st. Sl st into the next two sc stitches on the bag top edge. Turn.
Repeat Rows 3 and 4 all the way around the top edge of the bag. When you get back to the beginning, finish your last row of sl st blo, then seam the first and last rows of the rim together using slip stitches or by sewing with a yarn needle for a neat finish. Fasten off and weave in ends.
Crafting the Adorable Flower Charm
This bright orange, multi-petaled flower charm is a lovely focal point. It features a distinctively textured, almost “bobble-like” spherical center and two layers of petals, adding a playful touch.
Flower Center (Bright Orange Yarn)
Round 1: Start with a magic ring. Ch 1 (does not count). Work 6 sc into the ring. Pull tail to tighten. Do not join yet, we’ll work in a spiral for a seamless look. (6 sc) Round 2: Work 2 sc in each sc around. (12 sc) Round 3: 1 sc in next st, 2 sc in next st. Repeat from * to * around. (18 sc) Round 4-5: Work 1 sc in each st around. (18 sc for 2 rounds) Tip for texture: To achieve the distinct, almost “bobble-like” texture for the flower center seen in the photo, work these sc stitches relatively snugly. The chunky nature of the yarn combined with snug stitches and later stuffing will help create this pronounced texture. Round 6 (Decrease): 1 sc in next st, sc2tog (single crochet two together – insert hook in next st, pull up loop, insert hook in following st, pull up loop, yarn over, pull through all 3 loops on hook). Repeat from * to * around. (12 sc) Optional: Add a tiny bit of stuffing or yarn scraps now if you want it more spherical. Round 7 (Decrease): Sc2tog around. (6 sc) Fasten off, leaving a long tail. Thread the tail through the front loops of the remaining 6 stitches and pull tight to close the opening. Weave in this end securely.
Flower Petals – First Layer (Bright Orange Yarn)
Petal Round 1 (Image Specific – Follow this for the exact look in the photo): Attach yarn to a stitch on Round 4 of the center. Ch 1, (1 sc, 3 dc, 1 sc) all in the next stitch on the flower center. Sl st into the stitch after that. Repeat this sequence around the flower center, making about 8-9 petals. After the last petal, sl st to the first sc.
Flower Petals – Second Layer (Bright Orange Yarn)
This layer is worked behind the first layer of petals. Petal Round 2: Looking at the back of the first petal layer, you’ll see the stitches of the flower center between where the petals emerge. Join yarn to one of these visible stitches from Round 4 of the center, behind a petal from the first layer. Ch 4 (this forms a ch-4 space). Sl st to a center stitch behind the next petal, effectively making a ch-4 loop behind the first petal layer. Repeat this around, making 8-9 ch-4 spaces. Sl st to the first ch-4 space to join. Now, work into these ch-4 spaces: In each ch-4 space around: (Sl st, ch 1, 1 sc, 1 hdc, 3 dc, 1 hdc, 1 sc, sl st). After the last petal, fasten off, leaving a long tail for attaching the cord. Weave in the starting end.
Flower Cord (Bright Orange Yarn)
Ch a length of about 6-8 inches. Fasten off, leaving tails at both ends. Thread one tail of the cord through the back of the flower center and secure it. The other end will be used to tie the flower to the bag.
Finishing Touches: Assembly and Hardware
Your beautiful bag is almost complete!
- Attach D-ring Tabs:
- With terracotta brown yarn, ch 5.
- Row 1: Sc in 2nd ch from hook and in each ch across. (4 sc) Ch 1, turn.
- Rows 2-5 (or until long enough to fold over D-ring comfortably): Sc in each st across. Ch 1, turn.
- Fasten off, leaving a long tail for sewing. Make two of these tabs.
- Fold one tab over a D-ring. Position it on the outside of the bag, just below the ribbed rim on one side seam (or where a seam would be). Sew it securely to the bag using the yarn tail and tapestry needle. Repeat for the other D-ring on the opposite side.
- Sew in Magnetic Snap:
- Position the two halves of the magnetic snap on the inside of the top rim, centered. Ensure they align perfectly.
- Using the prongs (if your snap has them, push through the fabric and bend them down) or by sewing through the holes on the snap with matching yarn or strong thread, attach each half firmly to the inside of the ribbed top band.
- Attach Flower Charm:
- Using the free end of the flower’s cord, tie the flower securely to one of the D-ring tabs or to the base of the strap, as seen in the image. You can make a small bow or a secure knot.
- Attach Strap:
- Clip your purchased faux leather strap onto the D-rings.
- Weave in All Ends:
- Carefully weave in any remaining yarn tails on the inside of the bag and flower using your tapestry needle.
Your Masterpiece is Ready!
And there you have it! Stand back and admire the gorgeous basket weave bag you’ve brought into being. The rich texture, the sturdy form, and that pop of floral color make this a truly special accessory. Each stitch tells a story of your patience and developing skill.
Now, go ahead and fill it with your essentials. You’ve not just made a bag; you’ve fashioned a piece of wearable art. We’d absolutely love to see your finished bags! Feel free to share pictures of your handiwork. Happy crocheting on your next project!