
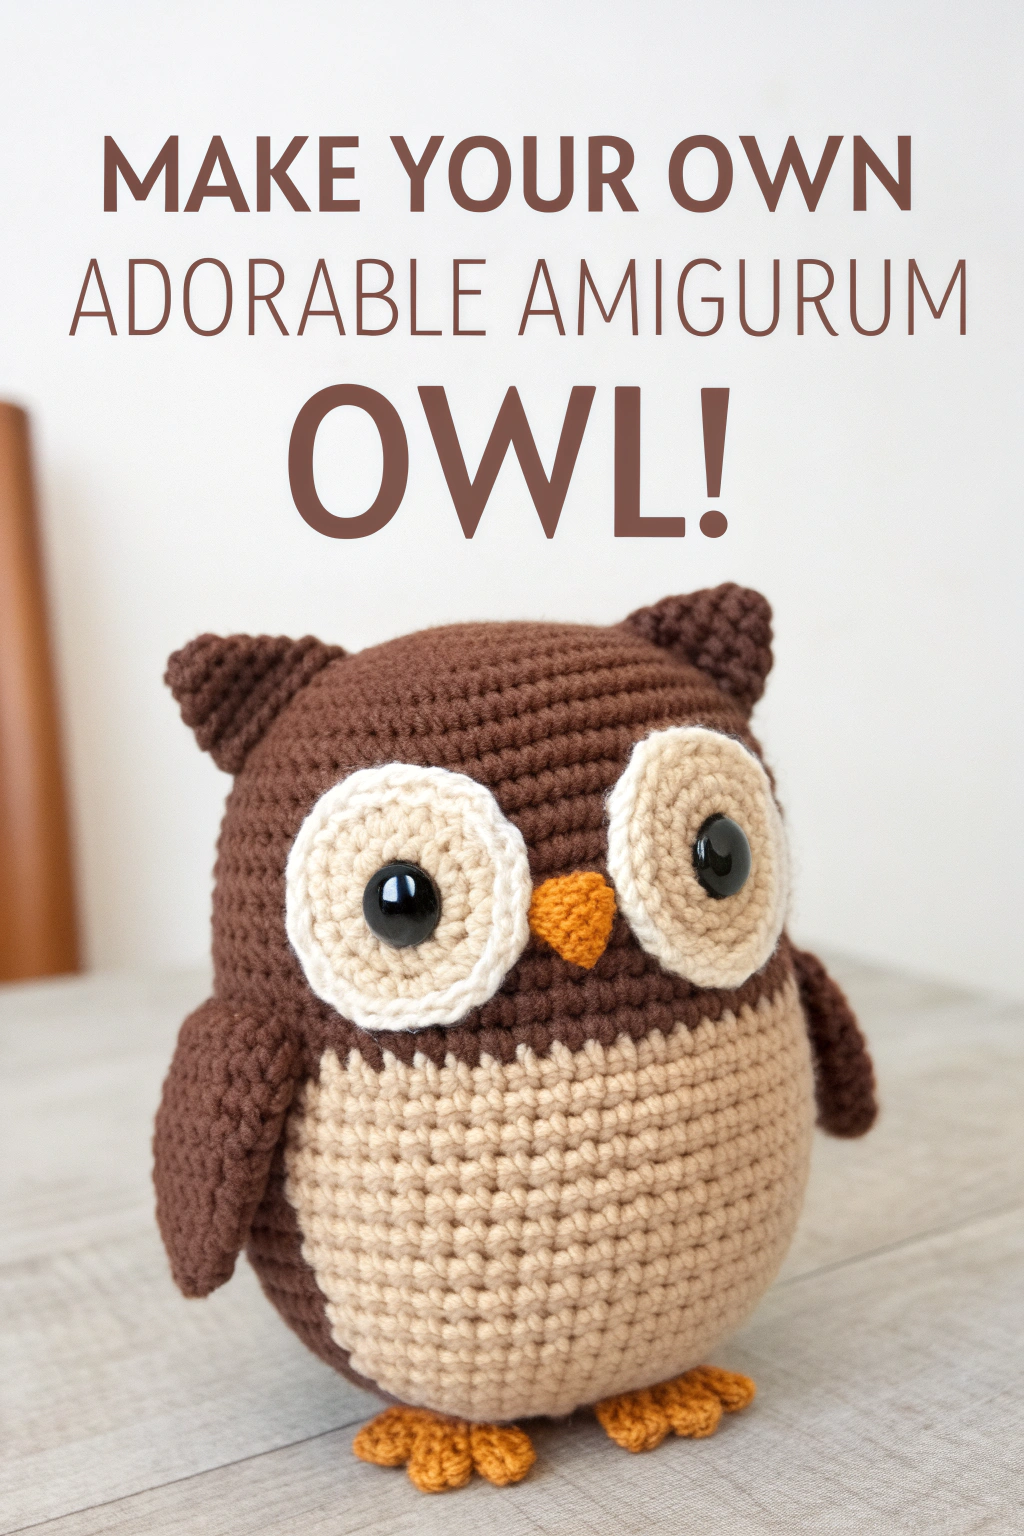
Crochet Your Own Adorable Owl Friend!
Hello fellow crafters! Are you ready to dive into the wonderfully cozy world of amigurumi? Today, we’re going to make the most charming little owl you’ve ever seen – completely by hand! If you’ve always wanted to try crochet but felt a little intimidated, don’t worry! This guide is designed just for you, even if you’ve never held a crochet hook before. We’ll take it slow and steady, step by step, and before you know it, you’ll have a delightful, handmade owl to call your own. Get ready to experience the pure joy of making something beautiful with your own two hands – it’s truly rewarding!
Materials You’ll Need to Get Started
Before we begin our fun crafting journey, let’s gather all the materials we’ll need. Having everything ready will make the making process smooth and enjoyable. For this adorable owl, you will need:
- Yarn: You’ll need yarn in a few different colors. Look at the image – we need a main brown color for the body, head, wings, and ears. For the owl’s lighter-colored belly, you’ll need a beige color. We also need light beige for the inner eye patches, a clean white (or off-white) for the eye borders, and a bright orange for the beak and feet. A soft, medium-weight yarn (like worsted weight cotton or acrylic) is perfect for beginners.
- Crochet Hook: The size of your crochet hook depends on your yarn. Check the yarn label for a recommended hook size. For medium-weight yarn, a 3.5mm or 4.0mm crochet hook is usually a good starting point.
- Stitch Markers: These little helpers are essential for keeping track of your rounds, especially when you’re just starting out. They’re like little flags that mark your place!
- Safety Eyes: We’ll use black safety eyes to give your owl its adorable gaze. A size around 9mm or 10mm usually looks great for an owl of this size.
- Stuffing: You’ll need fiberfill stuffing to give your owl its plump, huggable shape.
- Tapestry Needle: This is a large, blunt needle used for weaving in yarn ends and sewing pieces together.
- Scissors: For cutting your yarn.
Getting Ready: Understanding Basic Crochet Stitches
If you’re completely new to crochet, don’t fret! We’ll start with the very basics. Crochet uses a hook to pull loops of yarn through other loops, forming fabric. Here are the essential stitches and techniques we’ll use:
- Making a Slip Knot: This is how you get the yarn onto your hook to begin.
- Chain Stitch (ch): The foundation of many crochet projects.
- Single Crochet (sc): A basic, short stitch that forms a dense fabric, perfect for amigurumi.
- Double Crochet (dc): A taller stitch used to form shapes, like our owl’s feet. To make one: Yarn over, insert your hook into the stitch, yarn over and pull up a loop (you’ll have 3 loops on your hook). Yarn over and pull through the first two loops. Yarn over again and pull through the final two loops.
- Increase (inc): Making two single crochet stitches in the same stitch to make your work wider.
- Decrease (dec): We’ll use the invisible decrease to make the work narrower. Insert your hook into the front loop only of the next two stitches, then complete a single crochet as normal.
- Changing Colors: To make the owl’s belly, you’ll switch colors mid-round. To switch from brown to beige, work the last stitch in brown until you have two loops left on your hook. Drop the brown yarn, yarn over with the beige yarn, and pull it through the two loops to complete the stitch. You are now ready to work with beige.
- Slip Stitch (sl st): A stitch used to join rounds or make a flat, neat edge.
- Magic Ring (or Magic Circle): The best way to start crocheting in the round without a hole in the center.
Let’s Make the Amigurumi Owl: Step-by-Step Instructions
Now for the exciting part – let’s craft our adorable owl! We’ll start from the bottom up, forming the main body and head as one continuous, egg-shaped piece. Remember to refer to the image frequently to see how each part looks.
Making the Owl’s Main Body and Head
We’ll start with the brown yarn. The belly is made by switching to beige yarn for the front section of certain rounds.
- Round 1: Start with a magic ring. Make 6 single crochet (sc) stitches into the magic ring using brown yarn. Pull tight. (6 stitches)
- Round 2: (Brown) Increase (inc) in each stitch around. (12 stitches)
- Round 3: (Brown) [Sc in the next stitch, inc in the next stitch]. Repeat around. (18 stitches)
- Round 4: (Brown) [Sc in the next 2 stitches, inc in the next stitch]. Repeat around. (24 stitches)
- Round 5: (Brown) [Sc in the next 3 stitches, inc in the next stitch]. Repeat around. (30 stitches)
- Round 6: (Brown) [Sc in the next 4 stitches, inc in the next stitch]. Repeat around. (36 stitches)
- Round 7: (Brown) [Sc in the next 5 stitches, inc in the next stitch]. Repeat around. (42 stitches)
- Rounds 8-19 (12 rounds total): Now we will build the body’s height and the wide beige belly to match the photo’s round shape. In each of these 12 rounds, you will follow this exact color pattern: work 12 sc in brown, switch to beige and work 18 sc in beige, then switch back to brown and work the final 12 sc in brown. (42 stitches per round)
- Rounds 20-27 (8 rounds total): Cut the beige yarn, leaving a tail to weave in later. Continue with brown yarn only. Sc in each stitch around. (42 stitches) Note: This extended section forms the tall forehead, providing plenty of space to place the large eyes without them looking crowded.
- Round 28: [Sc in the next 5 stitches, decrease (dec)]. Repeat around. (36 stitches)
- Round 29: [Sc in the next 4 stitches, dec]. Repeat around. (30 stitches)
- Round 30: [Sc in the next 3 stitches, dec]. Repeat around. (24 stitches) Start stuffing the body firmly.
- Round 31: [Sc in the next 2 stitches, dec]. Repeat around. (18 stitches)
- Round 32: [Sc in the next stitch, dec]. Repeat around. (12 stitches) Finish stuffing the head.
- Round 33: Decrease (dec) in each stitch around. (6 stitches)
Cut yarn, leaving a long tail. Weave the tail through the front loops of the final 6 stitches and pull tight to close. Secure and hide the end.
Making the Eye Patches (x2)
These are made with two colors. To get the thick white border seen in the photo, we will use single crochet stitches for the final round.
- Start with light beige yarn.
- Round 1: Magic ring, 6 sc into ring. (6 stitches)
- Round 2: Increase (inc) in each stitch around. (12 stitches)
- Round 3: [Sc in the next stitch, inc]. Repeat around. (18 stitches)
- Change to white yarn.
- Round 4: [Sc in the next 2 stitches, inc]. Repeat around. (24 stitches) This makes the distinct white frame.
- Finish off, leaving a long white tail for sewing. Make two.
Adding the Eyes
Insert the safety eyes into the center of each completed eye patch before sewing them on. Secure them tightly on the back. Then, using the photo for placement, sew the eye patches securely onto the owl’s face (the brown forehead area you made in Rounds 20-27) using their white yarn tails.
Making the Beak
This is a small, flat triangle, just like in the photo. Use orange yarn.
- Row 1: Chain 3. Starting in the 2nd chain from the hook, sc in the next 2 chains. (2 stitches) Ch 1, turn.
- Row 2: Make one decrease (dec). (1 stitch)
- Finish off, leaving a tail for sewing. Sew the beak between and slightly overlapping the bottom of the eye patches.
Making the Wings (x2)
Use brown yarn. Make two.
- Round 1: Magic ring, 6 sc into ring. (6 stitches)
- Round 2: Increase (inc) in each stitch around. (12 stitches)
- Round 3: [Sc in the next stitch, inc]. Repeat around. (18 stitches)
- Rounds 4-7: Sc in each stitch around. (18 stitches for 4 rounds)
- Round 8: [Sc in the next stitch, dec]. Repeat around. (12 stitches)
- Finish off, leaving a long tail for sewing. Do not stuff. Flatten the wings and sew them to the sides of the body as shown in the picture.
Making the Ears (x2)
Use brown yarn. Make two. These are cone-shaped to match the photo.
- Round 1: Magic ring, 4 sc into ring. (4 stitches)
- Round 2: [Sc in the next stitch, inc]. Repeat twice. (6 stitches)
- Round 3: [Sc in the next stitch, inc]. Repeat around. (9 stitches)
- Round 4: [Sc in the next 2 stitches, inc]. Repeat around. (12 stitches)
- Round 5: Sc in each stitch around. (12 stitches)
- Finish off, leaving a tail for sewing. Flatten the ears slightly and sew them to the top of the head, positioned as in the photo.
Making the Feet (x2)
This makes the small, three-toed look from the photo in one simple piece. Use orange yarn. Make two.
- Round 1: Start with a magic ring. In the ring, work the following sequence three times: [Chain 2, make 2 double crochet (dc), chain 2, slip stitch].
- After the third repeat, pull the magic ring tail tight to close and form the three toes.
- Finish off, leaving a long tail for sewing. Sew the completed feet to the bottom front of the owl’s body.
Finishing Touches
Once all the pieces are sewn together, it’s time for the final touches! Weave in all loose yarn ends using your tapestry needle, carefully hiding them inside the owl. Make sure all parts are securely attached. Give your owl a gentle squeeze and admire your wonderful handmade amigurumi owl!
You Did It!
Congratulations! You’ve just made your very own adorable amigurumi owl! Wasn’t that fun? You took yarn and a hook and transformed them into this charming little friend. The joy of making something with your own hands is truly special, and you should be incredibly proud of yourself. Now that you’ve developed these skills, imagine all the other amazing things you can craft! Don’t stop here – keep exploring the wonderful world of crochet. We would absolutely love to see your finished owls! Please share photos of your finished owls online and tag us – we can’t wait to see your unique, handmade owls come to life! Happy crafting!
Guten Tag. Häkel ihr Eule nach bei mir kommt der Kopf zu klein vor. LG Iris Liesert
Hallo Iris, vielen Dank für deinen lieben Kommentar und dass du unsere Anleitung ausprobiert hast! Du hast erwähnt, dass der Kopf bei deiner Eule zu klein wirkt. Wir möchten dir gerne ein paar Tipps geben, die dabei helfen könnten. Der Körper und der Kopf unserer Eule sind, wie auf dem Foto zu sehen, als ein durchgehendes, eiförmiges Stück konzipiert. Der Kopf entsteht also durch die Abnahmerunden am oberen Ende des Körpers. Der wichtigste Trick bei solchen Amigurumi-Figuren ist oft das Ausstopfen. Wenn man das Spielzeug, besonders den oberen Bereich, nicht fest und gleichmäßig genug ausstopft, kann der Kopf kleiner und flacher aussehen, als er sollte. Wir empfehlen dir, zu versuchen, noch etwas mehr Füllwatte hinzuzufügen und die Form gut auszuarbeiten. Das bringt die Proportionen meistens genau richtig zur Geltung. Wir hoffen, das hilft dir weiter! Wir würden uns riesig freuen, deine fertige Eule zu sehen. Liebe Grüße.
The pattern is inaccurate. After row 23 how many more rounds should be done before you start decreasing to form the head? When I saw the picture and pattern I was so excited about it and started right away. Now I’m confused and can’t proceed further. Please help! Thank you in advance.
Sharlene
Hi Sharlene,
Thank you so much for your excellent question! You’ve pointed out a key step for getting the proportions just right for that perfectly round and cute shape in the photo.
To achieve that look, we’ve clarified the pattern: the main body section is best worked for a total of 9 rounds (from Round 8 to 16). After completing Round 16, you can proceed directly with the decrease rounds to shape the head.
The main post has been updated with this clarification to ensure everyone gets the best result. We hope this helps you finish your adorable owl!
Happy crafting!
Thank you for your response but that does not change anything. After you change from beige back to the brown how many rows do you do with just the brown before you start decreasing?
8 rows hen shapé as pattern . Annoying