
Dreamy Cheesecake Crumble Cake
Discover the joy of baking with a dessert that brings together the best of three worlds: a soft cake base, a rich cheesecake middle, and a crunchy, buttery crumble topping. This beautiful cake, with its distinct layers and a final flourish of chocolate drizzle, is a wonderfully satisfying project for any home baker. It’s the perfect centerpiece for a family gathering or a sweet treat to enjoy with a warm drink.
What Makes This Cake Special?
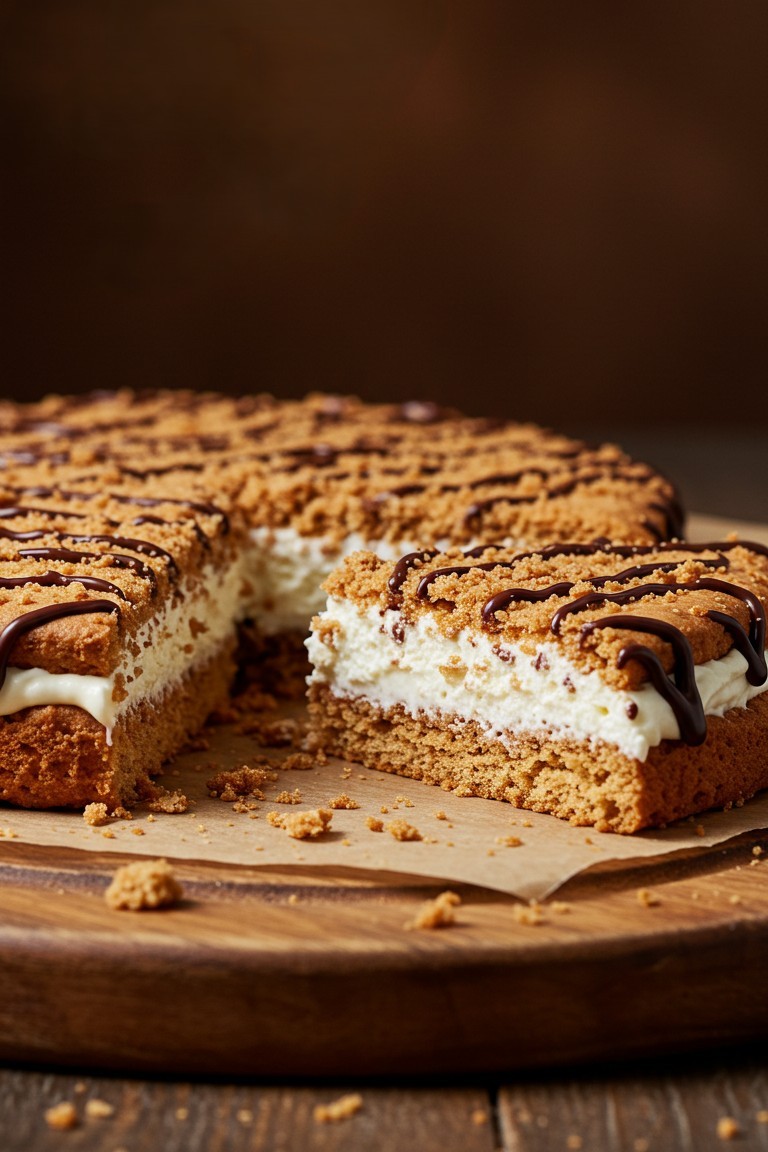
The appeal of this dessert lies in its layers of texture and flavor. It all begins with a tender, golden-brown cake base that is soft and flavorful. On top of that rests a generous, thick layer of smooth and luscious cheesecake filling, offering a cool, creamy contrast. The entire cake is crowned with a rustic, golden crumble and finished with elegant drizzles of dark chocolate. Each bite is a delightful experience.
Kitchen Essentials
- 🥣 Two large mixing bowls
- 🥄 A spatula or wooden spoon
- ⚡️ An electric hand mixer or stand mixer
- 🍰 A 9-inch (23 cm) round springform pan
- 📜 Parchment paper
- 📏 Measuring cups and spoons
- ♨️ A small, heatproof bowl for melting chocolate
Necessary Ingredients
For the Cake Base & Crumble Topping:
- 🧈 1 cup (227g) unsalted butter, softened to room temperature (ensure it is a halal variety)
- 🟤 ½ cup (100g) packed light brown sugar
- 🍚 ½ cup (100g) granulated sugar
- 🥚 1 large egg, at room temperature
- 🍦 1 teaspoon vanilla extract
- 🌾 2 ½ cups (300g) all-purpose flour
- 🥄 1 teaspoon baking powder
- 🧂 ¼ teaspoon salt
For the Cheesecake Filling:
- 🧀 16 oz (452g) full-fat block cream cheese, softened to room temperature (ensure it is a halal variety)
- 🥛 ¼ cup (60ml) heavy whipping cream (ensure it is a halal variety)
- 🤍 ¾ cup (90g) confectioners’ sugar (also known as powdered sugar)
- 🍦 1 teaspoon vanilla extract
For the Chocolate Drizzle:
- 🍫 2 oz (57g) good-quality dark chocolate, chopped (ensure it is a halal variety)
Step-by-Step Guide to a Perfect Crumble Cake
This recipe is broken down into four simple parts to guide anyone through the process, ensuring a beautiful result just like the one in the photograph.
Part 1: Preparing the Crumble Dough (for Base & Topping)
This clever recipe uses a single dough for both the bottom cake layer and the top crumble, which makes the process much simpler.
- Begin by preheating the oven to 350°F (175°C). Prepare the 9-inch springform pan by lining the bottom with parchment paper and lightly greasing the sides. The parchment paper, just like in the photo, makes it easy to lift and serve the cake later.
- In a large mixing bowl, combine the softened butter, brown sugar, and granulated sugar. Using an electric mixer, beat them together on medium speed for about 2-3 minutes. This technique is called creaming, and it’s done when the mixture is visibly lighter in color and has a fluffy texture. This step is key for a tender cake base.
- Add the egg and vanilla extract to the bowl. Beat again until they are just combined. Scrape down the sides of the bowl with a spatula to make sure everything is mixed in evenly.
- In a separate bowl, whisk together the flour, baking powder, and salt. Add this dry mixture to the wet ingredients in two batches, mixing on low speed until a crumbly, sandy dough forms. A very important tip: do not overmix here! Mixing just until the flour disappears will keep the cake tender and the crumble perfectly crumbly.
- Set aside about 1 ½ cups of this crumble mixture. This will be the topping. Take the rest of the dough and press it firmly and evenly into the bottom of the prepared springform pan to form the base layer.
Part 2: Assembling the Luscious Cheesecake Filling
A smooth, lump-free filling is the goal. Using room temperature ingredients is the secret to achieving that perfect, creamy texture.
- Wipe out the mixing bowl (or use a new one) and add the softened cream cheese. Beat on medium speed for about 2 minutes until it’s completely smooth and has no lumps.
- Add the confectioners’ sugar and vanilla extract, and mix on low speed until combined. Then, increase the speed to medium and beat for another minute until the mixture is smooth and glossy.
- Pour in the heavy cream and continue to beat on medium speed for 1-2 minutes, just until the filling is thick, spreadable, and holds its shape. Be careful not to overwhip.
Part 3: Building and Baking the Cake
Now it’s time to put all the components together to build the beautiful, layered cake.
- Spoon the cheesecake filling over the pressed base in the pan. Use the back of a spoon or a small offset spatula to spread it into a thick, even layer, reaching all the way to the edges. This forms the substantial white layer seen in the finished cake.
- Take the 1 ½ cups of crumble mixture that was set aside earlier. Use your fingers to sprinkle it evenly over the top of the cheesecake filling. The rustic, uneven texture of this crumble is what gives the cake its signature look.
- Place the pan on a baking sheet (to catch any potential drips) and bake in the preheated oven for 45-55 minutes. The cake is done when the crumble topping is a beautiful golden brown and the edges of the cake are slightly pulled away from the sides of the pan. The center should be mostly set, with only a very slight wobble.
- Once baked, remove the cake from the oven and let it cool completely in the pan on a wire rack. This is a crucial step; cutting into a warm cheesecake will result in a messy slice. For best results, chill the completely cooled cake in the refrigerator for at least 4 hours, or preferably overnight.
Part 4: The Finishing Touch – Chocolate Drizzle
This final step adds a touch of elegance and a lovely chocolate flavor that complements the cake perfectly.
- Once the cake is fully chilled, prepare the chocolate drizzle. Place the chopped dark chocolate in a small, microwave-safe bowl. Microwave in 15-second intervals, stirring in between, until the chocolate is melted and smooth. Alternatively, melt it gently over a double boiler (a heatproof bowl set over a saucepan of simmering water).
- Using a fork or a spoon, drizzle the melted chocolate back and forth over the top of the cake, forming the fine, wavy lines seen in the photograph.
- Allow the chocolate to set for about 10-15 minutes before slicing and serving.
There is such a deep satisfaction in presenting a homemade dessert, and this one is a true reward for your efforts. When that first slice is lifted to reveal the perfect, distinct layers, it’s a moment of pure baking success. Give this wonderful recipe a try, and enjoy sharing the beautiful results of your work.