
Dreamy Chocolate Ganache Cheesecake
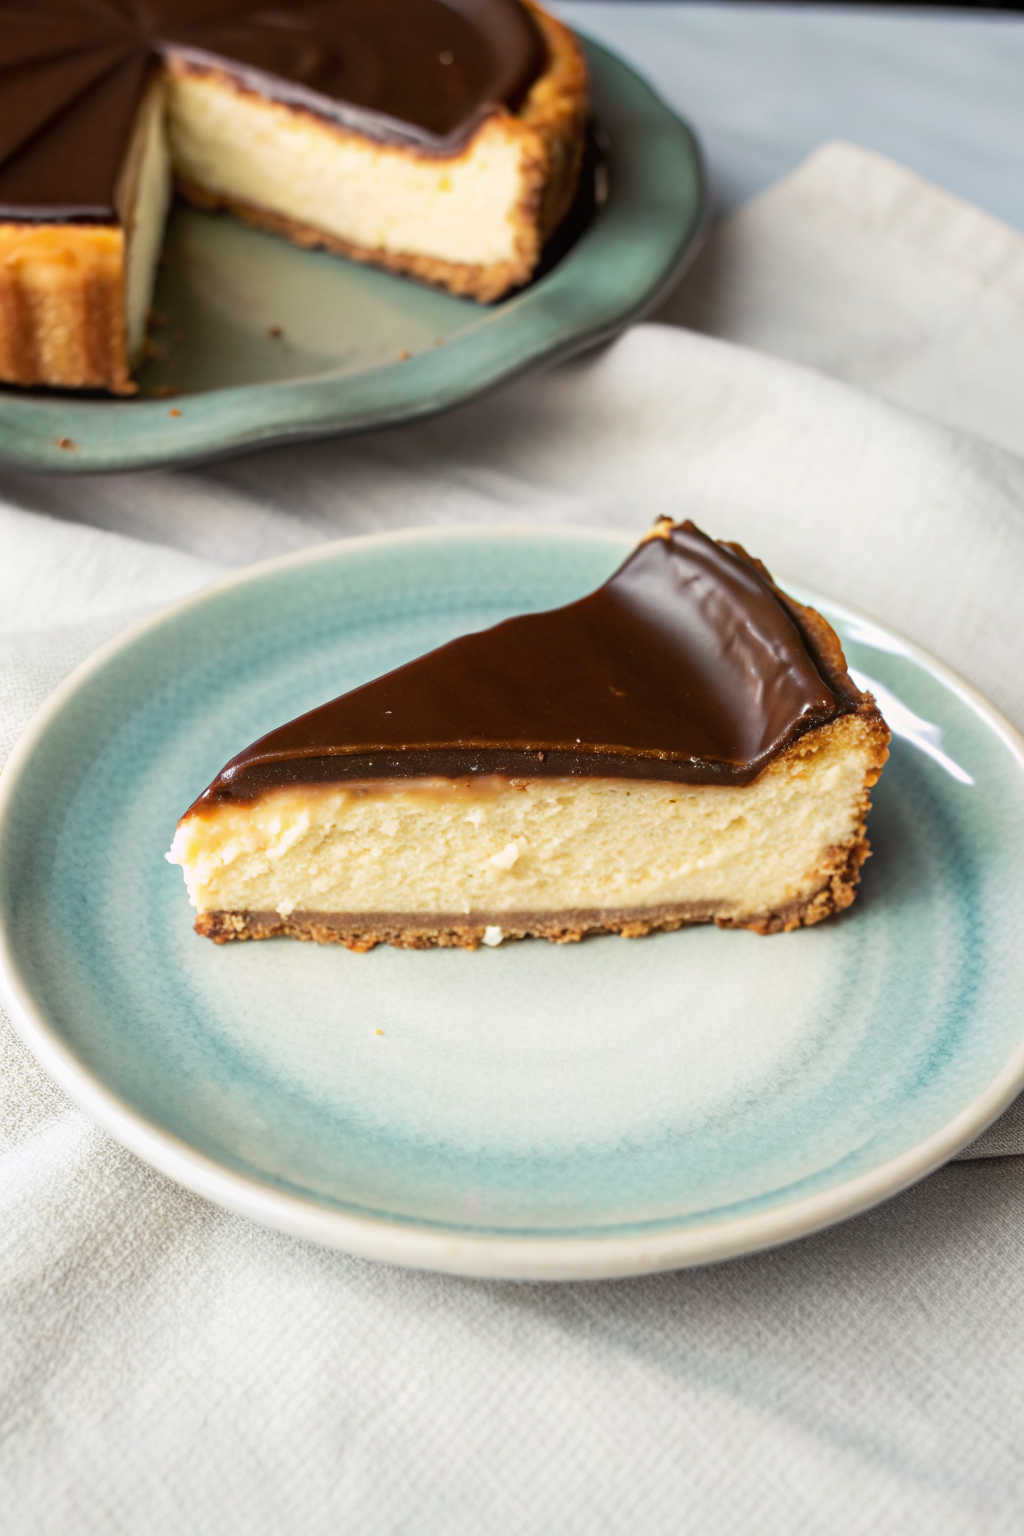
A slice of pure bliss sits on a beautiful teal plate—a testament to what home baking can achieve. This stunning dessert is composed of three perfect layers: a firm, golden-brown biscuit crust, a thick and velvety cheesecake filling, and a flawless, glossy chocolate ganache topping that shines with promise.
For anyone new to baking, a cheesecake might seem like a lofty goal, but it’s really a wonderful journey of simple techniques coming together. Following these steps carefully will guide any beginner to prepare this exact showstopper. The reward is a rich, decadent dessert that brings a special kind of satisfaction, perfect for sharing with family and friends.
What’s Needed for This Masterpiece
Kitchen Tools
- 🥣 A few mixing bowls (large, medium, and small)
- 🥄 A spatula and a whisk
- 🔌 An electric mixer (handheld or stand mixer)
- 🥧 A 9-inch (23 cm) springform pan (this is a pan with removable sides, which is key for a perfect cheesecake)
- 📏 Measuring cups and spoons
- 🍳 A small saucepan
- 🔥 A roll of heavy-duty aluminum foil
Halal Ingredients
For the Golden Crust:
- 🍪 1 ½ cups (about 150g) of finely crushed digestive biscuits or graham crackers
- 🧈 6 tablespoons (85g) of unsalted butter, melted
- 🍚 2 tablespoons of granulated sugar
For the Velvety Filling:
- 🧀 32 ounces (900g) of full-fat halal block cream cheese, softened to room temperature
- 🍚 1 cup (200g) of granulated sugar
- 🥛 ½ cup (120g) of halal sour cream, at room temperature
- 💧 1 teaspoon of pure vanilla extract (alcohol free)
- 🥚 4 large eggs, at room temperature
For the Glossy Chocolate Ganache:
- 🍫 4 ounces (115g) of good-quality halal semi-sweet chocolate, finely chopped
- 🥛 ½ cup (120 ml) of heavy whipping cream
Assembling the Cheesecake: Step by Step
This recipe is built in three parts. Patience is the secret ingredient here, especially when it comes to cooling!
Part 1: The Golden Biscuit Crust
- Preheat the oven to 350°F (175°C).
- In a medium bowl, combine the finely crushed biscuits and the granulated sugar. Pour the melted butter over the crumbs and mix with a fork until all the crumbs are evenly moistened, like wet sand.
- Tip the buttery crumbs into the springform pan. Press them down firmly and evenly across the bottom and slightly up the sides of the pan. A flat-bottomed glass or measuring cup is a great tool for getting a compact, even crust.
- Bake the crust for 10 minutes. This pre-baking step helps it become firm and golden. Once baked, set the pan on a wire rack to cool while you prepare the filling.
Part 2: The Creamy Cheesecake Filling
Before starting, it’s very important to understand what room temperature means for your ingredients. It means taking the cream cheese, sour cream, and eggs out of the refrigerator about 1-2 hours before you begin. This is a non-negotiable step for a smooth, lump-free cheesecake filling. Cold cream cheese will not blend smoothly, no matter how much you mix it.
- In a large bowl, using an electric mixer on low speed, beat the softened cream cheese until it is completely smooth and creamy. Scrape down the sides and bottom of the bowl with a spatula to make sure there are no lumps hiding.
- With the mixer still on low, gradually add the granulated sugar and beat until just combined.
- Add the sour cream and vanilla extract, mixing on low speed until they are blended in.
- Add the eggs one at a time, mixing on low speed only until the yellow yolk disappears into the batter after each addition. Do not over-mix once the eggs are in! Over-mixing incorporates too much air, which can cause the cheesecake to puff up and then crack as it cools.
- Now, it’s time to prepare for a water bath, also known as a bain-marie. This technique uses steam to bake the cheesecake gently, ensuring an even, creamy texture and preventing cracks. Tightly wrap the outside of your springform pan (bottom and sides) with a few layers of heavy-duty aluminum foil to make it waterproof.
- Pour the cheesecake filling over the cooled crust in the foil-wrapped pan and smooth the top with a spatula.
- Place the springform pan into a larger roasting pan. Carefully pour hot water into the roasting pan until it comes about halfway up the sides of the cheesecake pan.
- Very carefully, place the entire setup into the preheated oven. Bake for 55-70 minutes. The cheesecake is done when the edges are set, but the center still has a slight wobble (it shouldn’t be liquid, but should jiggle like gelatin).
- Turn the oven off, but leave the cheesecake inside with the oven door cracked open for 1 hour. This slow cooling process is another key step to prevent cracking.
- Remove the cheesecake from the water bath, take off the foil, and let it cool completely on a wire rack at room temperature. Once cool, cover it with plastic wrap and chill in the refrigerator for at least 6 hours, but preferably overnight. The cheesecake must be completely cold before you add the topping.
Part 3: The Glossy Chocolate Ganache
A ganache is a wonderfully simple and luxurious mixture of just chocolate and cream.
- Place the finely chopped chocolate in a heatproof bowl.
- Gently heat the heavy cream in a small saucepan over medium-low heat until it just begins to simmer around the edges. Don’t let it come to a rolling boil.
- Pour the hot cream directly over the chopped chocolate. Let it sit undisturbed for 5 minutes. This allows the hot cream to melt the chocolate gently.
- After 5 minutes, slowly whisk the mixture, starting from the center and working your way out, until it becomes a completely smooth, dark, and glossy ganache.
- Pour the ganache over the top of the chilled cheesecake. Gently tilt the pan to spread the ganache into an even layer that covers the entire surface, just like in the photograph.
- Return the cheesecake to the refrigerator for at least 1 hour, or until the ganache is firm to the touch.
Serving This Work of Art
To get those clean, perfect slices seen in the picture, dip a long, sharp knife in hot water and wipe it dry before each cut. The hot blade will slice cleanly through the ganache and filling.
There’s a special kind of pride that comes with placing a dessert this beautiful on the table. Give it a go, and get ready for the smiles that light up the room. We’d love to see photos of your finished cheesecake masterpiece.