
Elegant Homemade Mille-Feuille
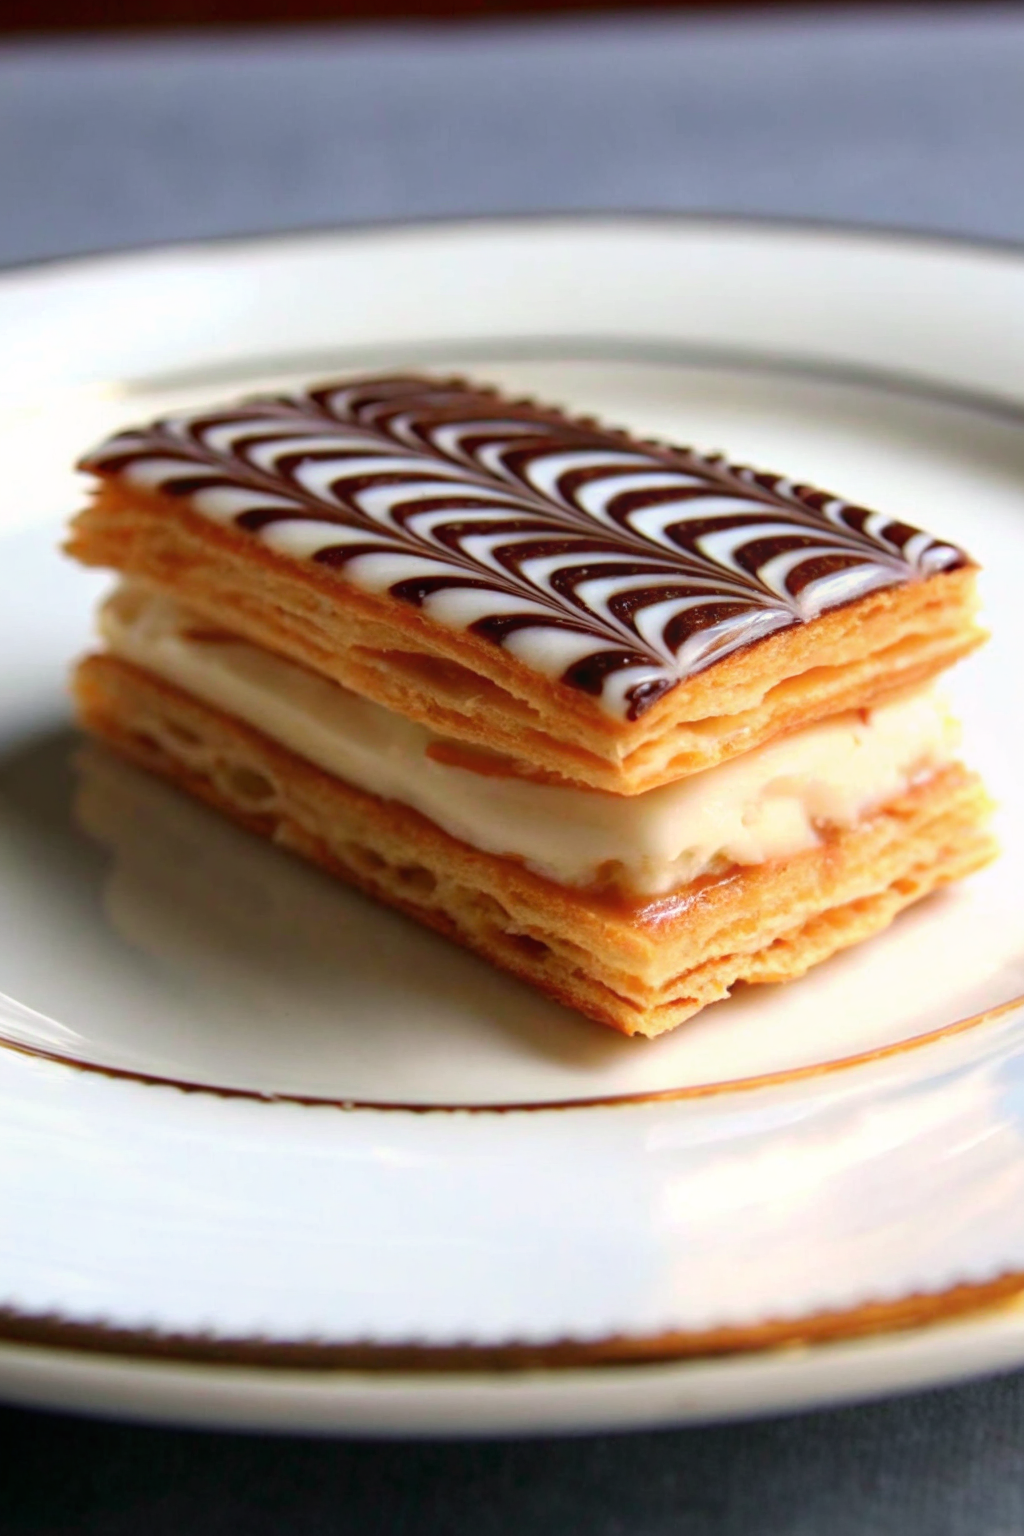
This stunning French pastry, the Mille-Feuille, is a true showstopper. With its crisp, golden layers of puff pastry, generous fillings of velvety pastry cream, and an iconic feathered chocolate icing, it’s a dessert that speaks of elegance and care. The good news is that putting together this beautiful sweet is entirely achievable at home. Follow these steps, and a patisserie-quality dessert will be ready to grace your table.
The Necessary Tools
Here is the equipment needed for this recipe:
- 🔪 Sharp knife or pizza cutter
- 🥣 Several mixing bowls
- Whisk
- Medium saucepan
- 📏 Ruler
- 🍴 Fork
- 🍪 2 large baking sheets
- 📜 Parchment paper
- 🍦 Piping bag with a plain round tip (or a sturdy zip-top bag)
- 🍢 Small skewer or toothpick
Halal Ingredients for Your Pastry
For the best results, gather these high-quality ingredients:
- 🥐 1 (14-ounce) sheet of all-butter puff pastry, preferably from a halal-certified brand
- 🥛 2 cups whole milk
- 🫘 1 vanilla bean or 1 teaspoon pure vanilla extract
- 🥚 6 large egg yolks
- 🍚 ¾ cup granulated sugar
- 🌽 ¼ cup cornstarch
- 🧈 4 tablespoons unsalted butter, cut into small pieces (from a halal-certified brand)
- 🍬 1 ½ cups powdered sugar (confectioners’ sugar)
- 💧 2-3 tablespoons milk or water
- 🍫 2 ounces dark chocolate (minimum 60% cacao)
Step 1: Preparing the Perfect Pastry Layers
The foundation of a Mille-Feuille is its impossibly flaky pastry. The goal is to bake it so it becomes flat, crisp, and deeply golden, just as seen in the final dessert.
- Preheat the oven to 400°F (200°C). Line a large baking sheet with parchment paper.
- Gently unfold the puff pastry sheet onto the prepared baking sheet. If it’s not already rectangular, lightly roll it to a rectangle about 10×15 inches.
- Now for a key technique called docking. Use a fork to prick the entire surface of the pastry thoroughly. This prevents it from puffing up too much during baking, ensuring flat, even layers.
- Place another sheet of parchment paper on top of the pastry, then place the second baking sheet directly on top. This weight is crucial for a compressed, crisp result.
- Bake for 15-20 minutes. Remove the top baking sheet and top parchment paper. The pastry should be pale gold.
- Return the pastry to the oven, uncovered, and bake for another 5-10 minutes, or until it is a beautiful, rich golden-brown color and feels crisp to the touch.
- Let the pastry cool completely on the baking sheet. Once cooled, use a very sharp knife and a ruler to carefully trim the edges and cut the pastry into three perfectly equal rectangles. Set them aside.
Step 2: Whipping Up the Silky Pastry Cream
This rich, smooth cream, known as crème pâtissière, is the luscious heart of the Mille-Feuille.
- If using a vanilla bean, split it lengthwise and scrape the seeds into a medium saucepan. Add the pod and the milk. If using extract, simply add the milk to the saucepan. Heat over medium heat until it just begins to simmer (small bubbles will form around the edge). Then, remove it from the heat.
- In a separate medium bowl, vigorously whisk together the egg yolks and granulated sugar until the mixture is pale yellow and thick. Whisk in the cornstarch until fully combined and smooth.
- Now for the most important step: tempering the eggs. While whisking the egg mixture constantly, slowly pour about half of the hot milk into the bowl. This gradual introduction of heat warms the eggs without scrambling them.
- Pour the tempered egg mixture back into the saucepan with the rest of the milk. Return the pan to medium heat.
- Cook, whisking constantly and scraping the bottom and corners of the pan, until the cream thickens considerably and begins to bubble. Let it bubble for one full minute while still whisking to cook out the starch.
- Remove the pan from the heat. If you used a vanilla pod, remove it now. Add the pieces of butter and stir until they have melted completely and the cream is glossy and smooth.
- Transfer the pastry cream to a clean bowl. Press a piece of plastic wrap directly onto the surface of the cream. This prevents a skin from forming. Chill in the refrigerator for at least 2 hours, or until completely cold and firm.
Step 3: Mastering the Iconic Feathered Icing
This beautiful marbled top is what makes the dessert so recognizable. It’s a simple technique with a wonderfully professional-looking outcome.
- In a small bowl, whisk together the powdered sugar and 2 tablespoons of milk. Add more milk, a tiny drop at a time, until you have a thick but spreadable glaze. It should not be runny.
- Gently melt the dark chocolate in a small, heatproof bowl over a saucepan of simmering water or in the microwave in short bursts.
- Take one of the baked puff pastry rectangles—this will be your top layer. Spread the white glaze evenly over its surface, going all the way to the edges.
- Quickly, while the glaze is still wet, transfer the melted chocolate to a small piping bag (or a corner of a zip-top bag) and snip off a tiny bit of the tip. Pipe thin, parallel lines of chocolate across the white glaze.
- Immediately, take a skewer or the tip of a knife and drag it through the lines in one direction. Then, drag it back through the lines in the opposite direction in the spaces between your first set of lines. This motion is what produces the classic chevron or “feathered” pattern.
- Let the icing set for about 15-20 minutes before the final assembly.
Step 4: Assembling Your Masterpiece
This is the final, rewarding step where all the components come together to create the classic three-layer structure seen in the photo.
- Give the chilled pastry cream a good stir to loosen it up, then transfer it to a piping bag.
- Place one of the plain (undecorated) puff pastry rectangles on your serving plate to serve as the base.
- Pipe or spread approximately half of the pastry cream evenly over its surface.
- Gently place the second plain pastry rectangle on top of the cream.
- Pipe or spread the remaining pastry cream over this second pastry layer.
- Gently lift the decorated top pastry rectangle and place it perfectly on top of the final cream layer. Press down ever so slightly to secure it.
- For the neatest slices, it is best to chill the assembled Mille-Feuille for about 30 minutes before serving. Use a very sharp, serrated knife to cut into individual portions.
There is a special kind of delight in sharing a dessert made with such attention to detail. Feel free to present your finished Mille-Feuille and enjoy the flaky, creamy, and altogether perfect results of your work.