
Golden Baked Classic Cheesecake
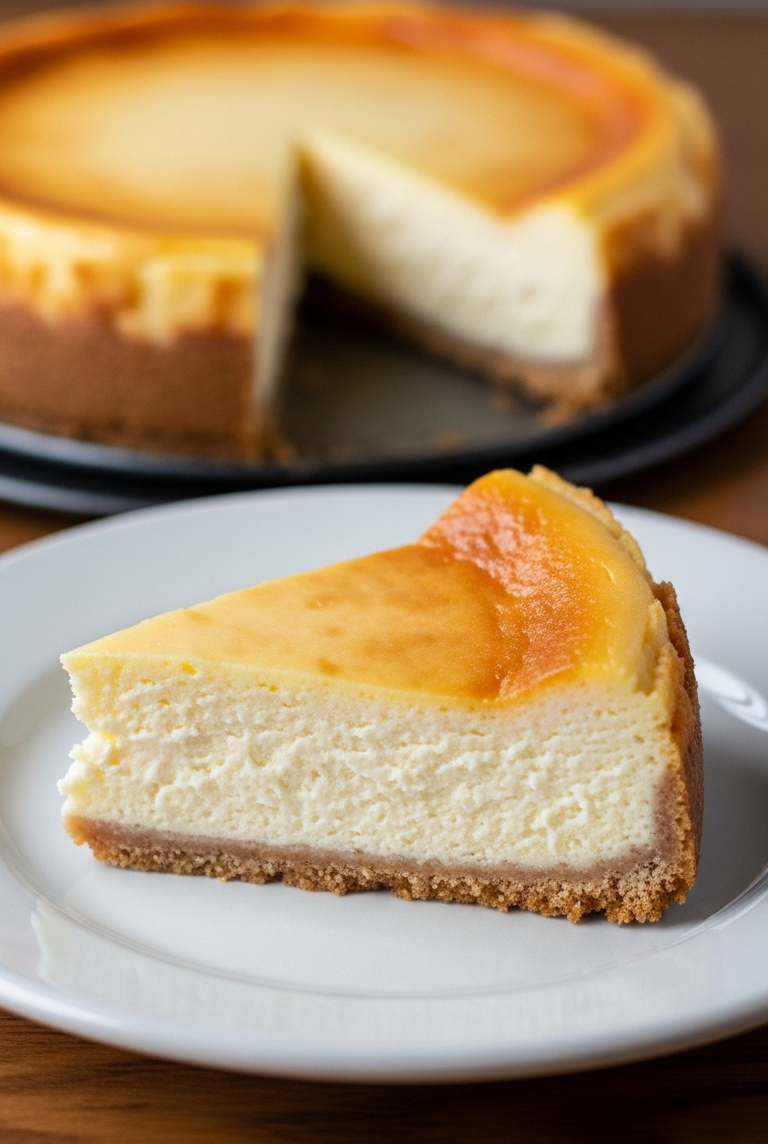
That first glimpse of a perfectly smooth, richly colored cheesecake slice, like the one pictured here, promises a truly delightful experience. This recipe guides aspiring bakers in assembling an equally impressive Classic New York Cheesecake, boasting a substantial, golden graham cracker crust and an incredibly creamy, dense filling. The top is baked to a beautiful amber hue, a hallmark of this timeless dessert. Following these instructions carefully will help anyone achieve a showstopper dessert, perfect for sharing.
Why This Cheesecake is Special
The cheesecake in the image is a testament to careful preparation. It features a robust, golden-brown graham cracker crust that extends uniformly up the sides, providing a wonderful textural contrast to the filling. Its filling is impeccably smooth and dense, with a creamy off-white to pale yellow color. Most notably, the top surface showcases a beautiful, even golden-brown bake, slightly more pronounced at the edges, and is entirely free of cracks. This guide focuses on the techniques to replicate these desirable qualities.
Gathering Your Supplies
Before embarking on this baking adventure, it’s essential to have all the necessary components and tools ready.
📝 Halal Ingredients
- 🧈 For the Crust:
- 🍪 1 ½ cups (around 150g) halal graham cracker crumbs (about 10-12 full crackers)
- 🍚 ¼ cup (50g) granulated sugar
- 🥄 ½ teaspoon ground cinnamon (optional, but adds warmth)
- 🧈 6 tablespoons (85g) unsalted halal butter, melted
- 🍰 For the Filling:
- 🧀 32 ounces (904g, or four 8-ounce blocks) full-fat halal cream cheese, very softened to room temperature
- 🍚 1 ¾ cups (350g) granulated sugar
- 🤏 ¼ teaspoon salt
- 🍦 1 cup (240g) halal full-fat sour cream, at room temperature
- 💧 2 teaspoons halal alcohol-free vanilla extract
- 🍋 1 teaspoon fresh lemon zest (optional, for brightness)
- 🥚 5 large halal eggs, at room temperature
- 🥛 2 tablespoons halal all-purpose flour (optional, for extra structure)
🛠️ Kitchen Tools
- 📏 Measuring cups and spoons
- 🥣 Large mixing bowls (at least two)
- 🥄 Rubber spatula
- ⚡ Electric mixer (handheld or stand mixer)
- 🎂 9-inch springform pan
- ✨ Aluminum foil (heavy-duty recommended)
- 🥘 Roasting pan or a larger baking pan (that the springform pan can fit inside for the water bath)
- 🌡️ Oven thermometer (recommended for accuracy)
- ♨️ Kettle or saucepan (for boiling water)
The Journey to a Perfect Cheesecake: Step-by-Step
Patience and attention to detail are the companions on the path to this magnificent cheesecake.
Stage 1: Building the Foundation – The Crust
The crust seen in the image is notable for its even thickness and height.
- Prepare the Pan: Preheat the oven to 350°F (175°C). Take the 9-inch springform pan. For cheesecakes, a springform pan is ideal because its sides can be removed, making it easy to present the finished cake without disturbing its structure. Do not grease the pan.
- Combine Crust Ingredients: In a medium bowl, thoroughly mix the graham cracker crumbs, granulated sugar, and ground cinnamon (if using). Pour the melted butter over the crumb mixture. Stir with a fork until all the crumbs are moistened. The mixture should resemble wet sand.
- Form the Crust: Tip the buttery crumbs into the springform pan. Using the flat bottom of a measuring cup or glass, press the crumbs firmly and evenly onto the bottom of the pan. Then, press crumbs up the sides of the pan, aiming for a height of about 1 to 1 ½ inches, ensuring the top edge is neat, similar to the distinct crust edge visible on the cheesecake slice. This firm packing is key to a sturdy crust that doesn’t crumble.
- Pre-Bake the Crust: Bake the crust for 10-12 minutes, just until it’s set and lightly fragrant. This step helps the crust hold its shape. Once baked, remove it from the oven and place it on a wire rack to cool slightly while preparing the filling. Reduce the oven temperature to 325°F (160°C).
Stage 2: Crafting the Creamy Filling
The wonderfully smooth texture of the cheesecake filling in the image comes from properly incorporated ingredients and avoiding overmixing.
- Beat the Cream Cheese: Ensure the cream cheese is truly softened. This is crucial for a lump-free filling. In a large mixing bowl, beat the softened cream cheese with an electric mixer on medium-low speed until it is completely smooth and creamy, with no lumps remaining. Scrape down the sides and bottom of the bowl frequently with a rubber spatula. This might take about 2-3 minutes.
- Add Sugar and Salt: Gradually add the granulated sugar and salt to the cream cheese. Continue to beat on medium-low speed until the sugar is well incorporated and the mixture is smooth. Again, remember to scrape the bowl.
- Incorporate Wet Ingredients: Add the sour cream, alcohol-free vanilla extract, and lemon zest (if using). Mix on low speed just until combined. Do not overmix. Overmixing incorporates too much air, which can cause the cheesecake to puff up excessively during baking and then crack as it cools.
- Whisk in Flour (Optional): If using flour for added structure, whisk it lightly with the eggs before adding, or sprinkle it over the batter and mix gently on low.
- Add Eggs Gently: Lightly whisk the eggs in a separate small bowl. With the mixer on its lowest speed, add the eggs to the cream cheese mixture one at a time, or in a slow, steady stream if pre-whisked. Mix just until each addition is incorporated. The moment the last bit of yellow from the egg disappears, stop the mixer. A few gentle folds with a spatula can ensure everything is combined. The final batter should be thick, smooth, and glossy.
Stage 3: The Gentle Bake
Achieving the crack-free, golden top seen in the image requires a gentle baking environment, often facilitated by a water bath.
- Prepare the Water Bath (Bain-Marie): A water bath, or bain-marie, is a technique where the pan containing the food is placed into a larger pan filled with hot water. This method promotes even baking and adds moisture to the oven environment, which is key to preventing cracks and achieving a creamy texture. To prepare:
- Boil a kettle of water.
- Take a large sheet of heavy-duty aluminum foil and wrap the outside of the springform pan (bottom and up the sides) tightly. This is to prevent any water from seeping into the cheesecake. Use a second sheet if necessary to ensure it’s watertight.
- Assemble for Baking: Pour the prepared cheesecake filling into the cooled crust. Place the foil-wrapped springform pan into the larger roasting pan. Carefully pour the hot water from the kettle into the roasting pan, around the springform pan, until the water level reaches about halfway up the sides of the springform pan. Be careful not to splash water into the cheesecake batter.
- Bake: Carefully transfer the entire setup to the preheated 325°F (160°C) oven. Bake for 75-90 minutes. The cheesecake is done when the edges are set and appear slightly puffed, and the center still has a slight jiggle – it should not be completely firm but also not liquid. The top will have developed the beautiful golden-brown color seen in the image, especially around the edges. An oven thermometer helps ensure accurate baking temperature.
Stage 4: Cooling – The Secret to Perfection
The flawless surface of the cheesecake in the photograph is largely due to a slow, patient cooling process. Rushing this can cause cracks.
- Initial Cool in Oven: Once the cheesecake is done, turn off the oven. Prop the oven door open slightly (with a wooden spoon, for example) and let the cheesecake cool in the oven for 1 hour. This gradual decrease in temperature is critical.
- Cool at Room Temperature: Carefully remove the roasting pan from the oven. Lift the springform pan out of the water bath and remove the foil. Place the cheesecake on a wire rack and let it cool completely to room temperature. This will take another 2-3 hours. As it cools, it will firm up significantly.
- Chill: Once at room temperature, cover the cheesecake loosely with plastic wrap (don’t let it touch the surface if possible) and refrigerate for at least 6 hours, but preferably overnight, or even up to 2 days. Chilling allows the flavors to meld and the texture to become perfectly dense and creamy.
Serving Your Masterpiece
To serve, carefully run a thin, sharp knife around the edge of the cheesecake to loosen it from the sides of the springform pan before releasing the spring. If some crust sticks, it can often be gently pressed back. Slice with a large, sharp knife, wiping the blade clean with a damp cloth between each cut for neat slices like the one showcased. This cheesecake is stunning on its own, its rich flavor and creamy texture needing no accompaniment, just as presented in the image.
Share Your Success!
There’s immense satisfaction in pulling a perfect, golden-topped cheesecake from the oven and an even greater joy in sharing it. After following these steps, bakers are encouraged to present their beautifully assembled cheesecakes and savor the delightful results with friends and family. Witnessing their enjoyment is a wonderful reward for the care invested.
The journey of transforming simple, halal ingredients into such an elegant dessert is a delightful one. May this guide lead to many successful bakes and happy taste testers.