

Golden Lemon Ricotta Cheesecake
Few things are as satisfying as setting down a beautiful, homemade dessert for others to enjoy. The Golden Lemon Ricotta Cheesecake captures the essence of simple elegance, offering a light, tangy flavor and an irresistibly creamy texture. It’s easy to prepare, making it a wonderful choice for anyone exploring the joys of baking.
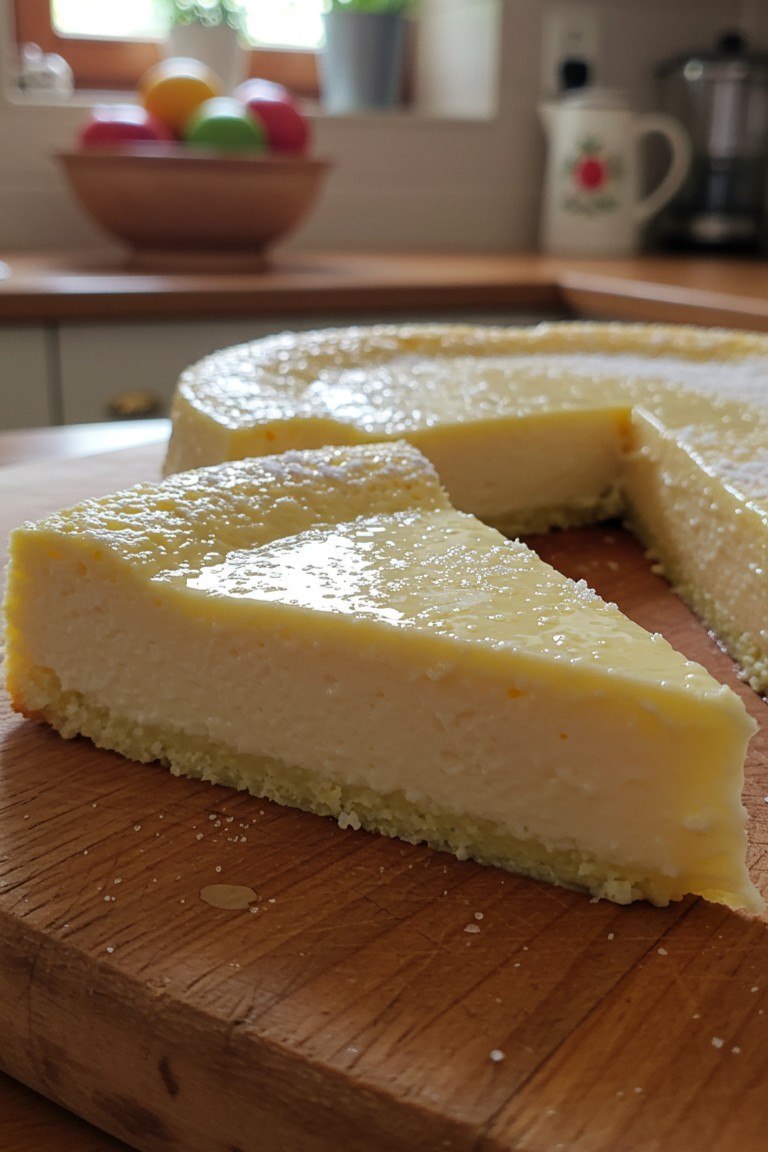
The experience begins long before the first bite—the soft rhythm of the mixer, the bright scent of lemon filling the kitchen, and finally, the quiet delight of serving a perfectly cut slice.
What You’ll Need
Gathering your tools and ingredients is the first step on this delicious journey. Having everything ready makes the entire process smooth and enjoyable.
Essential Kitchen Tools
- 🥣 A few mixing bowls (in different sizes)
- 🥄 Standard measuring cups and spoons
- ⚡️ An electric mixer (a handheld or stand mixer works perfectly)
- 🍋 A zester or a fine grater for the lemon peel
- 🍰 A 9-inch (23 cm) springform pan
- 🔥 A large roasting pan that is bigger than your springform pan
Halal Ingredients for Your Cheesecake
The quality of your ingredients will shine through in the final dessert.
For the simple, pale crust:
- 🧈 ½ cup (113g) Unsalted butter (halal-certified), melted and slightly cooled
- 🍚 1 ¼ cups (150g) All-purpose flour
- 🤍 ¼ cup (50g) Granulated sugar
- 🧂 A tiny pinch of salt
For the light and creamy filling:
- 🧀 15 oz (425g) Whole milk ricotta cheese (halal-certified)
- 🍦 8 oz (226g) Full-fat block cream cheese (halal-certified), softened to room temperature
- 🤍 ¾ cup (150g) Granulated sugar
- 🥚 3 Large eggs, at room temperature
- 🍋 Zest and juice of 1 large lemon
- ✨ 1 teaspoon Vanilla extract
- ❄️ A sprinkle of fine granulated sugar or powdered sugar for the topping
Putting It All Together: Step-by-Step
Follow these instructions closely to build the exact cheesecake shown in the picture, from its delicate crust to its smooth, pale yellow filling.
1. Prepare the Foundation: The Crust
First, get the oven ready by preheating it to 350°F (175°C). Lightly grease the bottom and sides of the springform pan. This type of pan has a removable collar, which is essential for getting the cheesecake out cleanly without any damage.
In a medium bowl, stir together the all-purpose flour, granulated sugar, and the pinch of salt. Pour the melted butter over the dry ingredients. Mix with a fork until the mixture forms coarse, damp crumbs. Tip these crumbs into the prepared springform pan. Use your fingers or the flat bottom of a glass to press the mixture firmly and evenly across the bottom of the pan. This forms the thin, pale crust visible in the photograph.
Bake the crust for 10-12 minutes, just until it’s set and very lightly golden at the edges. Remove it from the oven and set it on a wire rack to cool completely while you prepare the filling. Lower the oven temperature to 325°F (160°C).
2. Whip Up the Lemony Filling
For a perfectly smooth filling, all the dairy and eggs must be at room temperature. This helps them blend together seamlessly.
In a large bowl, use an electric mixer to beat the softened cream cheese and granulated sugar on medium speed until the mixture is completely smooth and free of lumps. This step is your best defense against a lumpy cheesecake!
Add the ricotta cheese and mix on low speed just until it’s combined. Ricotta is what gives this cheesecake its uniquely light and slightly rustic texture. Next, add the room-temperature eggs one at a time, mixing on low after each addition just until the yellow yolk disappears. A very important tip: Do not overmix once the eggs are in! Beating too much air into the batter is a primary cause of cracks forming on the cheesecake’s surface as it bakes.
Gently fold in the lemon zest, lemon juice, and vanilla extract with a spatula. This is where the cheesecake gets its bright, fresh flavor and its lovely pale yellow color.
3. Assemble for a Gentle Bake
Pour the finished filling over the cooled crust in the springform pan, spreading it into an even layer.
Now, it’s time to prepare a water bath. This is a simple but vital technique for baking creamy, crack-free cheesecakes. It involves baking the cheesecake in a larger pan filled with hot water. The steam from the water helps the cheesecake bake gently and evenly.
To do this, tear off a large sheet of heavy-duty aluminum foil and wrap it securely around the outside of your springform pan, covering the bottom and sides. This waterproofs the pan. Place the wrapped pan into your large roasting pan. Pour hot water into the roasting pan until it comes about halfway up the sides of the springform pan.
4. The Baking and Cooling Process
Carefully place the entire setup into the preheated 325°F (160°C) oven. Bake for 55 to 65 minutes. The cheesecake is done when the edges are set, but the center still has a distinct wobble to it when you gently nudge the pan. This slight jiggle is perfect—it means the cheesecake will set up to be creamy, not dry.
Note: After baking, the edges of the cheesecake may appear slightly golden or yellowish, while the center remains a paler, creamier shade. This gentle color variation is completely normal and actually indicates the desired creamy texture of a well-baked cheesecake.
Turn the oven off. Prop the oven door open with a wooden spoon and let the cheesecake cool slowly in the warm oven for one hour. This gradual temperature drop is another secret to preventing cracks.
After an hour, carefully remove the cheesecake from the water bath and take off the foil. Let it cool the rest of the way on a wire rack at room temperature. Once completely cool, cover it with plastic wrap and move it to the refrigerator to chill for at least 6 hours, or ideally, overnight. This chilling period is non-negotiable; it’s what allows the cheesecake to firm up properly for slicing.
5. The Simple, Elegant Finish
Just before you’re ready to serve, run a thin knife around the edge of the chilled cheesecake to loosen it, then gently unbuckle and lift away the springform pan’s collar.
The cheesecake in the photo has a beautiful, simple finish. To achieve this, sprinkle a very light dusting of fine granulated sugar over the top. This gives it a subtle sparkle and a hint of sweetness.
Now, all that’s left is to slice into your beautiful work. The firm, buttery crust and the rich, creamy lemon filling are a testament to the care taken in its preparation.
Enjoy every single bite of this wonderful homemade cheesecake. Sharing a slice is a lovely way to share the warmth and happiness that went into making it. We hope to see your beautiful results.