
Golden Sesame Snaps & Matcha Ice Cream
Here is a dessert that balances flavor and texture in the most wonderful way. A scoop of smooth, earthy matcha ice cream rests on a bed of crispy, nutty, and sweet sesame snaps. The rich, cool creaminess of the ice cream is a perfect partner to the warm, toasted flavor and satisfying crunch of the sesame candy. This guide walks through how to prepare both components from scratch, turning simple ingredients into an elegant, homemade treat that’s sure to bring smiles. It’s a rewarding kitchen project, perfect for a special afternoon.
Getting Your Tools and Ingredients Ready
Having everything on hand before starting is the key to a smooth and enjoyable cooking process.
Essential Kitchen Tools
- 🥣 Two medium mixing bowls
- 🍳 Two medium saucepans (a heavy-bottomed one is ideal for the snaps)
- 🥄 A whisk
- 🟤 A heatproof spatula
- 📜 Two sheets of parchment paper
- 📏 A rolling pin
- 🔪 A pizza cutter or a large, sharp knife
- 🧊 An ice cream maker (or a freezer-safe loaf pan for a no-churn version)
- 🕸️ A fine-mesh sieve
- Airtight container for freezer storage
Halal Ingredients for the Recipe
For the Golden Sesame Snaps:
- 🍚 1 cup (150g) white sesame seeds
- 🍬 ½ cup (100g) granulated sugar
- 💧 2 tablespoons water
- 🧈 1 tablespoon unsalted butter (halal certified)
- 🧂 ¼ teaspoon salt
For the Creamy Matcha Ice Cream:
- 🍵 2 tablespoons high-quality culinary-grade matcha powder
- 🥛 1 cup (240ml) whole milk
- 🍶 2 cups (480ml) heavy whipping cream (halal certified)
- 🥚 5 large egg yolks
- 🍬 ¾ cup (150g) granulated sugar
- 🌿 1 teaspoon alcohol-free vanilla extract
- 🧂 ¼ teaspoon salt
Part 1: Putting Together the Golden Sesame Snaps
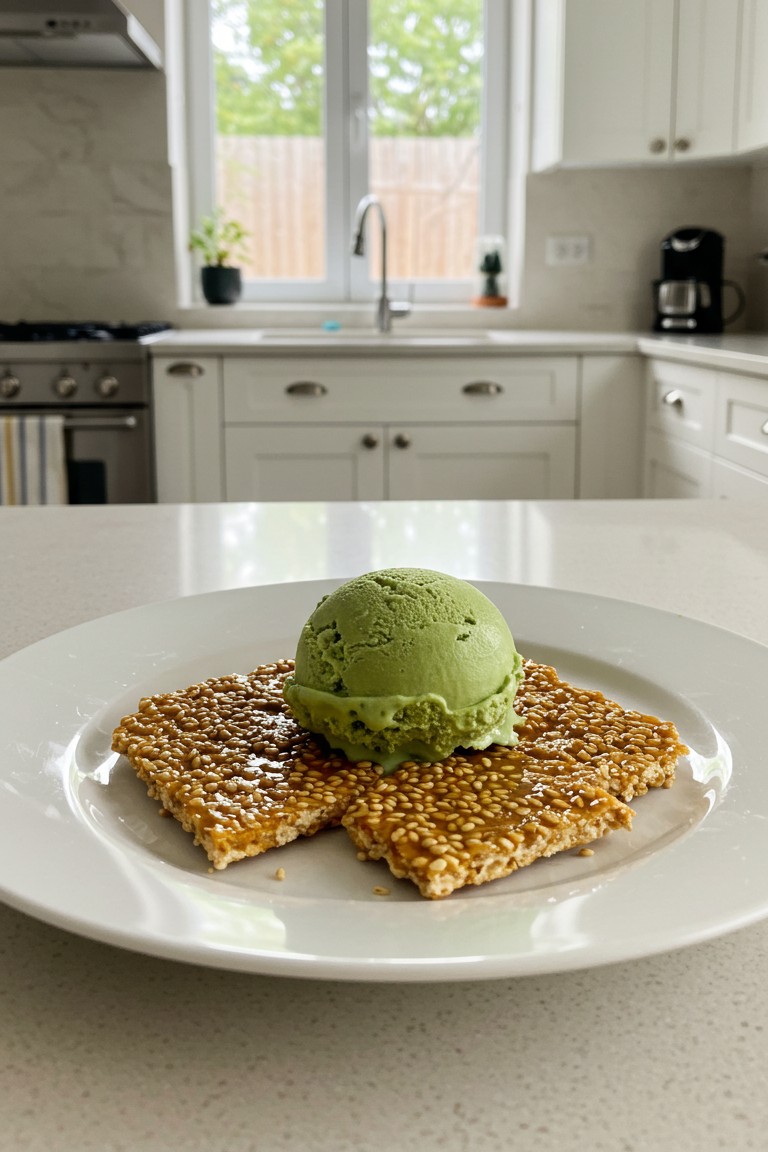
The image shows beautifully thin, square-shaped snaps with a glossy sheen. Following these steps will yield that same delicate, crunchy texture.
- Toast the Sesame Seeds. Place the sesame seeds in a dry, medium-sized saucepan over medium-low heat. Stir them constantly for 3-5 minutes. The seeds are done when they turn a light golden color and release a rich, nutty fragrance. Be very watchful, as they can burn quickly. Once toasted, immediately transfer them to a bowl to stop the cooking process.
- Set Up Your Workspace. This part moves fast, so preparation is essential. Lay a sheet of parchment paper on a heat-resistant countertop or a large baking sheet. Have your rolling pin and a second sheet of parchment nearby.
- Develop the Caramel. In a heavy-bottomed saucepan, combine the sugar and water. Turn the heat to medium and stir until the sugar dissolves. Once it’s bubbling, stop stirring and just swirl the pan occasionally. The mixture will thicken and gradually turn a deep amber color. This caramelization process is what gives the snaps their golden-brown hue and sweet, toasty flavor.
- Combine the Ingredients. As soon as the caramel reaches the perfect amber shade, turn the heat off. Immediately and carefully stir in the butter and salt—it will bubble up. Next, pour in the toasted sesame seeds and mix with a spatula until every seed is coated in the glossy caramel. You must work quickly because the mixture will begin to harden almost instantly.
- Pour and Spread. Pour the hot sesame mixture onto the prepared parchment paper. Place the second sheet of parchment paper on top and use the rolling pin to flatten the candy into a thin, even layer, about ⅛-inch thick. Rolling it this thin is how the snaps get their signature delicate crispness.
- Score and Cool. While the candy is still warm and slightly flexible, peel off the top layer of parchment. Use a pizza cutter or a sharp knife to score the slab into neat, uniform squares, just as seen in the photograph. If it cools completely before being cut, it will shatter. Let the slab cool on the counter for about 30 minutes until it’s completely hard and brittle. Once cool, gently break it apart along the scored lines.
Part 2: Making the Creamy Matcha Ice Cream
The vibrant light green color of the ice cream in the photo comes from using good quality matcha. This recipe uses a classic custard base for an extra rich and smooth result.
- Prepare the Matcha Paste. In a small bowl, whisk the matcha powder with 2 tablespoons of the milk until a completely smooth, lump-free paste forms. This extra step prevents flecks of matcha powder in the finished ice cream.
- Warm the Milk and Cream. In a medium saucepan, combine the remaining milk, the heavy cream, and the salt. Warm the mixture over medium heat until it is steaming slightly and small bubbles form around the edges. Don’t let it come to a rolling boil.
- Prepare the Egg Yolks. While the milk mixture is warming, whisk the egg yolks and sugar together in a separate mixing bowl. Keep whisking until the mixture becomes pale yellow, thick, and fluffy.
- Temper the Eggs. This is a very important technique called tempering, which gently warms the eggs so they don’t scramble. While whisking the egg yolks constantly, slowly drizzle about half a cup of the hot milk mixture into the bowl. Continue pouring in the hot liquid, a little at a time, until about half of it is incorporated.
- Cook the Custard Base. Pour the tempered egg mixture back into the saucepan with the rest of the milk and cream. Return the saucepan to medium-low heat. Cook, stirring constantly with a spatula and scraping the bottom of the pan, for 6-8 minutes. The custard is ready when it has thickened enough to coat the back of the spatula. A finger drawn across the spatula should leave a clean line. Do not let the custard boil, or it will curdle.
- Strain and Flavor. Immediately pour the hot custard through a fine-mesh sieve into a clean bowl. This ensures the base is perfectly smooth. Whisk in the matcha paste and the alcohol-free vanilla extract until fully combined. The base will have that lovely soft green color.
- Chill Thoroughly. Cover the bowl and refrigerate the custard base until it is completely cold, for at least 4 hours but preferably overnight. This step is essential for a creamy texture and helps the ice cream churn properly.
- Churn the Ice Cream. Once chilled, pour the custard into an ice cream maker and churn according to the manufacturer’s instructions. It’s ready when it has the consistency of soft-serve ice cream.
- No Ice Cream Maker? No problem. Pour the cold custard base into a freezer-safe loaf pan. Freeze for 3-4 hours, taking it out every 45 minutes to stir it vigorously with a whisk. This helps break up large ice crystals and keeps it smoother.
- Ripen the Ice Cream. Transfer the finished ice cream to an airtight container and freeze for at least 4 more hours. This final freeze, or ripening, allows the ice cream to firm up into the perfect scoopable consistency.
Assembling the Perfect Dessert
For a presentation that matches the photo, arrange a few of the golden sesame snaps in the center of a clean white plate. Use an ice cream scoop—dipped in hot water and wiped dry for a clean release—to place a perfect, round scoop of the matcha ice cream right on top of the snaps.
This delightful dessert offers a beautiful blend of temperatures, tastes, and textures. The effort put into each component pays off in the final, delicious result, making it a homemade treat worth sharing. We hope you take pleasure in both the process and the fantastic final product.