

Halal Mango Matcha Cheesecake
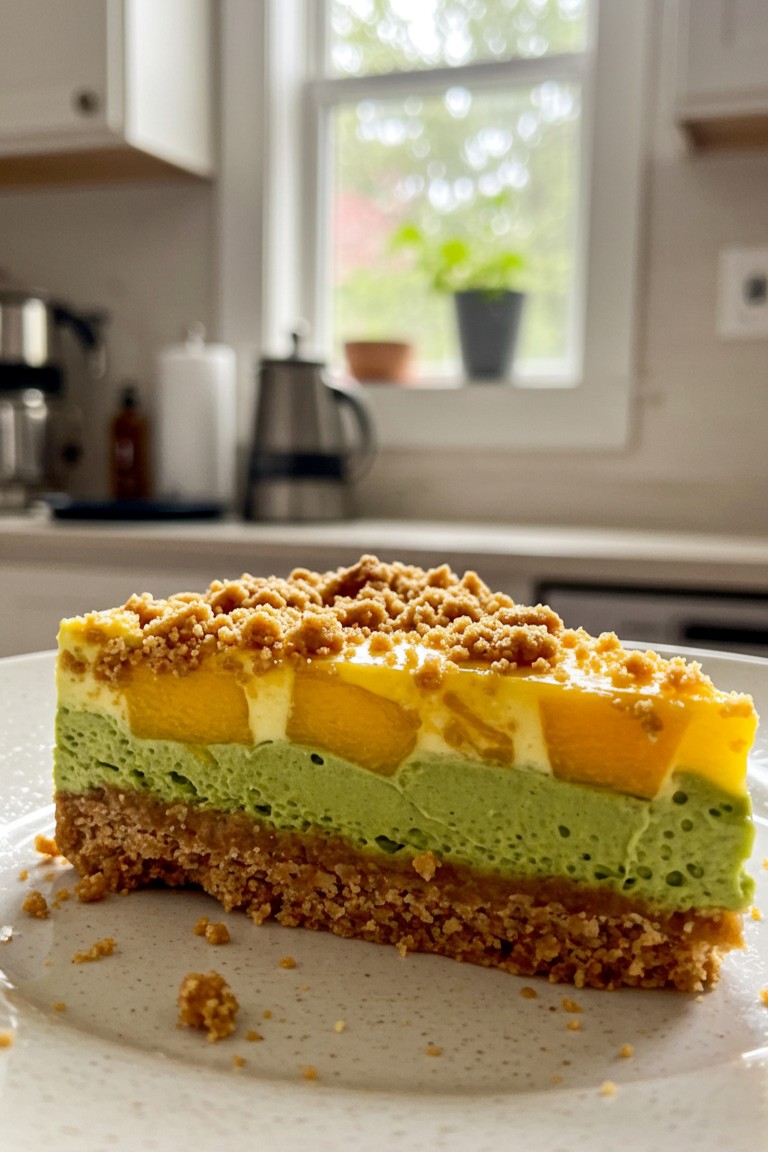
Get ready for a joyful baking adventure! Here is a guide to assembling a truly special dessert: a Mango Matcha Mousse Cheesecake. It’s a beautiful treat with a surprise in every layer—from the sweet and sunny mango to the calm, earthy matcha, all resting on a buttery biscuit bed. Putting this cheesecake together is a wonderfully rewarding process that results in a dessert that’s sure to brighten anyone’s day.
Your Kitchen Companions
Gathering all the needed supplies before starting is like setting the stage for a fun play. It makes everything go smoothly and turns the process into a pure pleasure.
- 📏 8-inch (20 cm) Springform Pan
- 🥣 A few different sized Mixing Bowls
- 🥄 Measuring Cups and Spoons
- Whisk
- Spatula
- Electric Hand Mixer or Stand Mixer
- Small Saucepan
- 🔪 A Sharp Knife and a Cutting Board
- 🌯 Plastic Wrap
The Recipe’s Halal Ingredients
These are the lovely ingredients that will come together to form this multi-layered delight. Ensuring these specific items are halal is the first step toward a perfect and thoughtful dessert.
- For the Sweet Crumble Topping:
- 🌾 ½ cup All-Purpose Flour
- 🍚 ¼ cup Granulated Sugar
- 🧈 ¼ cup Cold Unsalted Butter, diced into little cubes
- 🧂 A tiny pinch of Salt
- For the Sturdy Biscuit Crust:
- 🍪 1 ½ cups Digestive Biscuit Crumbs
- 🧈 6 tablespoons Unsalted Butter, melted until liquid
- 🍬 2 tablespoons Brown Sugar
- For the Earthy Matcha Mousse Layer:
- 💧 1 ½ teaspoons Halal Powdered Gelatin
- 💧 3 tablespoons Cold Water
- 🧀 8 oz (225g) Halal Cream Cheese, brought to room temperature so it’s soft
- 🍚 ½ cup Powdered Sugar
- 🍵 1 ½ tablespoons of good, vibrant Matcha Powder
- 🥛 1 cup Halal Heavy Whipping Cream, kept chilly in the fridge
- For the Sunny Mango & Cream Layer:
- 💧 1 ½ teaspoons Halal Powdered Gelatin
- 💧 3 tablespoons Cold Water
- 🥭 1 ½ cups of sweet, Ripe Mango, peeled and chopped into happy ½-inch cubes
- 🧀 8 oz (225g) Halal Cream Cheese, also nice and soft
- 🍚 ½ cup Powdered Sugar
- 🥛 1 cup Halal Heavy Whipping Cream, perfectly cold
Building the Dream Cheesecake, Step by Step
This dessert is built with love, one beautiful layer at a time. This method is the secret to getting those picture-perfect, distinct layers everyone will admire.
Part 1: The Golden, Crumbly Topping
The fun begins with the sweet and buttery crumble that will adorn the top of the cheesecake.
- Warm up the oven to 350°F (175°C). Prepare a small baking sheet by lining it with parchment paper.
- In a bowl, whisk together the flour, sugar, and salt for a moment.
- Add the cold butter cubes. Using just your fingertips, rub the butter into the flour mix. It’s a fun, tactile job! Keep going until the mixture looks like coarse crumbs. Try not to handle it too much, as this keeps the crumble light and delicate.
- Spread the crumble mixture onto the lined baking sheet in an even layer.
- Bake for about 12-15 minutes, until it turns a beautiful golden brown. The kitchen will smell amazing! Let it cool down completely.
Part 2: The Perfect Biscuit Foundation
Next, it’s time to construct the base. There is something incredibly satisfying about patting a biscuit crust into place.
- In a bowl, stir the digestive biscuit crumbs and brown sugar together. Pour the lovely melted butter all over and mix with a fork until every crumb is happily coated.
- Tip this mixture into the bottom of the springform pan. Press it down firmly and evenly. A flat-bottomed glass is a great tool for this job.
- Let this crust chill out in the refrigerator for at least 30 minutes. This little rest helps it become a solid foundation for the creamy layers to come.
Part 3: The Smooth and Serene Matcha Mousse
Here comes the layer that gives the cheesecake its stunning pop of green color.
- Time to prepare the gelatin. This is done through a simple process called blooming. It sounds fancy, but it just means sprinkling the gelatin powder over cold water in a small bowl. Let it sit for 5 to 10 minutes to soften up. This is the secret to a lump-free mousse!
- In a big bowl, beat the soft cream cheese with the powdered sugar until it’s super smooth and luscious. Sifting the matcha powder into the bowl first is a great tip for ensuring a flawlessly even green color.
- Gently warm the softened gelatin until it turns back into a liquid. A quick 5-second visit to the microwave or a few moments over a pan of warm water will do the trick. Just be sure it never boils!
- Pour the liquid gelatin into the matcha-cream cheese mix and beat it on low speed until everything is just acquainted.
- In a separate, chilled bowl, whip the cold heavy cream. Turn the mixer up high and whip until it forms stiff peaks. This is when the cream is thick enough to stand up straight in little points when the beaters are lifted. It’s a wonderful transformation to watch!
- Now, very gently fold the airy whipped cream into the matcha mixture. This means using a spatula to scoop from the bottom and fold the mixture over the top, preserving all those lovely air bubbles.
- Pour this light, green mousse over the chilled crust and smooth the top. It then goes back to the fridge for 1 to 2 hours to set.
Part 4: The Bright and Cheerful Mango Layer
The final layer is a celebration of sweet, tropical mango nestled in a cloud-like cream.
- Bloom the second batch of gelatin in cold water, just like before.
- Beat the soft cream cheese and powdered sugar until completely smooth. Then, mix in the warmed, liquid gelatin.
- Whip the remaining cold heavy cream to stiff peaks.
- Gently fold the whipped cream into the cream cheese base. Now, add the happy little cubes of mango and fold them in, so they’re dotted throughout the cream.
- Carefully spoon this mango-filled dream over the set matcha layer and spread it out.
- Take the cooled crumble and sprinkle it generously over the top, making a final delicious blanket.
- Cover the pan and let the whole cheesecake chill for at least 6 hours, or even better, overnight. This is the quiet time when all the layers settle in and the dessert becomes truly complete.
The Happy Moment of Serving
After its long chill, the cheesecake is ready for its debut. Gently running a knife around the inside of the pan before releasing the springform’s side helps for a clean release.
Slicing into this dessert reveals all the care and happy effort put into its making. It’s a wonderful piece of homemade goodness, ready to be shared and to bring a little sunshine to the table.