
Handmade Glow Your Own Face Pads
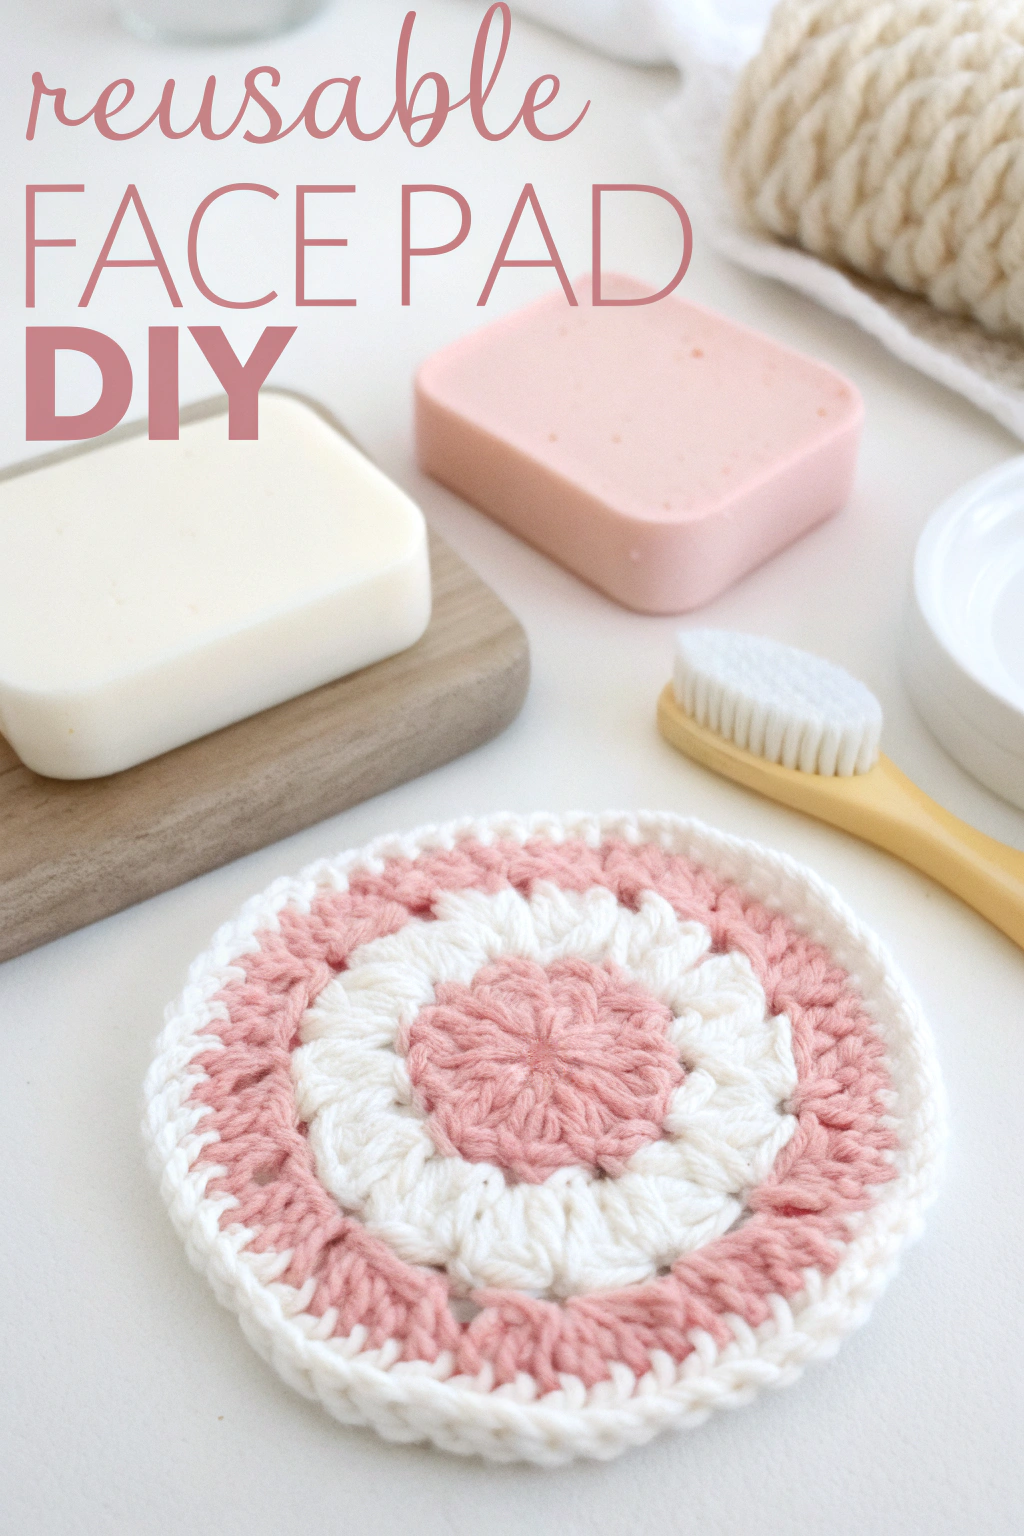
Ready to add a touch of handmade charm to your daily routine? Let’s make these absolutely lovely Reusable Crocheted Face Pads together! The ones pictured here feature delightful rounds of pink and white yarn, forming a soft, textured circle perfect for cleansing or applying toner. They’re washable, eco-friendly, and whipping them up is wonderfully satisfying. Even if you’ve never held a crochet hook before, stick with me – we’ll go step-by-step, and you’ll be admiring your handiwork in no time.
Gathering Your Supplies
Before we start looping yarn, let’s get our tools ready. For pads just like the one in the image, you will need:
- 🧶 Yarn: 100% Cotton yarn is best for absorbency and washability. You need small amounts in two colors. The pad in the photo uses a soft Pink and a clean White. Worsted weight (medium thickness) is a good starting point.
- 🪝 Crochet Hook: A size G/6 (4.00mm) or H/8 (5.00mm) hook often works well with worsted weight cotton, but check your yarn label for recommendations.
- ✂️ Scissors: For snipping yarn.
- 🪡 Yarn Needle (or Tapestry Needle): This has a large eye and blunt tip, perfect for weaving in the yarn ends neatly.
Understanding the Basics (For Absolute Beginners!)
Don’t worry if these terms are new! Here’s a quick rundown in simple language:
- Magic Ring (or Magic Circle): This is a clever way to start projects worked in the round (like our face pad) so there’s no hole in the very center. You’ll make a loop with your yarn, work your first stitches into that loop, and then pull the yarn tail to magically close the hole tight!
- Slip Knot: The little knot that gets your yarn onto the hook to begin.
- Chain (ch): The most basic crochet stitch. It’s like making a series of interconnected loops with your hook. We use it to start rounds or sometimes to move between other stitches.
- Slip Stitch (sl st): A tiny stitch used to join parts of your work together, often used to close a round smoothly. You insert your hook, yarn over, and pull the yarn through both loops on your hook in one go.
- Double Crochet (dc): A taller stitch that builds fabric quickly. Here’s the motion:
- Yarn over your hook (wrap the yarn around it).
- Insert your hook into the specified stitch or space.
- Yarn over again.
- Pull a loop of yarn through the stitch (you’ll have 3 loops on your hook).
- Yarn over again.
- Pull the yarn through the first two loops on your hook (2 loops left).
- Yarn over one last time.
- Pull the yarn through the remaining two loops on your hook. That’s one Double Crochet!
- Single Crochet (sc): A shorter, denser stitch, great for borders. Insert hook, yarn over, pull up a loop (2 loops on hook), yarn over, pull through both loops.
- Cluster: In this pattern, it refers to a group of 3 double crochet stitches worked into the same spot.
- Ch-1 Space (ch-1 sp): The small gap produced when you make a chain stitch between clusters in the previous round. You’ll work stitches into these spaces in the next round.
Let’s Make the Reusable Crocheted Face Pad!
We’ll be working in rounds, starting from the center. Remember to pull the Magic Ring tight after Round 1! We are replicating the exact pad in the image, which has a pink center, a white round, a pink round, and a white border.
Round 1 (Pink Yarn)
- Start with your Pink yarn. Make a Magic Ring.
- Ch 3 (This counts as your very first Double Crochet stitch – clever, right?).
- Work 2 dc into the Magic Ring. Now you have a little group of 3 stitches (your first cluster).
- Ch 1.
- Work [3 dc into the ring, ch 1] five more times. You’re essentially repeating step 3 and 4 again and again.
- You should now have 6 clusters of 3 dc, each separated by a ch-1 space. Pull the starting yarn tail gently but firmly to close the center hole of the Magic Ring.
- Join the round: Find the top of your starting ch-3 (it looks like the top of a regular dc stitch) and make a sl st into it. (You should have 6 clusters and 6 ch-1 spaces. Total 18 dc stitches).
Round 2 (White Yarn)
- Time for a color change! Before completing the final slip stitch of Round 1, drop the pink yarn (don’t cut it yet if you prefer not to weave in too many ends right away, but cutting after leaving a 6-inch tail is often easier for beginners). Pick up your White yarn and pull it through the last loops of the slip stitch to finish the join. Now your hook has the white yarn ready to go. Cut the pink yarn, leaving a 6-inch tail.
- Important: We’re going to work into the ch-1 spaces from Round 1. Make a sl st into the very next ch-1 space to move your starting point.
- Ch 3 (Counts as your first dc).
- Work (2 dc, ch 1, 3 dc) all into that same ch-1 space. This makes your first increase point or ‘corner’ for the round.
- Ch 1.
- Skip the next 3 dc cluster from Round 1. Find the next ch-1 space. Work (3 dc, ch 1, 3 dc) all into that space.
- Repeat Step 6 (Ch 1, skip the cluster, work (3 dc, ch 1, 3 dc) in the next ch-1 space) four more times around the circle.
- After the last cluster group, Ch 1.
- Join with a sl st to the top of the starting ch-3. (You’ve increased! You now have 12 clusters (6 groups of two clusters separated by a ch-1) and 12 ch-1 spaces between them. Total 36 dc stitches).
Round 3 (Pink Yarn)
- Change back to Pink yarn using the same method as before (finish the final sl st of Round 2 with the Pink yarn). Cut the white yarn, leaving a tail.
- Sl st into the very next ch-1 space (this is the space between the two 3-dc groups you put in the same space last round).
- Ch 3 (counts as first dc).
- Work 2 dc into that same ch-1 space (first cluster of this round).
- Ch 1.
- Find the next ch-1 space (this one sits between the ‘corner’ groups from Round 2). Work 3 dc into this space.
- Ch 1.
- Repeat from * (Work 3 dc into the next ch-1 space, ch 1) all the way around the circle. You’ll be alternating placing clusters into the spaces made in the previous round.
- Join with a sl st to the top of the starting ch-3. (You’ve increased again by adding single clusters between the corner increases. You now have 18 clusters and 18 ch-1 spaces. Total 54 dc stitches).
Round 4 (White Yarn – The Border)
- Change to White yarn one last time, finishing the sl st of Round 3 with White. Cut the pink yarn, leaving a tail.
- Ch 1 (This does not count as a stitch).
- Work 1 sc into the same stitch as the join.
- Work 1 sc into each dc stitch around the circle.
- Work 1 sc into each ch-1 space around the circle. Keep going, putting one single crochet into every stitch and every space. This makes a nice, smooth, solid white border just like the one pictured.
- Once you get all the way back around, join with a sl st to the very first sc you made in this round. (You should have 72 sc stitches in total: 54 from the tops of the dc’s and 18 from the ch-1 spaces).
Finishing Touches
- Cut the white yarn, leaving a 6-inch tail. Pull the tail completely through the last loop on your hook to fasten off.
- Now for the tidy part! Thread each yarn tail onto your yarn needle. Weave the tails back and forth through the stitches on the wrong side of your face pad for about an inch or so. Try to weave into stitches of the same color to hide the ends well. Snip off any remaining excess yarn close to the fabric.
- Admire your beautiful, finished Reusable Crocheted Face Pad! It has the distinct pink center, followed by rings of white and pink clusters, finished with a neat white edge – precisely matching the item in the photograph.
Tips for Success
- Count your stitches! Especially as a beginner, counting the clusters or stitches at the end of each round helps catch mistakes early.
- Tension Matters: Try to pull your yarn loops through with consistent pressure. Too tight, and your pad might curl; too loose, and it might be floppy. It takes practice! Don’t worry if your first one isn’t perfect.
- Weaving Ends: Take your time weaving in the ends securely. This ensures your pad stays together through washing and use.
- Practice Stitches: If you’re brand new, maybe practice making a few chains, single crochets, and double crochets on a little test swatch before starting the pad.
Making things with your own hands brings such a unique kind of joy. Feel the soft cotton, see the pattern emerge round by round – it’s a wonderful process. Once you’ve made one, you’ll probably want a whole stack! They also make lovely little gifts.
Go on, give it a try! We’d love to see the lovely face pads you fashion. Share photos of your finished pieces! Happy stitching!