
Handmade Style: The Drawstring Backpack
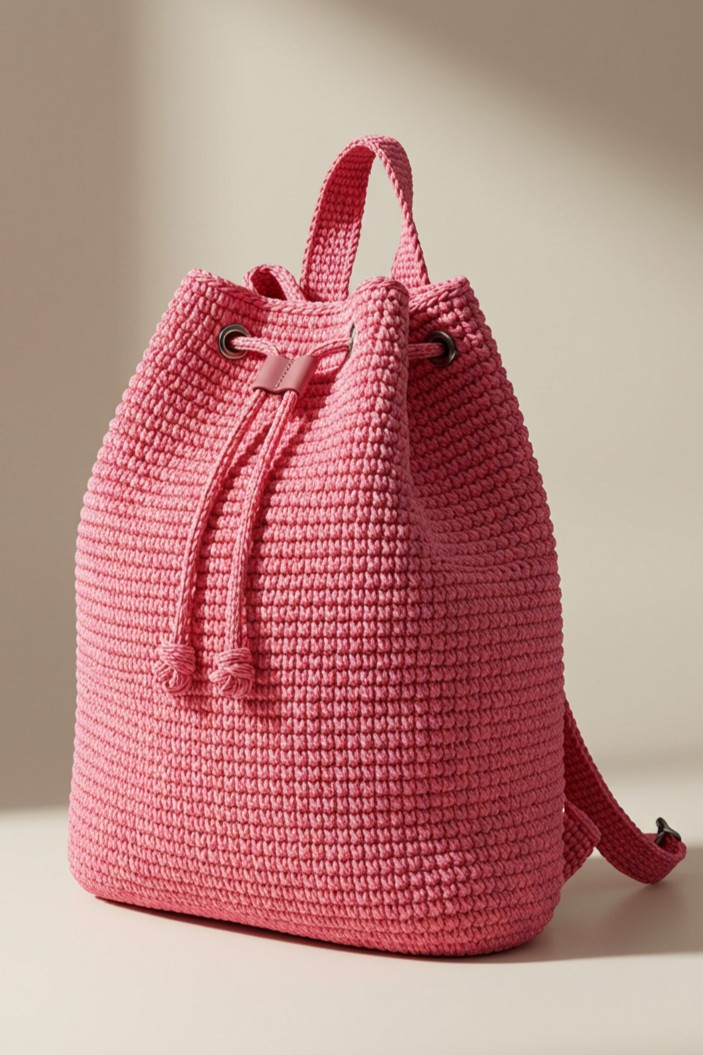
Elevate your style with this gorgeous pink crochet backpack—a piece that’s not just an accessory, but a testament to your skill. The best part? You’re about to make it yourself.
This step-by-step guide is all you need. We’ll break down the process, from the first stitch to the finishing touches, to ensure your final backpack is a perfect match to the one pictured.
What You’ll Need
Before we dive in, let’s gather our tools. The dense, knit-like fabric of this bag comes from using a thick yarn and a special stitch, which also helps the project progress wonderfully quickly!
- 🧶 Yarn: A sturdy T-shirt yarn or a thick cotton cord in a vibrant pink. You will need about 2-3 skeins, depending on their size.
- 🪝 Crochet Hook: A large hook, such as an 8.0mm or 9.0mm, to work with the thick yarn.
- ✂️ Scissors: For clean cuts.
- 🪡 Yarn Needle: A large-eyed tapestry needle is essential for weaving in the thick yarn ends.
- 🔩 Hardware:
- 8-10 metal grommets/eyelets (about 1/2 inch or 1.5cm in diameter).
- 1 leather or faux-leather drawstring slide, which is the small piece that cinches the cords together.
- 2 metal strap adjusters (approx. 1 inch or 2.5cm, optional, for adjustable straps).
The Foundational Stitches
This backpack uses two different stitches: a special stitch for the body to make that knit-like look, and a standard stitch for the straps to ensure they are flat and strong.
1. The Waistcoat Stitch (wst) – For the Bag’s Body
This is the key stitch that creates the beautiful, dense, V-patterned fabric seen in the photo. It’s a variation of the single crochet, often called “Center Single Crochet.”
- Look at the single crochet stitch from the previous round. You’ll see it forms a “V” shape.
- Insert your hook not under the top two loops (as you would for a standard single crochet), but directly into the center of that “V”, between the two vertical strands.
- Push the hook all the way through to the back of the work.
- Yarn over and pull the yarn back through the stitch. You will now have two loops on your hook.
- Yarn over again and pull the yarn through both loops. That’s one waistcoat stitch.
- Tip: This stitch can be tight. Try to keep your tension loose to make it easier to insert the hook into the “V” on the next round.
2. The Single Crochet (sc) – For the Handle & Straps
This classic stitch is used to create the flat, sturdy handle and shoulder straps.
- Insert your hook into the designated stitch (under both top loops).
- Yarn over your hook.
- Pull the yarn back through the stitch. You will have two loops on your hook.
- Yarn over again.
- Pull the yarn through both loops on your hook.
The Magic Ring
This is the best way to start a project in the round without leaving a hole in the middle. There are many wonderful video tutorials online if you search for “magic ring for beginners.”
Step-by-Step: Assembling Your Backpack
We’ll build this bag piece by piece. Remember to use the Waistcoat Stitch (wst) for the base and body.
Part 1: Forming the Flat Base
The backpack has a sturdy, flat circular base. We’ll form this by working in continuous rounds and increasing our stitches evenly.
Round 1: Start with a Magic Ring and work 6 single crochet (sc) stitches into the ring. (For the very first round, sc is used as there are no “V”s to work into yet). Pull the tail to close the ring. Place a stitch marker in the last stitch. (6 stitches)
Round 2: Work 2 waistcoat stitches (wst) into the center “V” of every stitch from the previous round. This is an increase. (12 stitches)
Round 3: [1 wst in the next stitch, then 2 wst in the stitch after that]. Repeat this pattern all the way around. (18 stitches)
Round 4: [1 wst in each of the next 2 stitches, then 2 wst in the stitch after that]. Repeat this pattern all the way around. (24 stitches)
Continue this pattern of increasing (adding one more stitch between increases each round) until your flat circle measures about 9-10 inches (23-25cm) in diameter. This will form a solid, wide base for your bag.
Part 2: Building the Body of the Bag
This is the most meditative part. To make the sides grow upwards, you simply stop increasing.
From here on out, just work 1 waistcoat stitch (wst) in every stitch of the round. After the first round without increases, you’ll see the edge begin to turn upward, forming the walls of your backpack.
- Pro Tip: The waistcoat stitch has a natural tendency to slant slightly when worked in continuous rounds. This is normal and part of its charm. To keep the look neat, give your work a gentle tug and straighten it every few rounds.
Continue working round after round of waistcoat stitch. Keep going until the body of the bag is about 12-14 inches (30-35cm) tall. Fasten off and weave in the end.
Part 3: The Drawstring & Hardware
- Install Grommets: Following their instructions, evenly space 8-10 grommets around the top opening of your bag, about 1.5-2 inches (4-5cm) down from the top edge.
- Make the Drawstring: Take a long strand of your yarn (at least 60 inches/150cm). Crochet a chain, then turn and work a slip stitch into each chain stitch to create a thicker, sturdier cord. Make two of these cords.
- Thread the Drawstring: Before knotting, thread both cords through the leather slide. Then, starting from the front, weave one cord through the grommets in one direction, and the second cord in the opposite direction. The ends of both cords should exit from the two front-most grommets.
- Finish the Ends: Tie a thick, secure knot at the end of each cord, as seen in the image. Trim any excess.
Part 4: The Handle and Straps
The handle and straps are made using standard single crochet (sc) worked in rows, not the waistcoat stitch.
- Top Handle: Chain 6. Turn, and starting in the second chain from the hook, work 1 single crochet (sc) in each stitch across (5 sc). Chain 1 at the end of each row and turn. Repeat this process, working back and forth in rows of sc until you have a short strap about 7-8 inches long. Leave a long tail for sewing. Securely sew the handle to the top-back of your backpack.
- Shoulder Straps: Repeat the exact same process as the handle (working in rows of sc), but continue until you have two long straps (about 25-30 inches, or your preferred length). Attach one end of each strap to the back of the bag, near the top handle. Attach the other ends to the bottom back corners. Sew them on very securely, as they will bear all the weight.
Weave in any remaining ends, and your backpack is complete!
Take a moment to admire your work. You’ve transformed simple yarn into a durable, chic, and entirely unique backpack. Every stitch was placed by you. Now, pack it with your essentials and wear it with the pride it deserves.