
Handmade Tag for Your Travels
Ready to add a personal touch to your luggage? Let’s put together this lovely crocheted travel tag! It’s a wonderful small project, perfect for practicing basic stitches and resulting in something both beautiful and useful. Imagine spotting your unique, handcrafted tag on the baggage carousel – such a satisfying moment! This guide will walk you through every step, making it easy even if you’re just starting your crochet journey.
Getting Started: What You’ll Need
Before we begin fashioning your tag, let’s gather our supplies:
- 🧶 Yarn: Worsted weight cotton or a cotton blend yarn in a light beige color (like the one pictured). About 20-30 yards should be plenty.
- 🪝 Crochet Hook: Size G/6 (4.0 mm) or H/8 (5.0 mm), depending on your yarn and tension. Use the size that gives you a nice, firm fabric.
- ✂️ Scissors: For trimming yarn ends.
- 🧵 Yarn Needle: (Also called a tapestry needle) For weaving in ends neatly.
Stitch Guide & Abbreviations (Beginner Friendly!)
We’ll use a few fundamental crochet techniques. Here’s a simple breakdown:
- ch: Chain stitch. This is your foundation! Make a slip knot on your hook, yarn over (wrap yarn around the hook), and pull the yarn through the loop on your hook. That’s one chain.
- st(s): Stitch(es). Refers to any crochet stitch you make.
- sl st: Slip Stitch. Insert your hook into the indicated stitch, yarn over, and pull the yarn through both the stitch and the loop on your hook. It’s used for joining or finishing.
- sc: Single Crochet. Insert your hook into the stitch, yarn over, pull up a loop (you’ll have 2 loops on your hook), yarn over again, and pull through both loops on the hook. Nice and simple!
- hdc: Half Double Crochet. Yarn over, insert your hook into the stitch, yarn over, pull up a loop (3 loops on your hook), yarn over again, and pull through all three loops on the hook. A bit taller than an sc.
- sk: Skip. Don’t work into the next specified stitch(es).
- […]: Repeat instructions within brackets as directed.
A Note on Tension: Try to keep your stitches consistent – not too tight, not too loose. This helps your tag have an even shape and texture.
Making the Tag Body
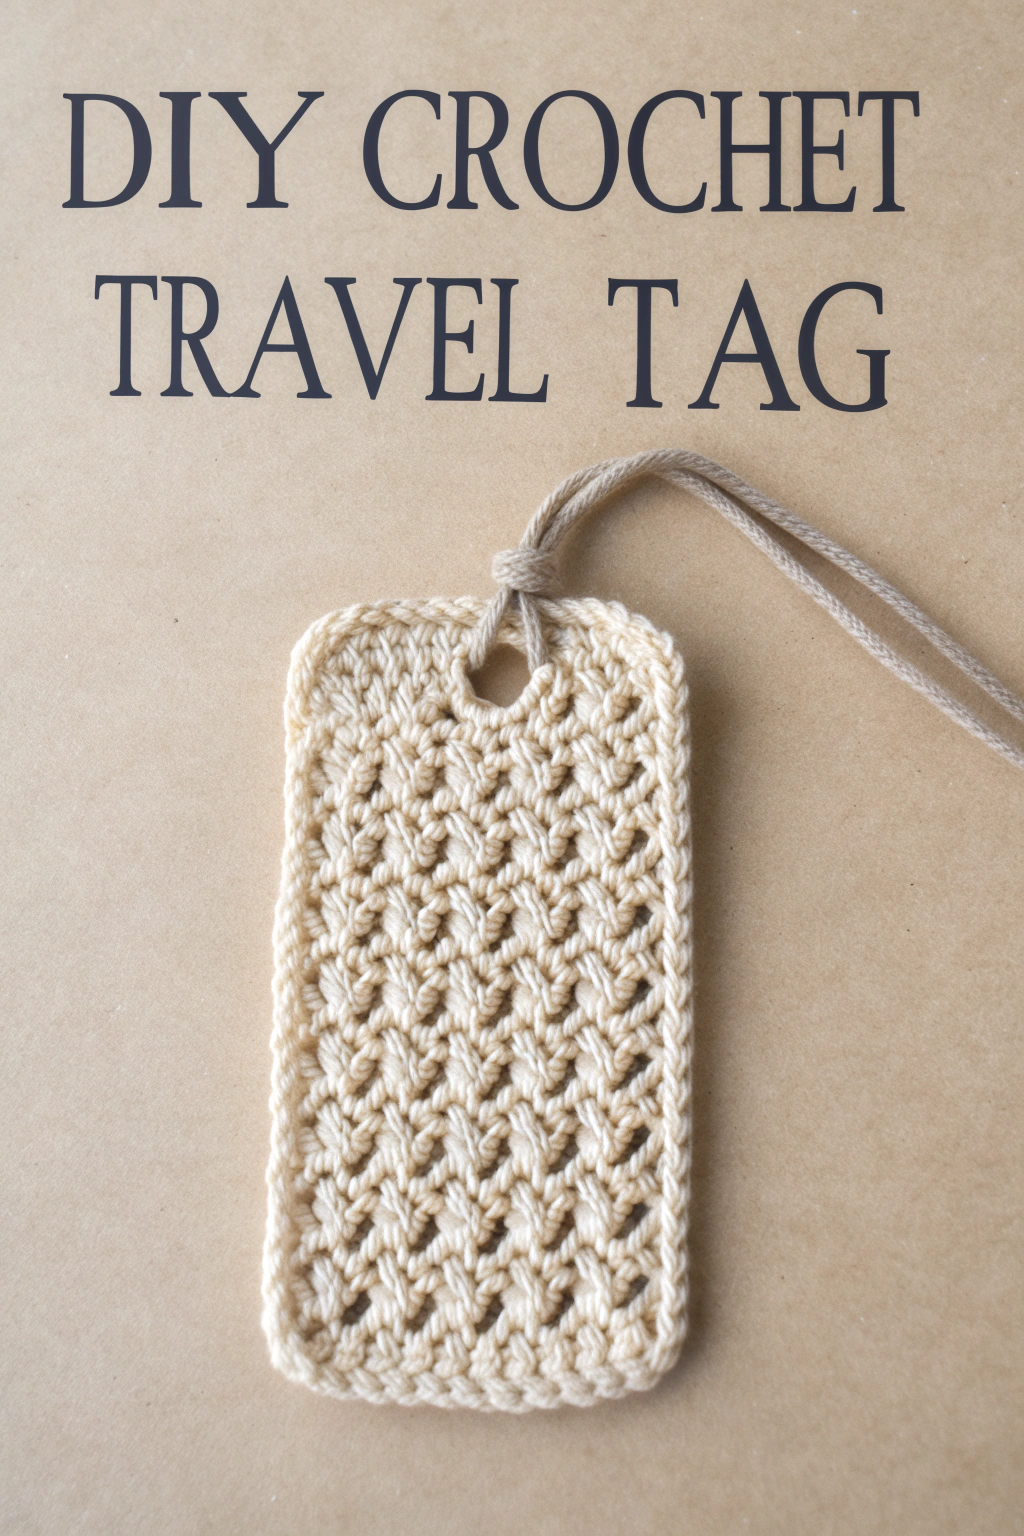
This tag features a lovely, dense textured pattern. We’ll build this row by row. The finished tag in the image appears roughly 2.5 inches wide and 4 inches tall before the border.
- Foundation Chain: Ch 11. (This determines the width. You can adjust slightly if desired, using an odd number of chains).
- Row 1: Turn your chain over. Starting in the second ch from the hook, work 1 sc. Then, work 1 hdc in the same chain stitch. [Sk the next ch, work (1 sc, 1 hdc) into the following ch]. Repeat from * across the row until you have one chain left. Work 1 sc in the last ch. (You should have 5 sets of (sc, hdc) clusters and the single sc at the end, for a total of 11 stitches across). Ch 1, turn.
- Tip: Working into the second chain from the hook gives a neater starting edge. The ch 1 at the end of the row is a ‘turning chain’ and helps bring the yarn up to the correct height for the next row.
- Row 2: Work 1 sc in the very first stitch (the sc from the previous row). Now, work 1 hdc in the same first stitch. [Sk the next st (which is an hdc from the row below), work (1 sc, 1 hdc) into the following st (which is the sc from the row below)]. Repeat from * across the row until you have one stitch left. Work 1 sc in the last st. (Again, 11 stitches total). Ch 1, turn.
- Explanation: You’re always skipping the taller hdc from the row below and working your (sc, hdc) pair into the shorter sc stitch. This is what forms that distinctive textured pattern visible in the photo.
- Rows 3 – 14 (or desired height): Repeat Row 2 exactly. Continue building the fabric until the tag reaches your preferred height, remembering you’ll add a border. Aim for roughly 3.5 inches tall for the main body.
- Check: Your tag should be a neat rectangle with straight sides and that beautiful, dense texture seen in the image.
- Forming the Hole Row: On your next row (let’s say Row 15), we need to make the space for the tie. Work Row 2 instructions for the first 4 stitches (meaning: (sc, hdc) in the first st, sk 1, (sc, hdc) in the next st). Now, ch 3, sk the next 3 sts below (this will be an sc, an hdc, and another sc). Work (1 sc, 1 hdc) into the next st. Sk 1 st. Work 1 sc in the last st. Ch 1, turn.
- Troubleshooting: Make sure you skipped exactly 3 stitches under your chain-3 space. This centers the hole.
- Row 16 (Row above hole): Work 1 sc in the first st, 1 hdc in the same st. Sk the next st (the hdc). Work (1 sc, 1 hdc) into the next st (the sc). Now, work 3 sc directly into the ch-3 space you made in the previous row. Next, work (1 sc, 1 hdc) into the next sc stitch after the chain space. Sk the next st (the hdc). Work 1 sc in the last st. (You should be back to 11 effective stitches across). Ch 1, turn.
- Row 17: Work Row 2 instructions one last time across this top edge. (11 stitches). Do not fasten off yet! We’ll go straight into the border.
Adding the Finishing Border
The tag in the image has a clean single crochet border all around, which neatens the edges and adds durability.
- Side 1: After finishing Row 17 and the ch 1, do not turn. Instead, rotate your work 90 degrees clockwise. Start working sc stitches evenly down the long side edge of the tag. Aim for roughly one sc per row end. Keep the stitches neat and evenly spaced.
- Bottom Corner: When you reach the bottom corner, work 3 sc stitches into the corner stitch (or the space at the corner). This helps turn the corner smoothly without puckering.
- Bottom Edge: Continue working sc stitches across the foundation chain edge (the bottom of the tag). Try to work one sc into each chain space.
- Second Corner: When you reach the next corner, work 3 sc stitches into that corner stitch/space.
- Side 2: Rotate again and work sc stitches evenly up the second long side edge, matching the number you did on the first side as closely as possible.
- Top Corners: When you reach the top edge (where you started the border), work 2 sc into the first top corner space. Continue working sc stitches across the top edge, including into the stitches above the hole. Work 2 sc into the final top corner space.
- Join: Find the very first sc stitch you made for the border (at the start of Side 1). Work a sl st into that stitch to join the round neatly.
- Fasten Off: Cut your yarn, leaving a 6-inch tail. Pull the tail through the loop on your hook to secure it.
- Weave in Ends: Thread the yarn tail onto your yarn needle. Weave the end securely and discreetly into the back of your stitches. Trim any excess yarn. Do the same for the starting yarn tail.
Making the Tie
The tag uses a simple cord for attachment.
- Cut Cord: Cut a piece of your yarn (or a slightly thicker twine/cord if you prefer) about 10-12 inches long.
- Attach: Fold the cord in half. Push the folded loop end through the hole in your tag from front to back. Then, pull the two loose ends of the cord through that loop. Gently pull the ends to tighten the loop around the top edge of the hole, securing the tie. This forms a lark’s head knot.
Your Handcrafted Tag is Ready!
And there you have it! A beautifully textured, sturdy crocheted travel tag, put together with your own hands. Feel that lovely stitch definition and the firmness of the fabric – perfect for standing up to travel adventures. Attaching this to your suitcase adds a unique, personal element that’s easy to spot and feels wonderful to use.
Why not make a few more? They’re fantastic little gifts for fellow travelers or anyone who appreciates a handmade touch. Experiment with different yarn colors too! We’d love to see the tags you fashion – share a picture if you feel like it! Happy travels and happy stitching!