

Hop Into Handmade Bunny Booties
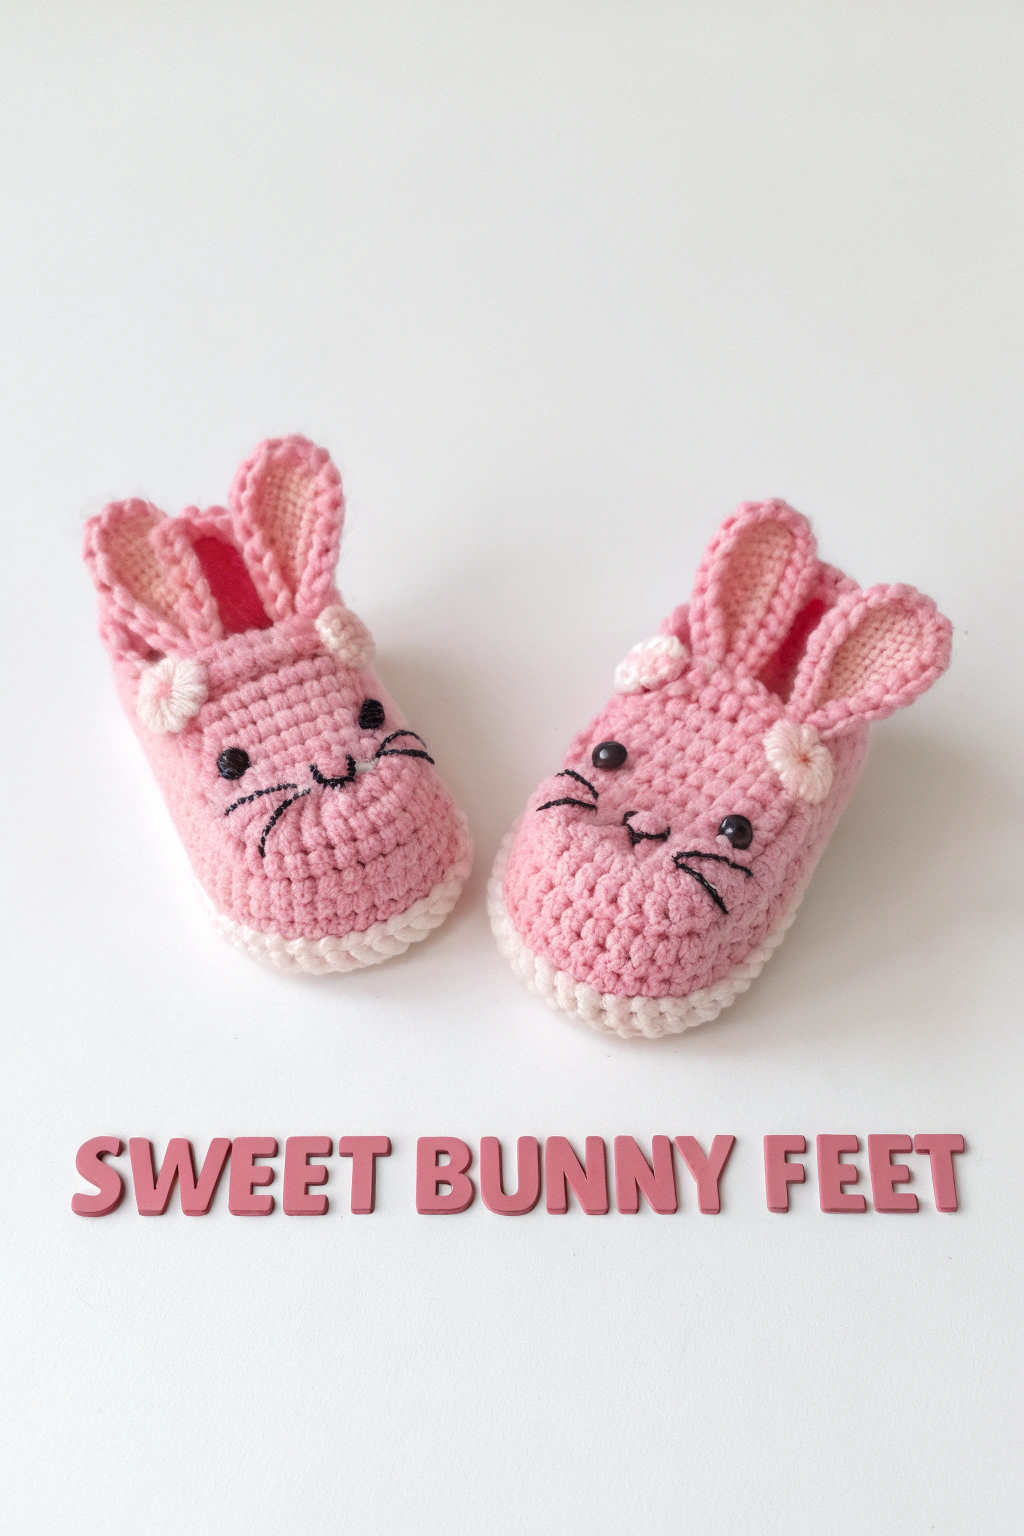
Have you ever admired a pair of exquisitely handmade baby booties and wished you could fashion something just as lovely? Today, we’re embarking on a delightful journey to make the charming pink crocheted bunny booties exactly as they appear in the picture. These tiny treasures are simply perfect for gifting or for wrapping little feet in warmth and undeniable cuteness. Just picture the joy when these sweet bunny feet make their debut!
This project is a fantastic way to build your beginner crochet confidence. We’ll proceed step-by-step, and I’ll explain every technique in simple terms. So, pick up your hook, and let’s begin this heartwarming adventure together.
What You’ll Need to Gather
Before we jump into the enjoyable part, let’s get all our supplies in order. Having everything at hand makes the entire process wonderfully smooth.
- 🧶 Medium Pink Yarn: Worsted weight (Category 4). This is the primary color for the booties and the outer ear sections.
- 🧶 Light Pink Yarn: Worsted weight (Category 4). This will be used for the inner ear sections and the round cheek accents.
- 🧶 White or Cream Yarn: Worsted weight (Category 4). This is for the distinct sole trim.
- 🪡 Crochet Hook: Size G/6 (4.0 mm) or H/8 (5.0 mm) – it’s best to check your yarn label for recommendations, or use the size that helps you achieve a firm fabric so the booties maintain their shape.
- 🧵 Black Embroidery Thread or Thin Black Yarn: For embroidering the bunny’s delicate facial features.
- ✂️ Scissors: For neatly snipping your yarn.
- 🪡 Yarn Needle (Tapestry Needle): Essential for weaving in ends and assembling all the pieces.
- 📏 Measuring Tape: Optional, but can be helpful for checking the size.
Understanding the Basics: Your Crochet Toolkit
For these booties, we’ll primarily employ a few fundamental crochet stitches. If you’re entirely new to crochet, here’s a quick guide. Don’t fret; they are quite easy to learn!
- Chain (ch): This is the starting point for most crochet items. You’ll form a slip knot on your hook, then yarn over (wrap yarn around your hook) and draw it through the loop currently on your hook. That completes one chain!
- Slip Stitch (sl st): This stitch is used to join rounds, move your yarn across stitches without adding height, or to finish edges. Insert your hook into the designated stitch, yarn over, and pull the yarn through both the stitch and the loop on your hook in one fluid motion.
- Single Crochet (sc): This is a short, compact stitch, ideal for producing a sturdy fabric like these booties. Insert your hook into the stitch, yarn over, pull up a loop (you will have two loops on your hook), yarn over again, and draw the yarn through both loops on your hook.
We’ll be working in rounds for several parts of this project, which means we’ll be shaping circular or tubular pieces of fabric.
Let’s Get Stitching: The Bootie Sole (Make 2)
We’ll commence by fashioning the soles of the booties using the medium pink yarn. These instructions will produce a bootie approximately 4 inches long, suitable for a 3-6 month old baby. You can adjust the length of the starting chain if you need a different size.
- Start: Chain 11 (ch 11).
- Round 1: Work 2 single crochet (sc) stitches into the 2nd chain from the hook (this is your first increase). Then, sc in each of the next 8 chains. Into the last chain, work 5 sc (this shapes the toe curve). Now, working along the opposite side of the foundation chain, sc in each of the next 8 chains. Work 3 sc into the last chain space (which was the very first chain space you worked into, completing the heel curve). Join with a slip stitch (sl st) to the first sc of the round. (You should have 26 stitches).
- Round 2: Chain 1 (ch 1, this does not count as a stitch here and throughout). Work 2 sc in each of the first 2 stitches. Sc in each of the next 8 stitches. Work 2 sc in each of the next 5 stitches (around the toe area). Sc in each of the next 8 stitches. Work 2 sc in each of the last 3 stitches (around the heel area). Join with a sl st to the first sc. (You should have 36 stitches).
- Round 3 (Sole Trim – White/Cream Yarn): Fasten off the pink yarn. Join the white or cream yarn with a sl st to any stitch. Ch 1. Work 1 sc in each stitch around the entire sole. Join with a sl st to the first sc. (36 stitches).
- Tip: This white/cream round forms the crisp, visible base edge seen in the image. Ensure your stitches are neat and even!
Fasten off the white/cream yarn, leaving a short tail to weave in. Repeat steps 1-4 for the second sole. You now have two sturdy foundations for your bunny booties!
Building the Bootie Upper (Make 2)
Now, we’ll switch back to the medium pink yarn to construct the sides of the bootie, working directly into the stitches of the white/cream trim.
- Round 1 (Joining to Sole): With the right side of the sole (the side that looked neatest as you crocheted it) facing you, join the medium pink yarn with a sl st to any stitch of the white/cream round, preferably at the center back (heel). Ch 1. Work 1 sc in the back loop only (BLO) of each stitch around. Join with a sl st to the first sc. (36 stitches).
- Why BLO? Working in the back loop only encourages the sides of the bootie to stand upright neatly from the sole.
- Rounds 2-4 (Height): Ch 1. Work 1 sc in each stitch around (working through both loops now). Join with a sl st to the first sc. (36 stitches per round).
- You can add or remove a round here if you prefer the booties to be slightly taller or shorter.
- Round 5 (Starting Toe Shaping): Ch 1. Sc in the next 10 stitches. Then, we’ll begin decreasing to shape the top of the foot. Work a single crochet 2 together (sc2tog) over the next two stitches. (To do this: insert hook in next stitch, yarn over, pull up a loop. Insert hook in following stitch, yarn over, pull up a loop. Yarn over, pull through all 3 loops on hook). Repeat sc2tog 7 more times (for a total of 8 decreases). Sc in the remaining 10 stitches. Join with a sl st to the first sc. (28 stitches).
- Round 6 (More Toe Shaping): Ch 1. Sc in the next 9 stitches. Sc2tog 5 times. Sc in the remaining 9 stitches. Join with a sl st to the first sc. (23 stitches).
- Round 7 (Final Shaping Round): Ch 1. Sc in each stitch around. Join with a sl st to the first sc. (23 stitches).
Fasten off, leaving a longer tail (about 8-10 inches) for tidying up the opening if necessary, and weave in the end securely. Repeat for the second bootie. They are truly starting to resemble footwear! How wonderful is that?
Crafting the Bunny Ears (Make 4 Complete Ears)
Each bootie boasts two utterly adorable, perky ears. Each ear is composed of a medium pink outer piece and a light pink inner piece.
Outer Ear (Medium Pink Yarn – Make 4)
- Start: Ch 7.
- Row 1: Sc in the 2nd ch from hook and in each ch across. (6 sc). Ch 1, turn.
- Rows 2-5: Sc in each stitch across. (6 sc). Ch 1, turn.
- Row 6 (Start Shaping Top): Sc2tog, sc in next 2 sts, sc2tog. (4 sc). Ch 1, turn.
- Row 7: Sc2tog twice. (2 sc). Ch 1, turn.
- Row 8: Sc2tog. (1 sc). Fasten off, leaving a tail for sewing later.
Inner Ear (Light Pink Yarn – Make 4)
- Start: Ch 5.
- Row 1: Sc in the 2nd ch from hook and in each ch across. (4 sc). Ch 1, turn.
- Rows 2-3: Sc in each stitch across. (4 sc). Ch 1, turn.
- Row 4 (Start Shaping Top): Sc2tog twice. (2 sc). Ch 1, turn.
- Row 5: Sc2tog. (1 sc). Fasten off, leaving a short tail.
Assembling the Ears
Place one light pink inner ear piece on top of one medium pink outer ear piece, ensuring the bottoms are aligned. Using the yarn tail from the medium pink piece and your yarn needle, neatly sew the two pieces together around the edges of the light pink piece. The light pink inner ear is visibly smaller and sits centered on the medium pink outer ear, precisely as shown in the image. Repeat to assemble all four ears.
Making the Cheek Accents (Light Pink Yarn – Make 4)
These are the small, light pink circular accents that form the bunny’s cheeks, as seen in the image.
- Round 1: Using the light pink yarn, make a magic ring (or ch 2, and work into the 2nd ch from hook). Work 6 sc into the ring. Pull the ring tight to close the center hole. Join with a sl st to the first sc. (6 sc). Fasten off, leaving a tail for sewing. Repeat to make four cheek accents.
Bringing Your Bunnies to Life: Assembly & Embroidery
This is where the true enchantment occurs, and your booties gain their charming personalities!
- Attach the Ears: Take one bootie. Position two assembled ears on the upper front section of the bootie, just above the shaped toe area. The image shows them fairly close together and standing upright. Use the yarn tails from the outer ears and your yarn needle to securely sew the base of each ear to the bootie.
- Tip: You can slightly pinch the base of each ear as you sew it on to help it stand up perky and alert.
- Attach the Cheek Accents: Position one light pink cheek accent on either side of where the nose will be, slightly below and outward from where the eyes will be placed. The image shows these as distinct circular patches. Use the yarn tails from the cheek accents and your yarn needle to sew them flat against the bootie.
- Embroider the Face: This is what gives your bunnies their sweet and endearing expressions! Using your black embroidery thread (or thin black yarn, perhaps splitting the plies if it’s too thick) and a yarn needle:
- Eyes: To create the small, round black eyes, you have a few delightful options! You can embroider them using a few straight stitches clustered together or by forming a small satin stitch for a solid look – you might even notice subtle variations in how this can be done in the example booties. Alternatively, for a different but equally charming effect, you could use small, ready-made safety eyes (ensure they are baby-safe if these booties are for an infant) or tiny black buttons. Choose the method that you prefer or that best suits your supplies! Position them above the cheek accents.
- Nose: The image shows a small, distinct black nose. Form this by making a few small, overlapping horizontal or slightly oval straight stitches, positioned centrally above where the mouth will be.
- Mouth: Directly below the nose, embroider a small ‘V’ shape or a shallow ‘U’ shape for the mouth, using two small, diverging straight stitches.
- Whiskers: Add two or three small, straight stitch whiskers fanning out from each side of the nose area, over the cheek accents.
Repeat the assembly and embroidery steps for the second bootie. Take your time with the facial features – careful, symmetrical placement makes them look exceptionally polished and sweet!
Your Sweet Bunny Feet are Hopping to Go!
And there you have them! A pair of utterly precious crocheted bunny booties, lovingly fashioned with your very own hands. Admire those sweet faces, perky ears, and charming cheek details! Each stitch is a testament to your care and developing skill. Aren’t they simply a joy to behold?
Please don’t feel hesitant to try this project. Even if you are just beginning your crochet adventure, breaking it down into manageable steps makes it entirely achievable. The satisfaction of seeing these little booties take shape is truly a special reward.
We would be thrilled to see your finished bunny booties! Do share a picture of your wonderful handiwork. Happy stitching, and may your hooks always bring you joy!