
Iconic Homemade Halal Beef Burger
Isn’t it wonderful when a beautifully put-together hamburger, all warm and tempting, comes right from your own kitchen? If you’re new to cooking, this guide is your friendly helper! We’ll go through the steps to make a classic beef burger that looks every bit as delicious as the one in the photo, really showing off how fantastic simple, quality ingredients can be. You’re about to see how easy and truly satisfying it is to whip up this much-loved meal!
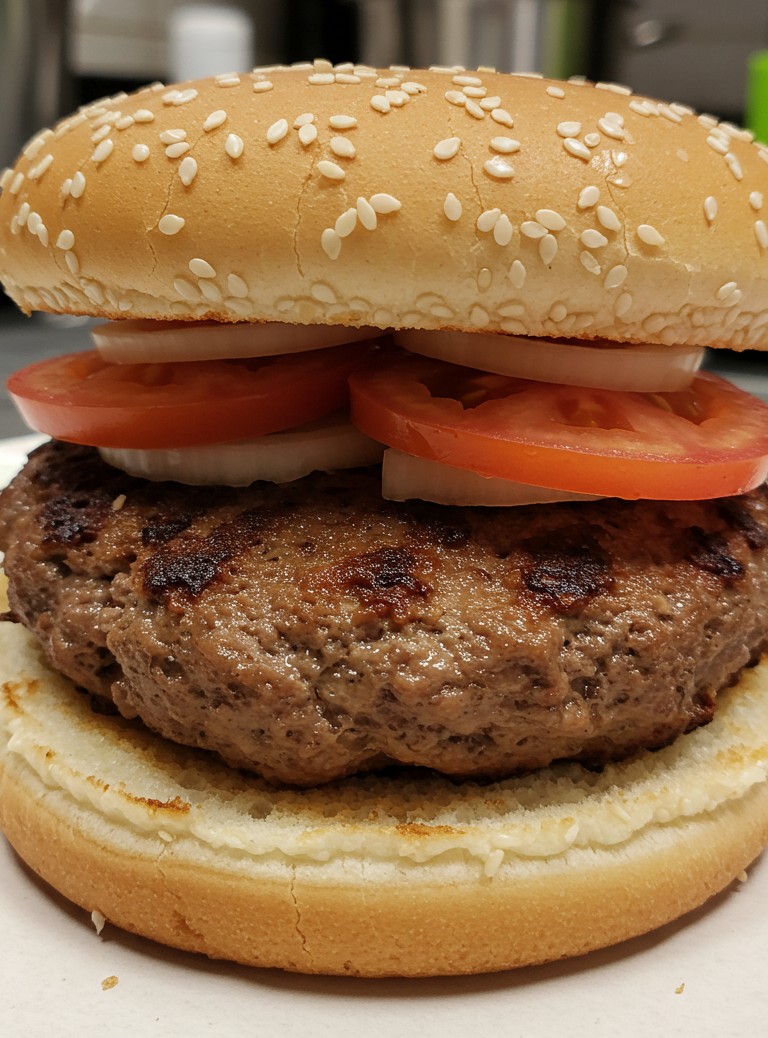
Why This Burger Shines
The burger in the image is a testament to classic simplicity elevated by generous portions. It features a notably thick, well-seared beef patty, domed impressively and nestled between a soft sesame seed bun. The freshness is evident in the multiple, vibrant red tomato slices and the substantial white onion rings. This recipe focuses on achieving that exact satisfying experience, proving that uncomplicated can be incredibly delicious.
Gather Your Provisions
To embark on this burger journey, a few choice items are needed. Prioritizing quality will elevate the final taste.
- 🥩 180-200g (approx. 0.4-0.44 lb) halal ground beef (preferably 80/20 lean to fat ratio) per burger, to achieve the pictured thickness
- 🍔 1 sesame seed burger bun per burger
- 🍅 1 large ripe tomato (to yield at least four good slices)
- 🧅 1/2 small white onion
- 🧂 Pinch of salt
- 🌶️ Pinch of black pepper
- 🧈 A small amount of butter or a light brush of oil (for toasting buns, optional)
Essential Kitchen Tools
Having the right tools makes any cooking task smoother and more enjoyable.
- 🔪 Sharp knife
- 🥢 Cutting board
- 🍳 Heavy-bottomed skillet or frying pan (cast iron is excellent)
- ↔️ Spatula (preferably metal for pressing and flipping)
- 🥣 A small bowl (optional, for shaping patties)
- 🍽️ Plate
Building Your Burger Masterpiece
Follow these steps carefully, and a fantastic homemade burger will be the reward.
1. Preparing the Toppings
The fresh components of this burger add brightness and texture. First, wash the tomato. Using a sharp knife on the cutting board, carefully slice the tomato into rounds, about 1/4-inch thick. As seen in the image, at least four distinct tomato slices are used per burger, arranged closely to give a full, layered appearance. Next, peel the white onion. Slice it into substantial rings, approximately 1/4 to 3/8-inch thick. The image shows several of these robust rings of raw white onion, providing a significant, crisp bite. Set these prepared vegetables aside.
2. Shaping the Beef Patty
The heart of the burger is, of course, the patty, and its impressive thickness is a key feature in the photograph. Gently take the ground beef. It’s important not to overwork the meat, as this can make the patty tough. Form it into a thick disc that is slightly wider than the diameter of the burger bun; it will shrink a bit during cooking. Aim for a thickness of at least 1 inch to replicate the noticeably thick and domed patty seen in the photograph. A helpful tip for very thick patties is to press a slight dimple into the center of one side of the patty with your thumb. While thick patties naturally tend to dome, this can help manage extreme puffing and encourage more even cooking. The patty in the image exhibits a pronounced, appealing dome. Season one side of the patty generously with salt and pepper.
3. Cooking the Patty to Perfection
Achieving that beautiful sear visible on the robust patty in the image is key. Place the heavy-bottomed skillet over medium-high heat. Let it get properly hot. A hot pan is crucial for searing, which is the process of browning the meat’s surface quickly to develop a rich flavor and a desirable crust. Once the pan is hot, place the patty seasoned-side down into the skillet. Now, season the other side with salt and pepper. Cook for about 4-5 minutes on the first side, resisting the urge to move it. This allows a good crust to develop – notice the dark, rich browning on the patty in the image. Using the spatula, carefully flip the patty. Cook for another 4-6 minutes on the second side, or longer, depending on the desired level of doneness for such a thick patty. For a patty like the one shown, which appears well-done with its significant thickness and domed shape, this extended timing is necessary. If you have a meat thermometer, the internal temperature for well-done is 160°F (71°C). Once cooked, remove the patty from the skillet and let it rest on a clean plate for a couple of minutes. This allows the juices to redistribute, resulting in a more succulent burger.
4. Toasting the Buns
Toasting the buns adds a delightful textural contrast and helps prevent them from becoming soggy. The image shows both the top and bottom buns are lightly golden on their cut surfaces. You can do this in the same skillet used for the patty, making use of any remaining rendered beef fat for extra flavor, or you can use a separate pan or toaster. If using the skillet, you might want to wipe out any excess grease first. Lightly butter the cut sides of the sesame seed bun halves, or give them a very light brush with oil. Place them cut-side down in the warm skillet over medium heat for 1-2 minutes, or until they are lightly golden brown and slightly crisp. Keep a close eye on them as they can brown quickly.
5. Assembling Your Classic Burger
Now for the exciting part – putting it all together, just as presented in the image.
- Place the toasted bottom half of the sesame seed bun on a serving plate, cut-side up.
- Carefully position the cooked, domed beef patty directly onto the bottom bun.
- Arrange the prepared substantial white onion rings on top of the patty. The image shows a generous layer of these thick rings.
- Place the four (or more) vibrant red tomato slices on top of the onions, ensuring full coverage as depicted.
- Finally, complete your burger by placing the toasted top half of the sesame seed bun over the tomatoes.
Beyond the Bite
This classic beef burger stands proudly on its own, a substantial and satisfying meal. Consider serving it with a side of homemade fries or a fresh green salad to complement its richness. The true joy comes from tasting the fruits of one’s labor – a burger put together with care, featuring flavors that meld beautifully.
Final Flourish
There’s an undeniable charm in mastering fundamental recipes with attention to detail. This homemade beef burger is more than just a meal; it’s an experience, a small victory in the kitchen. Give this method a try, aiming for that impressive presentation, and perhaps share a snapshot of your own burger accomplishment. Happy cooking!