

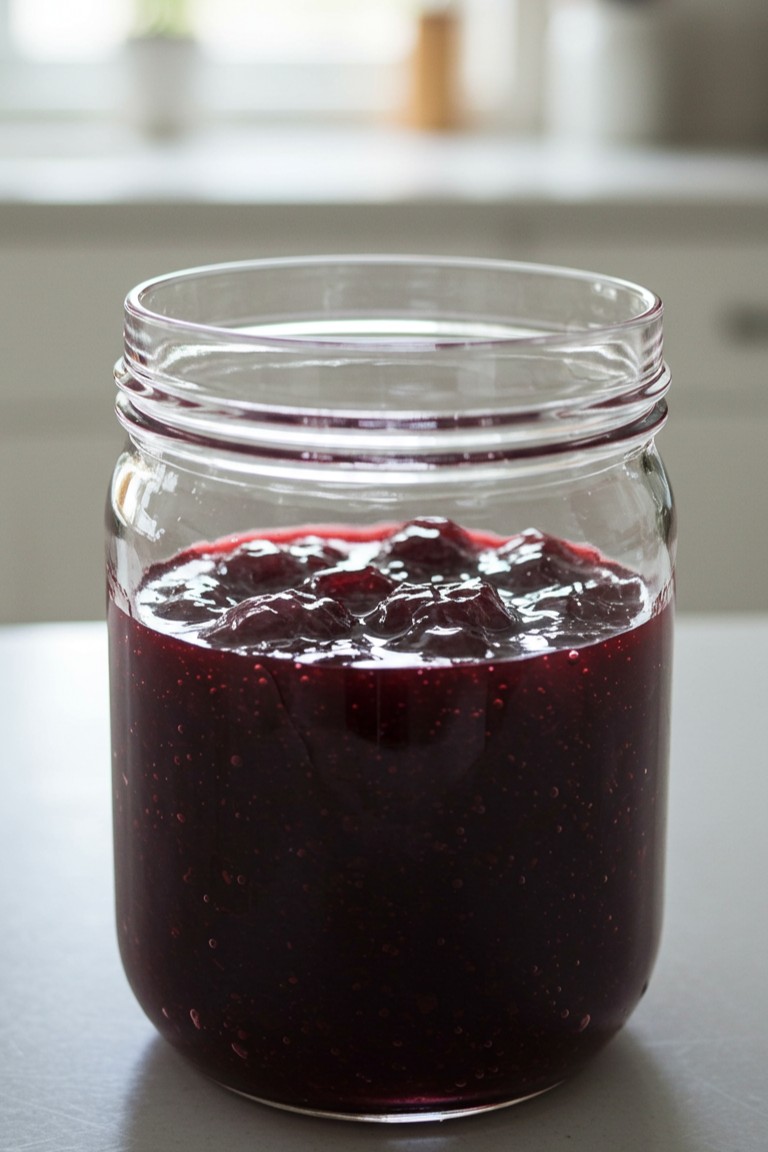
Jar of Jewel-Toned Cherries
A handful of fresh cherries holds incredible potential. But for many aspiring jam makers, one question looms: “How do I make sure it’s not runny?” The stunning, perfectly thick preserves you see in this jar aren’t the result of luck, but of one crucial technique. This guide not only demystifies the process but also shares the foolproof ‘freezer test’—the simple secret that guarantees a perfect, chunky set every single time. Let’s make that spectacular jar of cherry jam, with full confidence.
What You’ll Need
Here are the tools and ingredients required to get started. Ensuring the ingredients are halal is key to a wonderful final product.
Essential Halal Ingredients
- 🍒 1 kg fresh sweet cherries (like Bing or Lambert)
- 🍋 3 tablespoons fresh lemon juice
- 🍚 750g granulated sugar (ensure it’s bone-char free for a fully halal product)
- 💧 1/4 cup water
Kitchen Equipment
- 🥣 A large, non-reactive bowl (glass or stainless steel)
- A heavy-bottomed pot or Dutch oven
- 🔪 A sharp knife or a cherry pitter
- 🥄 A long-handled spoon for stirring (wood or silicone)
- Ladle A ladle or large spoon for transferring
- 🧊 A small plate, kept in the freezer (for testing the set)
- 🫙 One large (or several small) clean, sterilized glass jar with a lid
Assembling Your Cherry Preserves: A Step-by-Step Guide
Following these steps carefully will lead to beautiful, delicious preserves with the perfect texture and color.
Step 1: Prepare the Cherries
The first step is preparing the fruit. Wash the cherries thoroughly under cool, running water. Remove all the stems and pits. A cherry pitter makes this job quick, but it can also be done by hand. Simply slice each cherry in half and pop the pit out with your fingers or the tip of the knife. Halving the cherries is what yields the wonderfully chunky texture seen in the final preserves.
Step 2: Macerate the Fruit
Maceration is a simple technique where fruit is mixed with sugar and left to sit. This process draws the natural juices out of the fruit, helping it to break down gently and forming a syrup before any heat is applied.
In the large bowl, combine the pitted cherry halves with the sugar. Gently stir everything together until the cherries are fully coated. Cover the bowl and let it sit at room temperature for at least two hours, or for best results, in the refrigerator overnight. After this time, the bowl will contain softened cherries floating in a substantial amount of deep red, syrupy juice.
Step 3: Cook the Preserves
Transfer the entire contents of the bowl—cherries and all the liquid—into your heavy-bottomed pot. Add the lemon juice and water. The lemon juice not only brightens the flavor but also helps the preserves to set, which means to thicken to a jam-like consistency.
Place the pot over medium-high heat and bring the mixture to a boil, stirring occasionally to dissolve any remaining sugar. Once it reaches a rolling boil, reduce the heat to maintain a steady simmer. Simmering means the liquid will be bubbling consistently but gently, not boiling vigorously. A wild, hard boil can scorch the sugar and break down the fruit too much.
Step 4: Skim and Simmer
As the preserves simmer, a layer of foam may rise to the surface. Use a large spoon to carefully skim this foam off and discard it. Removing the foam results in a clearer, more jewel-toned final product and can also help with its shelf life.
Continue to let the preserves simmer, stirring every few minutes to prevent sticking. The mixture will slowly thicken. This entire simmering process can take anywhere from 20 to 35 minutes.
Step 5: Test for the Perfect Set
Knowing when the preserves are done is the most important part. The easiest method for beginners is the freezer plate test.
After about 20 minutes of simmering, take the small plate out of your freezer. Spoon a small drop of the hot preserves onto the cold plate and return it to the freezer for one to two minutes. After it has chilled, push the edge of the drop with your finger. If it wrinkles and holds its shape, the preserves are ready. If it’s still runny, continue simmering for another 5 minutes and test again. This technique ensures the preserves will have that thick, syrupy quality seen in the photo, rather than being a thin sauce.
Step 6: Jarring the Preserves
Once the preserves have reached their setting point, remove the pot from the heat. Let them cool for about 10 minutes in the pot; this allows the fruit pieces to distribute evenly throughout the syrup instead of floating to the top of the jar.
Warning: The preserves and the pot will be extremely hot. Use caution during this step.
Carefully ladle the warm cherry preserves into your sterilized glass jar, leaving about 1/2 inch of space at the top (this is called headspace). Wipe the rim of the jar clean of any drips, seal it with the lid, and let it cool completely to room temperature before refrigerating.
There is a simple joy in stocking a shelf with something made by hand. These gorgeous cherry preserves are perfect on toast, swirled into yogurt or oatmeal, or served over ice cream. Go ahead and try it—a jar of homemade goodness awaits.