
Knit a Cozy Stripe Hat for Baby
Giving something you’ve personally put together brings a unique joy, especially when it’s for a tiny new person! Picture this charming Knitted Baby Hat, featuring soft stripes and a cheerful pom-pom, keeping a little one snug – all fashioned through your own effort. Does knitting seem daunting? Not with this project! It’s a lovely introduction, and we’ll guide you through every part, explaining things simply. That wonderful ‘I finished this!’ feeling is just a few steps away.
What You’ll Need
Let’s gather your supplies first. For this hat, you’ll want a soft yarn suitable for babies.
- 🧶 Yarn: Worsted weight yarn (Category 4) in three colors: Peach (Main Color – MC), Cream (Color A), and Light Green (Color B). Choose something soft and washable. You won’t need a full skein of each.
- 🥢 Knitting Needles: Size US 8 (5.0 mm) straight needles are a good starting point, but check the yarn label for recommendations.
- ✂️ Scissors: For snipping yarn.
- 🪡 Yarn Needle (Tapestry Needle): One with a large eye for weaving in ends and seaming.
- 📏 Measuring Tape: Helpful for checking your progress.
- 🎀 Pom-pom Maker (Optional): You can use cardboard donuts or even your hand, but a maker simplifies things.
Getting Started: The Basics
Before we jump into the hat itself, let’s define a few key knitting actions you’ll be using.
- Cast On: This is how you get your first stitches onto the needle to begin knitting. There are many methods, but a simple Long-Tail Cast On is common and sturdy. (Look up a quick video tutorial if you’re unsure – seeing it helps!).
- Knit Stitch (k): The most basic stitch. Insert the right needle into the front of the first stitch on the left needle from left to right, wrap the yarn around the right needle tip, pull the yarn through the loop, and slide the original stitch off the left needle.
- Purl Stitch (p): The other fundamental stitch. Bring the yarn to the front of your work. Insert the right needle into the front of the first stitch on the left needle from right to left, wrap the yarn around the right needle tip, push the yarn back through the loop, and slide the original stitch off the left needle.
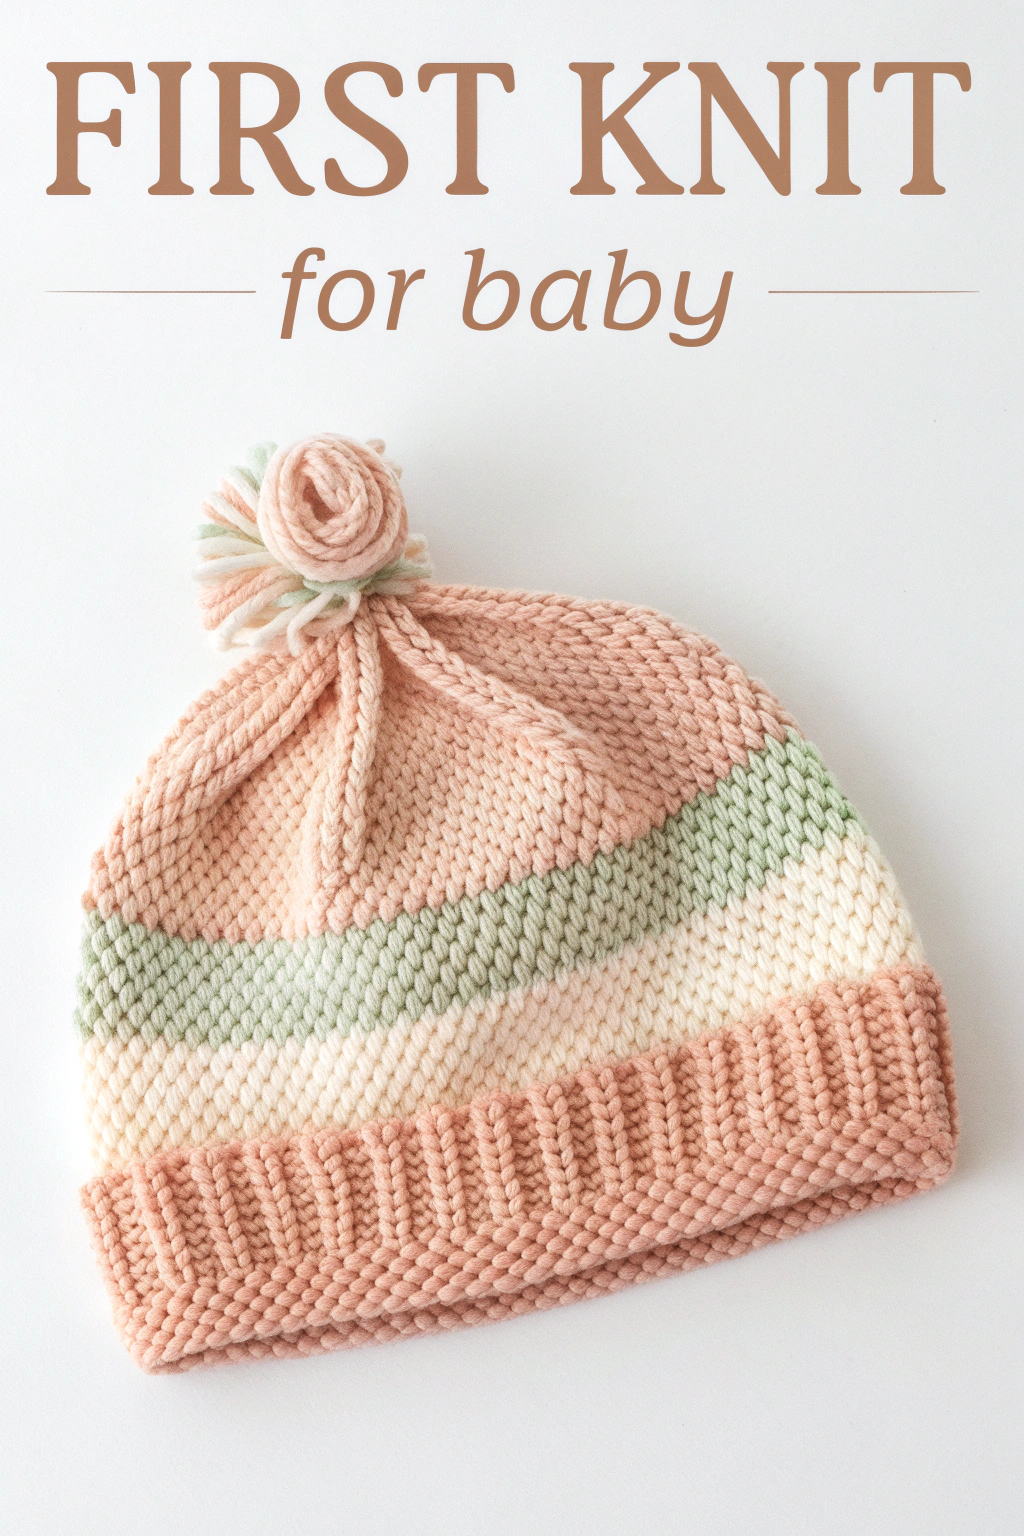
- Garter Stitch: This is the lovely bumpy texture you see on the main body of the hat in the image. It’s achieved by knitting every single row when working flat (back and forth). Super simple!
- 1×1 Rib Stitch: This makes the stretchy brim seen in the photo. It’s formed by alternating one knit stitch and one purl stitch (k1, p1). To create the “ribs,” on every following row, you knit the stitches that look like V’s and purl the stitches that look like bumps as they face you. This ensures the columns of knits and purls line up vertically.
- Knit Two Together (k2tog): A basic decrease stitch. Insert the right needle into the next two stitches on the left needle as if to knit them normally, wrap the yarn, and pull through both loops at once. This turns two stitches into one.
A Note on Gauge: Gauge means how many stitches and rows fit into a certain measurement (like 4 inches). For a baby hat, being slightly off isn’t critical, but it’s good practice. If you knit a small square (maybe 20 stitches wide for 20 rows) in Garter Stitch, you can measure it to see if it matches the gauge suggested on your yarn label. If you have too many stitches per inch, use larger needles; too few, use smaller needles.
Knitting the Hat: Step-by-Step
We’ll knit this hat flat as a rectangle and then seam it up.
1. Knit the Brim
- Using your Main Color (Peach), cast on 56 stitches. (This is an estimate for a 3-6 month size; adjust slightly fewer for newborn or slightly more for 6-12 months if desired. Aim for a brim circumference that’s snug but stretchy).
- Row 1 (Right Side): *Knit 1, Purl 1.* Repeat from * to * across the entire row.
- Row 2 (Wrong Side): Look at the stitches on your needle. You will see alternating “V” shapes (knit stitches) and “bumps” (purl stitches) from the row below. *Knit the knit stitches and purl the purl stitches* as they appear. Since you ended Row 1 with a purl stitch, you will begin this row by knitting the first stitch. The pattern will again be: *Knit 1, Purl 1.*
- Repeat Row 2 for all subsequent rows until the ribbed brim measures about 1.5 inches (or your desired brim height). End after completing a Wrong Side row.
Note for Beginners: Your first cast-on row might look a bit more bumpy or different than the rows above it. This is completely normal! As you continue to work in the k1, p1 pattern, you will see the distinct vertical columns of the rib stitch form, just like in the photo.
Important Note on the Photo: The baby hat in the picture is shown with its brim folded up. Our pattern directs you to switch to Cream yarn right after the Peach brim. When you knit the hat as written and fold up the brim, the first stripe you see will be Cream. This creates a lovely, clean look!
2. Work the Body in Garter Stitch Stripes
Now we switch to the main body pattern and start adding colors! Remember, Garter Stitch means knitting every row.
- Switch to Cream (Color A): Cut the Peach yarn, leaving a 6-inch tail. Start knitting the next row with Cream yarn, also leaving a tail. You’ll weave these tails in later.
- Knit every row with Cream until the Cream stripe measures about 1 inch tall.
- Switch to Light Green (Color B): Cut the Cream yarn (leave a tail!). Start knitting with Light Green.
- Knit every row with Light Green until the Green stripe measures about 1 inch tall.
- Switch back to Peach (MC): Cut the Green yarn (leave a tail!). Start knitting with Peach.
- Knit every row with Peach until the Peach section measures about 2 inches tall.
Tip for Changing Colors: When starting a new color, just begin knitting the first stitch of the row with the new yarn, leaving a tail of both the old and new colors hanging at the edge. On the next row coming back, you can loosely tie the two tails together to secure them before weaving them in properly at the end.
3. Shape the Crown
This is where we decrease stitches to close the top of the hat. We’ll use the k2tog decrease. Continue using the Peach yarn.
- Decrease Row 1 (Right Side): *Knit 6, k2tog.* Repeat from * to * across the row. (You should have 49 stitches left).
- Row 2 (Wrong Side): Knit all stitches.
- Decrease Row 3: *Knit 5, k2tog.* Repeat from * to * across the row. (42 stitches).
- Row 4: Knit all stitches.
- Decrease Row 5: *Knit 4, k2tog.* Repeat from * to * across the row. (35 stitches).
- Row 6: Knit all stitches.
- Decrease Row 7: *Knit 3, k2tog.* Repeat from * to * across the row. (28 stitches).
- Row 8: Knit all stitches.
- Decrease Row 9: *Knit 2, k2tog.* Repeat from * to * across the row. (21 stitches).
- Row 10: Knit all stitches.
- Decrease Row 11: *Knit 1, k2tog.* Repeat from * to * across the row. (14 stitches).
- Decrease Row 12: *K2tog.* Repeat from * to * across the row. (7 stitches).
4. Finishing Touches
Almost there!
- Gather the Top: Cut the yarn, leaving a long tail (about 12 inches). Thread this tail onto your yarn needle. Carefully slip the needle through the remaining 7 stitches on your knitting needle as if to purl, sliding them off the knitting needle and onto the yarn tail. Pull the tail tight like a drawstring to close the hole at the top of the hat. Secure it with a knot on the inside.
- Seam the Hat: Fold the hat flat with the Right Sides facing each other (the inside is out). Use the long yarn tail (or a new piece of Peach yarn) and your yarn needle to sew the side edges together, starting from the brim up to the gathered top. A mattress stitch gives a nice invisible seam on garter stitch. (Look this up too – it alternates picking up the bar between stitches on each edge).
- Weave in Ends: Turn the hat right side out. Use your yarn needle to weave in all those yarn tails left from casting on, changing colors, and finishing. Thread each tail and weave it back and forth through the stitches on the inside of the hat for an inch or two before snipping the excess.
- Make the Pom-Pom: The hat in the photo features a special “rosette” or “flower” style pom-pom, which is a more advanced technique. For this beginner-friendly pattern, we will create a lovely, full, multi-colored pom-pom that will look just as sweet!To do this, hold all three strands of yarn (Peach, Cream, Light Green) together. Wrap them at the same time around your pom-pom maker, cardboard donut, or fingers until it’s nice and thick. Tie it tightly around the middle with a strong piece of yarn, leaving long tails for attaching. Cut the loops on both sides and trim the pom-pom into a neat, round ball. Wrapping the colors together will create a beautiful random swirl. (Optional tip: To get a look that hints at the rosette, try wrapping one color tightly around the center tie a few times before you cut the main loops).
- Attach the Pom-Pom: Use the long tails you left on the pom-pom and the yarn needle to securely sew the pom-pom to the gathered top of the hat. Tie knots on the inside to secure it.
Your Beautiful Handmade Hat!
Take a moment to admire your handiwork! You’ve taken yarn and needles and fashioned this adorable, practical Knitted Baby Hat. Feel the soft texture, see the neat stripes, and know that it was made with care. Knitting is a journey, and this is a fantastic first step (or early step!).
Don’t hesitate to try this pattern. If you get stuck, remember there are loads of videos online for specific techniques like casting on or the mattress stitch. Enjoy the process, the rhythm of the stitches, and the joy of producing something tangible and lovely. We’d love to see your finished hats – feel free to share photos! Happy knitting!
There are no ‘stars’ to follow 🙁 As I am new to knitting, I am puzzled.
Ooooops, forgot to ask why k1 p1 seems to start after a few other rows have been knit. However the pattern indicates to start with k1 p1
Hi there! Thank you so much for your excellent questions. These are details that can often be puzzling for new knitters, and we’re happy to clarify!
First, about the ‘stars’ (*). That’s a great point to bring up! In knitting patterns, the asterisk is a standard symbol used to mark a section of instructions that you need to repeat. So, when you see something like “Knit 1, Purl 1” followed by “repeat from * to *”, it simply means you should continue that “Knit 1, Purl 1” sequence over and over until you reach the end of the row. It’s a bit of knitting shorthand!
Your observation about the brim is also spot-on. It’s very common for the first row or two of knitting, especially the cast-on edge, to look a little different or flatter before the pattern becomes clearly visible. If you begin directly with the “Knit 1, Purl 1” instruction as the pattern indicates, you’ll see that beautiful, stretchy ribbing from the photo start to form perfectly after just a few rows. You’re on the exact right track!
We hope this helps clear things up. Happy knitting, and we’d absolutely love to see your finished hat when you’re done!
I agree the first 1/2 inch of the pattern looks like seed stitch and then you have a rib stitch pattern same color!! Very confusing!
Thank you so much for your comment and your sharp eye! You’ve spotted something that often confuses new knitters. The very first row after casting on often looks different from the rest of the ribbing and can look very much like a seed stitch. The pattern is correct as written, and as you work a few more rows, that edge will blend in and the 1×1 ribbing will become clear. This is such helpful feedback that we’ve added a note to the pattern to clarify this for others. Thanks for helping me make the tutorial better! Happy knitting!
It looks like in the picture after the brim there may be another section of knit rows in peach and the brim is folded up. Is this correct? Also, could this be done on a loom?
Thanks:)
Thank you for your sharp eye and this excellent question! You are absolutely right—the brim in the photo is folded up. Our pattern, as written, moves directly from the peach brim to the cream stripe.
Your feedback was incredibly helpful in showing us where we could make things clearer. We have now updated the post with a note to clarify this for everyone. Thank you for helping us improve the pattern for the whole community! Regarding your second question: Yes, this pattern can certainly be adapted for a knitting loom. Happy knitting!
I’m a bit confused. What drew me to this hat was the way the stitches staggered on the body of the hat. Typical garter rows look like the peach rows under the rib brim. The body of the hat looks like a different stitch….im not sure how that look was achieved. The stitches look vertical rather than horizontal. It is a cute hat and I love the rosette for a pompom.
Hi, thank you so much for your comment and your keen observation! That’s an excellent question. The beautiful “staggered vertical” look you’re describing is actually the unique texture of garter stitch. You’re seeing it perfectly! While garter stitch creates horizontal ridges, the stitches themselves nestle together in that lovely way you noticed. So, rest assured, if you follow the pattern by knitting every row for the body, you will achieve the exact look you see in the photo. Happy knitting!
Sprint version without ads would be amazing! Very cute hat🤓