

Knit a Stunning Two-Tone Cable Pillow
Experience the unique joy of turning a simple skein of yarn into a beautiful, functional piece for your home. This gorgeous two-tone pillow, with its lush and touchable cables, brings a sense of handmade comfort to any space. Though it looks professionally crafted, our step-by-step instructions make the process clear and easy to follow. This project is a wonderful journey into the rhythm of knitting cables and the art of color blocking. Let’s begin making this cozy masterpiece together.
What You’ll Need
To begin, you’ll want to gather a few simple tools and materials. The yarn for this pillow is a super bulky weight, which makes the project progress quickly and gives the cables their wonderful, chunky definition.
- 🧶 Yarn: Super bulky (Category 6) yarn. You will need one large skein in a soft peach color (Color A) and one in a creamy off-white (Color B).
- 🥢 Knitting Needles: 10mm (US size 15) straight or circular needles.
- 🪢 Cable Needle: A standard cable needle is essential for holding stitches.
- 🧵 Pillow Insert: A square 18×18 inch (45×45 cm) pillow form.
- 🪡 Tapestry Needle: For weaving in ends and seaming the pillow cover.
- ✂️ Scissors: For trimming your yarn.
Getting Started The Basic Stitches
If you’re brand new to knitting, welcome! Let’s quickly review the fundamental building blocks you’ll use for this pillow. Taking a moment to practice these on a small swatch will build your confidence.
Casting On
This is how you get your very first stitches onto the needle. Every project begins here. For this pillow, a simple long-tail cast-on works perfectly; it’s stretchy and neat.
The Knit Stitch
The knit stitch is the most basic stitch in knitting. The front of a knit stitch looks like a little “V”.
The Purl Stitch
The purl stitch is the reverse of the knit stitch. The front of a purl stitch looks like a small horizontal bump.
The Background Stitches
This pattern uses a combination of stitches to make the cables pop.
- The cable panels themselves are worked in Stockinette Stitch (knit on the right side, purl on the wrong side).
- The background between the cables is Reverse Stockinette Stitch (purl on the right side, knit on the wrong side). This contrast makes the cables stand out.
- The side borders are worked in Garter Stitch (knit every row) to prevent curling and create a stable edge for seaming.
Mastering the Magic Cable Knitting
The beautiful woven pattern on the front of the pillow is a cable. It is formed by knitting stitches out of order using a cable needle. For this pattern, all cables are worked over 6 stitches and twist in the same direction to create a beautiful, flowing vine or heart pattern.
- C6F (Cable 6 Front): Slip the next 3 stitches onto your cable needle and hold it at the front of your work. Knit the next 3 stitches from your left-hand needle. Then, knit the 3 stitches from your cable needle. This creates a cable that twists to the left.
The Pillow Pattern Step-by-Step
This pillow cover is constructed from two identical knitted panels that are seamed together. We will focus on making one panel.
Gauge: Approximately 9 stitches and 13 rows per 4 inches (10 cm) in the pattern. This is crucial for sizing.
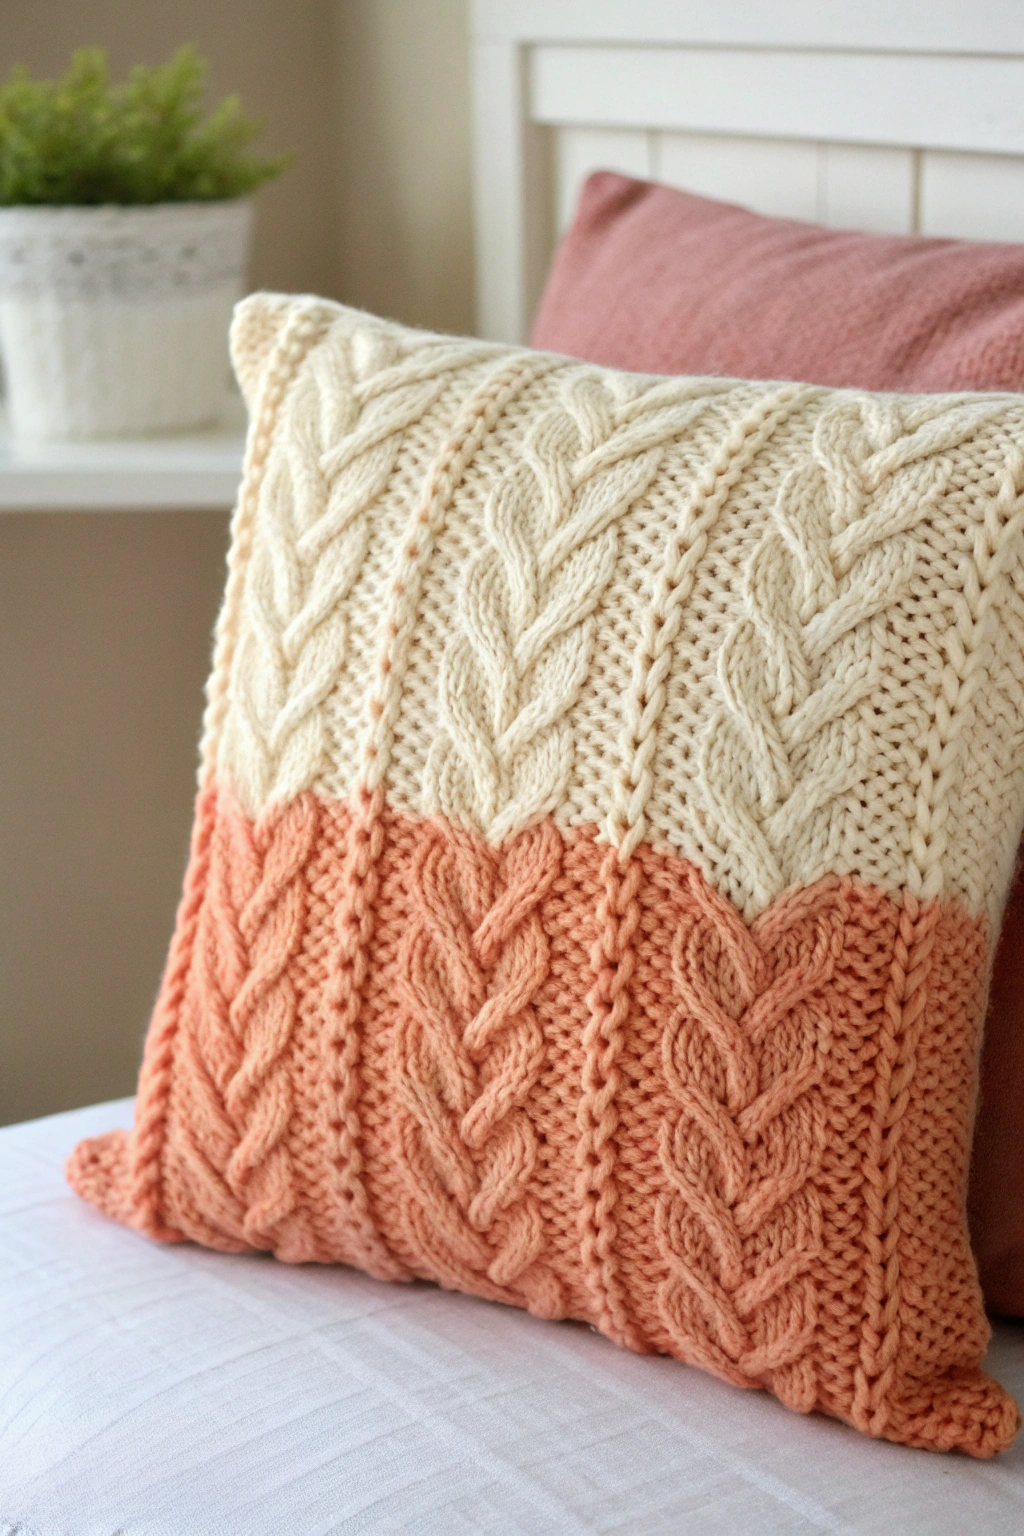
Cast On: Using your peach yarn (Color A), cast on 40 stitches. (Reviser’s Note: The row-by-row pattern instructions (K2, P2, K6, P2, K6, P2, K6, P2, K6, P2, K2) add up to a total of 40 stitches to create the four cable columns seen in the photo. The cast-on number has been corrected to 40 to match the pattern instructions and the finished product.)
Part 1: The Peach Section
You’ll establish the pattern of 4 cable columns separated by purl stitches and framed by a garter stitch border.
Establish the Pattern (8-Row Repeat):
- Row 1 (RS – Right Side): K2, P2, K6, P2, K6, P2, K6, P2, K6, P2, K2.
- Row 2 (WS – Wrong Side): K2, K2, P6, K2, P6, K2, P6, K2, P6, K2, K2.
- Row 3 (RS – Cable Row): K2, P2, C6F, P2, C6F, P2, C6F, P2, C6F, P2, K2.
- Row 4 (WS): Repeat Row 2.
- Row 5 (RS): Repeat Row 1.
- Row 6 (WS): Repeat Row 2.
- Row 7 (RS): Repeat Row 1.
- Row 8 (WS): Repeat Row 2.
This 8-row sequence forms the cable motif. Repeat these 8 rows until the peach section measures approximately 9 inches from the cast-on edge, making sure to end after completing a Row 8.
Part 2: The Two-Tone Transition
This is where the unique color change happens. The change is not a straight line; it follows the top of the cable motifs, forming distinct “V” shapes. This technique is called intarsia. For the transition rows, you will need to use separate small balls, or bobbins, of yarn for each color section to avoid carrying the yarn across the back.
You will begin the transition on the next Row 1 of the pattern repeat. You will need your main ball of Color A (peach) and a new ball of Color B (cream).
- Transition Row 1 (RS): With Color A (peach), K2, P2. Drop Color A and join Color B (cream), K6. Drop Color B and pick up Color A, P2. Repeat the instructions between the asterisks (*) three more times across the cable panels. Finish the row with K2 in Color A. (You will have used one strand of Color A for the start, one for each P2 section, and one for the end. You will have used a separate strand of Color B for each K6 cable section. Twist the yarns at the back of the work each time you change color to prevent holes.)
- Transition Row 2 (WS): Work back across, following the pattern and colors as established in the previous row, twisting your yarns at each color change. The row will be: (Color A) K2, K2. (Color B) P6. (Color A) K2. Repeat from * to * three more times. End with K2 in Color A.
- Transition Row 3 (RS – Final Transition & Cable Row): With Color A, K2. Drop Color A completely for this row. With Color B, work the rest of the row as follows: P2, C6F, P2, C6F, P2, C6F, P2, C6F, P2. Join a new strand of Color A for the final K2. (After this row, you can cut the Color A yarns from the main body, leaving tails to weave in.)
Part 3: The Cream Section
From this point on, the rest of the panel is completed only in Color B (cream).
- Cut your Color A yarns (leaving tails to weave in) and continue with only Color B.
- Continue the 8-row cable pattern as established (starting with Row 4 of the repeat).
- Keep knitting until the cream section measures 9 inches, making the total panel length approximately 18 inches.
- End after a Row 8 of the pattern repeat for a clean top edge.
Bind Off: Bind off all stitches loosely in pattern. Cut your yarn, leaving a long tail for seaming.
Second Panel: Follow the exact same instructions to make a second, identical panel.
Assembling Your Pillow
You are so close to the finish line! The final step is to put your beautiful knitted pieces together.
- Weave in Ends: First, use your tapestry needle to neatly weave in all the yarn tails on the wrong side of both panels. This is especially important for all the ends from the intarsia color change.
- Seam the Sides: Place the two panels together with the right sides facing out. Using the long tail you left after binding off and your tapestry needle, begin sewing up three of the four sides. The mattress stitch is a wonderful choice for an invisible seam.
- Insert the Pillow: Carefully push your pillow insert into the cover, making sure it fills out the corners nicely.
- Final Seam: Sew the final fourth side closed. Your pillow is now complete!
Find a prime location for your new, squishy, and stylish pillow. You’ve just fashioned a truly special item that brings personality and comfort to your space. Be proud of every stitch.