
Knit a Sweet Fox Sweater for Little Ones
Hello fellow crafters! Are you ready to embark on a super fun and rewarding knitting adventure? Today, we’re going to fashion the most adorable fox sweater, perfect for keeping your little loved ones warm and looking absolutely charming. This project is designed to be a clear, step-by-step guide to creating the seamless, top-down sweater you see in the picture. Get ready to experience the joy of making something beautiful with your own hands!
Sizing and Materials
This pattern is written for size 12-18 months.
- Finished Chest Circumference: Approximately 22.5 inches (57 cm)
- Finished Length from Shoulder: Approximately 13 inches (33 cm)
- Finished Sleeve Length from Underarm: Approximately 8.5 inches (21.5 cm)
Let’s gather all the supplies we’ll need. Having everything ready will make the process smooth and enjoyable.
- 🧶 Yarn: DK weight (Category 3) yarn in a soft, baby-friendly material.
- Main Color (MC): Warm Orange, approx. 300 yards (275 m)
- Contrast Color (CC): Creamy White, approx. 150 yards (137 m)
- 🪡 Knitting Needles:
- US 4 (3.5 mm) 16-inch (40 cm) circular needle for neckband and cuffs.
- US 6 (4.0 mm) 16-inch and 24-inch (40 cm and 60 cm) circular needles for the yoke and body.
- US 6 (4.0 mm) Double-Pointed Needles (DPNs) or your preferred method for small circumference knitting for the sleeves.
- ✂️ Scissors: For snipping yarn.
- 📍 Stitch Markers: You will need 5 markers; one for the beginning of the round, and four for the raglan seams.
- 📏 Measuring Tape: To check your gauge and measurements.
- 🧵 Tapestry Needle: A large-eyed blunt needle for weaving in ends and sewing on the fox appliqué.
- 🦊 Yarn Scraps for Fox Details: Small amounts of black and pink yarn for embroidering the fox’s eyes, nose, and cheeks.
Let’s Get Knitting: Step-by-Step Guide
Now for the exciting part! This sweater is knit seamlessly from the top down, meaning we start at the neck and work our way down in one piece.
Getting Started: Gauge and Basics
Before we begin, it’s crucial to check your gauge. Gauge is how many stitches and rows fit into a specific measurement, and it ensures your sweater will turn out the correct size.
To check your gauge, use your US 6 (4.0 mm) needles and MC yarn to knit a small square (at least 4×4 inches) in stockinette stitch worked in the round.
Gauge: 22 stitches and 30 rows = 4 inches (10 cm) in Stockinette Stitch.
Wash and block your swatch before measuring. If you have too many stitches per inch, go up a needle size. If you have too few, go down a needle size.
Let’s also quickly go over some key knitting terms:
- Cast on: Getting your first stitches onto the needle.
- Knit (k) / Purl (p): The two basic stitches.
- Stockinette stitch (in the round): Knit every single stitch of every round.
- 1×1 Ribbing (in the round): *K1, p1.* Repeat from * to * for the entire round.
- M1L (Make 1 Left): Insert left needle from front to back under the bar between stitches, knit this bar through the back loop. (1 st increased).
- M1R (Make 1 Right): Insert left needle from back to front under the bar between stitches, knit this bar through the front loop. (1 st increased).
- BOR: Beginning of Round.
- PM / SM: Place Marker / Slip Marker.
- K2tog: Knit two stitches together (a right-slanting decrease).
- SSK: Slip 1 stitch knitwise, slip another stitch knitwise, insert left needle into the fronts of these two stitches and knit them together (a left-slanting decrease).
Step 1: The Yoke
The yoke is the top part of the sweater that covers the shoulders. We will shape it using raglan increases.
Neckband:
Using your CC (White) yarn and US 4 (3.5 mm) circular needles, cast on 68 stitches. Place your BOR marker and join to work in the round, being careful not to twist.
Work in 1×1 ribbing (k1, p1) for 8 rounds.
Raglan Setup:
Switch to US 6 (4.0 mm) circular needles. The next round will be a knit round where you place the four raglan markers.
Setup Round: k12 (sleeve), PM, k22 (front), PM, k12 (sleeve), PM, k22 (back). Your BOR marker is now at the end of the back section.
Yoke Increases:
You will now work a 2-round repeat to shape the yoke.
Round 1 (Increase Round): Knit to 1 st before marker, M1R, k1, SM, k1, M1L. Repeat from * to * a total of 4 times. Knit to the end of the round. (8 stitches increased).
Round 2 (Plain Round): Knit all stitches.
Repeat these two rounds (Increase Round and Plain Round) a total of 20 times.
After all increases are complete, you will have 228 stitches on your needles, divided as follows: 52 sts for each sleeve, and 62 sts for the front and back.
Next, knit 2 plain rounds (knit all stitches).
The yoke should now measure about 5.5 inches from the cast-on edge.
Step 2: Separate the Body and Sleeves
In this step, we will put the sleeve stitches on hold and join the front and back to create the body.
Separation Round:
1. Remove BOR marker, knit across the first 52 sleeve stitches and transfer them to a piece of scrap yarn or a stitch holder.
2. Using the backward loop method, cast on 6 stitches for the underarm.
3. PM to mark the new side “seam”.
4. Knit across the 62 front stitches.
5. Transfer the next 52 sleeve stitches to a separate piece of scrap yarn.
6. Cast on 6 stitches for the other underarm.
7. PM for the new BOR.
8. Knit across the 62 back stitches to the BOR marker.
You now have 136 stitches on your needles for the body (62 front + 62 back + 6 underarm + 6 underarm).
Step 3: Knit the Body
Continue working in the round with your **CC (White) yarn**. Knit every round (stockinette stitch) for 1 inch.
Switch to your MC (Orange) yarn.
Continue in stockinette stitch until the body measures 6.5 inches from the underarm, or desired length minus the hem.
Hem:
Switch to US 4 (3.5 mm) needles.
Work in 1×1 ribbing (k1, p1) for 1.5 inches.
Bind off all stitches loosely in pattern.
Step 4: Knit the Sleeves (Make 2)
Transfer the 52 held stitches for one sleeve onto your **US 6 (4.0 mm)** DPNs or circular needle for magic loop.
Setup: Starting at the center of the underarm, pick up and knit 6 stitches from the underarm cast-on edge. Knit across the 52 held sleeve stitches. Place a BOR marker. You now have 58 stitches for the sleeve.
Knit every round using MC (Orange) yarn.
Work 8 rounds plain.
Decrease Round: K1, k2tog, knit to last 3 sts, SSK, k1. (2 sts decreased).
Repeat this Decrease Round every 8th round, a total of 6 times. (46 stitches remaining).
Continue in stockinette stitch until the sleeve measures 7 inches from the underarm.
Cuff Detail:
Switch to CC (White) yarn. Knit 4 rounds plain.
Cuff Ribbing:
Switch to US 4 (3.5 mm) needles.
Work in 1×1 ribbing (k1, p1) for 1.5 inches.
Bind off all stitches loosely in pattern.
Repeat for the second sleeve.
✨ Optional Cuff Detail
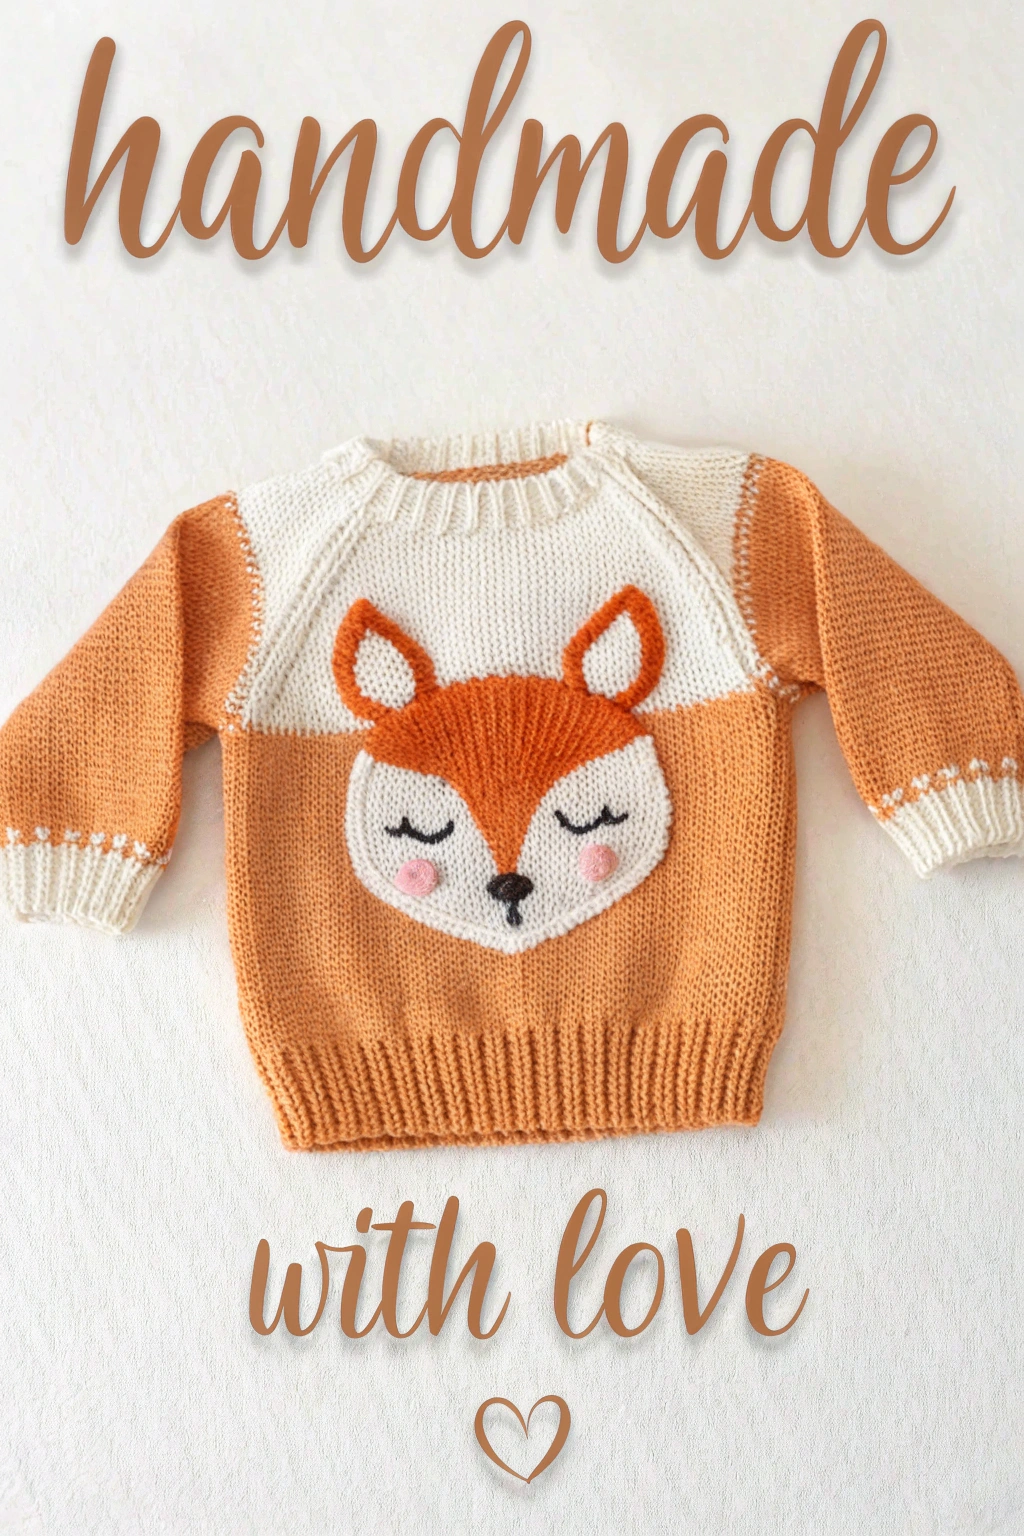
The sweater in the photo has a small decorative detail on the cuffs. To add this, take a length of your MC (Orange) yarn and a tapestry needle. On the white stockinette section of each cuff, embroider small, evenly spaced horizontal stitches (running stitches) to mimic the look in the picture. This small touch adds a lovely bit of extra character!
Step 5: Crafting the Fox Appliqué
This is the final touch that brings the sweater to life! Use your **US 4 (3.5 mm)** needles for a denser fabric. This appliqué is worked flat (back and forth).
Orange Head (MC):
Cast on 32 sts.
Rows 1-10: Work in Stockinette Stitch (Knit RS rows, Purl WS rows).
Row 11 (RS): SSK, knit to last 2 sts, k2tog. (30 sts)
Row 12 (WS): Purl.
Repeat Rows 11-12 five more times. (20 sts)
Next Row (RS): SSK, knit to last 2 sts, k2tog. (18 sts)
Next Row (WS): Purl.
Repeat these last 2 rows until 4 sts remain.
Bind off.
White Face Patch (CC):
Cast on 2 sts.
Row 1 (WS): Purl.
Row 2 (RS): KFB (Knit Front and Back) in each st. (4 sts)
Row 3: Purl.
Row 4: K1, M1R, knit to last st, M1L, k1. (6 sts)
Row 5: Purl.
Repeat Rows 4-5 until you have 20 sts.
Work 4 rows in Stockinette Stitch.
Next Row (RS): SSK, knit to last 2 sts, k2tog. (18 sts)
Next Row (WS): Purl.
Repeat these last 2 rows until 14 sts remain.
Bind off.
Ears (Make 2 in MC):
Cast on 8 sts.
Row 1 (WS): Purl.
Row 2 (RS): SSK, k4, k2tog. (6 sts)
Row 3: Purl.
Row 4: SSK, k2, k2tog. (4 sts)
Row 5: Purl.
Row 6: SSK, k2tog. (2 sts)
Bind off.
Assembly and Attachment:
Weave in all ends on the sweater and appliqué pieces.
Using white yarn, sew the White Face Patch onto the Orange Head.
Using orange yarn, sew the ears to the top corners of the Orange Head.
Using black yarn, embroider closed eyes and a small triangle nose onto the white patch using satin stitch.
Using pink yarn, embroider two small round cheeks.
Carefully position the finished fox face onto the center front of the sweater’s orange section and sew it securely in place using orange yarn. A whipstitch or a simple running stitch very close to the edge will give you a clean and secure finish.
Finishing Touches and Sharing Your Creation
Congratulations! You’ve successfully fashioned your very own adorable fox sweater! Give it a gentle wash or block according to your yarn’s care instructions. Laying it flat to dry will help even out your stitches and give it a professional finish.
The joy of making something with your own hands is truly special. Imagine the smiles when your little one wears this cozy and cute sweater, crafted with love by you. We encourage you to share your finished fox sweater! Snap a picture and share it with fellow crafters online. It’s wonderful to see everyone’s unique creations and inspire others to try this fulfilling hobby.
Happy knitting, and we can’t wait to see your foxy sweaters!
Am I missing it? What is the size of this sweater – for a child of which age?
Thank you so much for your question! You weren’t missing anything at all—that was an important detail we accidentally left out. Thanks to your comment, we’ve just updated the post with all the necessary information. The pattern is now written for size 12-18 months, and you’ll find the finished measurements listed at the very beginning. We truly appreciate you bringing this to our attention so we could make the pattern clearer for everyone. Happy knitting!