
Easy Homemade Honey Cake Recipe (Russian Medovik)
Ready to bake a dessert that warms the soul? This honey layer cake is a beautiful construction of soft honey sponge, creamy frosting, and an elegant, rustic style. The process itself is a pleasure—a perfect, aromatic project for a quiet afternoon that results in a showstopper dessert for loved ones. Every detail is broken down in this step-by-step guide, designed to help even absolute beginners feel confident as they assemble the gorgeous cake you see here, ensuring a joyful and successful baking experience.
Gearing Up for Baking
Before starting, it’s a good idea to gather all the necessary kitchen tools. Having everything ready makes the process smooth and enjoyable.
- 🥣 Large heatproof bowl (glass or metal)
- Saucepan (for the water bath)
- 🥄 Whisk
- 🔪 Spatula
- 📏 Rolling pin
- 📜 Parchment paper
- 🍽️ A 9-inch (23 cm) round plate or cake ring for tracing
- 🍪 Baking sheets
- 🔪 Sharp knife or pizza cutter
- 🤖 Food processor (or a zip-top bag and rolling pin)
- 🍴 Offset spatula or butter knife
- 🥡 Large mixing bowl (for the frosting)
Halal Ingredients for the Honey Cake
Here are the components needed for this delightful cake. Using high-quality ingredients will make a world of difference in the final taste and texture.
For the Honey Cake Layers:
- 🧈 ¾ cup (170g) Unsalted Butter (halal-certified)
- 🍯 ⅔ cup (225g) Honey (halal-certified)
- 🍚 1 cup (200g) Granulated Sugar
- 🥚 3 Large Eggs (at room temperature)
- 🥄 1 tablespoon Baking Soda
- 🌾 3 ½ cups (420g) All-Purpose Flour, plus more for dusting
For the Creamy Frosting:
- 🥛 3 ½ cups (800g) Full-Fat Sour Cream (at least 20% fat)
- 🍬 1 cup (120g) Powdered Sugar
- 🍦 2 teaspoons Alcohol-Free Vanilla Extract
For the Garnish:
- 🍯 2 tablespoons Honey, for drizzling
- 🌰 ½ cup Chopped Walnuts
Assembling the Honey Cake, Step by Step
This recipe is broken down into manageable stages: preparing the dough, baking the layers, whipping up the frosting, and finally, assembling the masterpiece.
Part 1: Making the Aromatic Honey Dough
- Set up a water bath. This is a gentle heating method that prevents the honey mixture from scorching. To do this, fill a saucepan with about 1-2 inches of water and bring it to a gentle simmer over medium-low heat. Place a large heatproof bowl on top of the saucepan. Important: The bottom of the bowl should not touch the simmering water.
- In the heatproof bowl, combine the butter, honey, and granulated sugar. Let them melt together over the simmering water, stirring occasionally until the sugar has dissolved and the mixture is smooth.
- Now for the fun part! Add the baking soda to the honey mixture and whisk continuously for about a minute. The mixture will foam up vigorously and turn a beautiful deep amber or caramel color. This reaction is what gives the cake its distinctive flavor and color. Once it has foamed, remove the bowl from the heat and set it aside to cool for about 10-15 minutes. It should be just warm to the touch, not hot.
- In a separate small bowl, lightly beat the eggs. Once the honey mixture has cooled down, pour the beaten eggs into it while whisking constantly. This is a crucial step; if the mixture is too hot, the eggs will scramble.
- Gradually add the flour to the wet ingredients, about one cup at a time. Switch from a whisk to a spatula and begin to fold the flour in. Folding means using the spatula to cut down through the center of the mixture, scrape along the bottom, and lift it back over the top, rotating the bowl as you go. Continue until a soft, sticky dough forms. Don’t worry if it seems too soft—it will firm up as it cools.
- Cover the bowl with plastic wrap and let the dough rest at room temperature for 30 minutes. This will make it much easier to handle.
Part 2: Baking the Golden Cake Layers
- Preheat the oven to 350°F (180°C). Line two large baking sheets with parchment paper.
- Lightly flour a clean work surface and turn the rested dough out. Divide it into 8 equal portions. Keep the portions you aren’t working with covered so they don’t dry out.
- Take one portion of dough and roll it out very thinly (about ⅛-inch thick) directly on a sheet of parchment paper. The dough will be sticky, so lightly flour the rolling pin as needed.
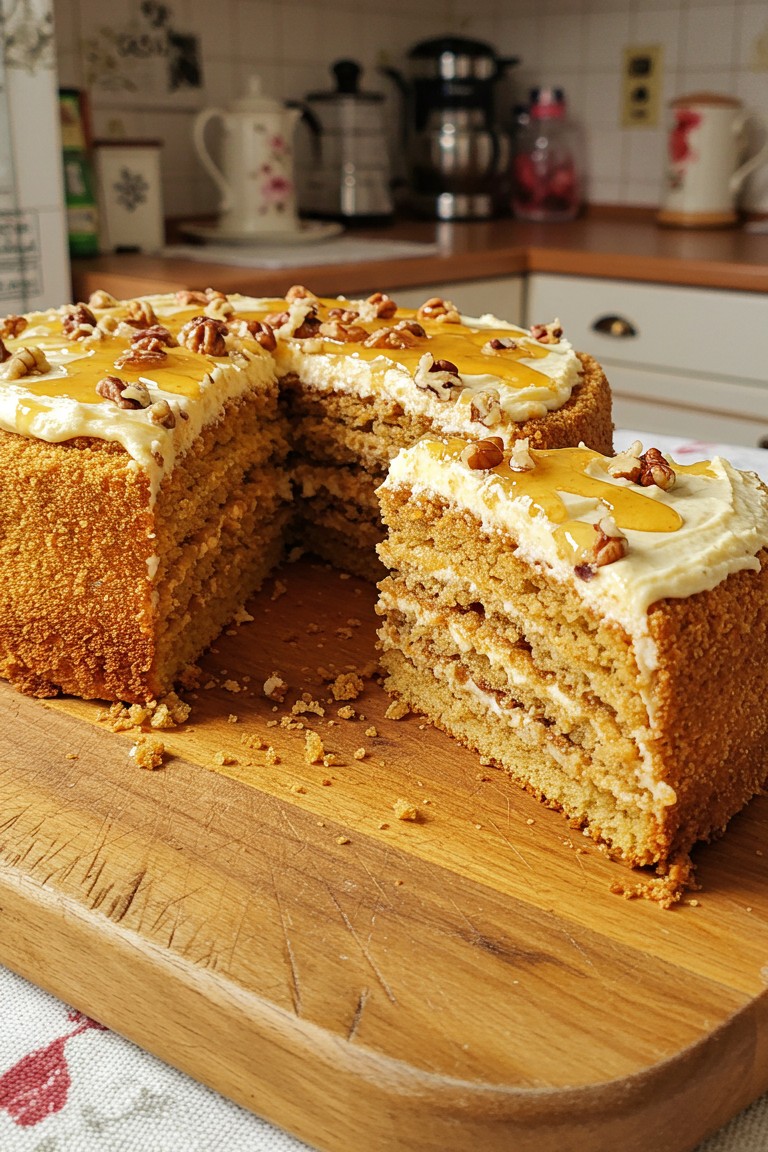
- Place a 9-inch plate or cake ring on the rolled-out dough and use a sharp knife or pizza cutter to trace around it, cutting out a perfect circle. Do not remove the scraps from around the circle. These will be baked and used for the crumb coating on the sides of the cake, which is a key feature of the final presentation seen in the photograph.
- Slide the parchment paper with the dough circle and its scraps onto a baking sheet. Bake for 5-7 minutes, or until the layer is a deep golden brown. Watch it closely as it bakes quickly!
- Repeat the rolling, cutting, and baking process with the remaining 7 portions of dough. You can get two layers on one large baking sheet. As each layer comes out of the oven, let it cool completely. Once cooled, the baked scraps can be separated from the circles.
Part 3: Preparing the Tangy Cream Frosting & Crumbs
- While the cake layers cool, prepare the frosting. In a large mixing bowl, combine the full-fat sour cream, powdered sugar, and vanilla extract. Whisk everything together until the mixture is smooth, creamy, and has no lumps. Using high-fat sour cream is essential for a thick, luscious frosting that won’t be too runny.
- Gather all the baked scraps from the cake layers. Place them in a food processor and pulse until they form fine crumbs. If a food processor isn’t available, put them in a zip-top bag, seal it, and crush them with a rolling pin. These crumbs will be used to coat the sides of the cake.
Part 4: The Final Assembly
- Place one cooled cake layer onto a serving plate or cake stand. Spread a generous layer of the sour cream frosting over it, going all the way to the edges. Don’t be shy with the frosting—each layer needs a good amount to help soften the cake.
- Place another cake layer on top and repeat the process. Continue layering cake and frosting until all 8 layers are stacked.
- Use the remaining frosting to cover the top and sides of the entire cake, using an offset spatula or butter knife to get a smooth-ish finish.
- Now, take the reserved cake crumbs and gently press them onto the sides of the cake, covering it completely. This technique gives the cake its beautiful, rustic crumb-coated exterior as seen in the photo.
- This final step is the most important one for texture and taste: Cover the cake and let it chill in the refrigerator for at least 8 hours, or preferably overnight. This resting time allows the firm cake layers to absorb the moisture from the frosting, becoming incredibly soft, tender, and flavorful.
- Just before serving, drizzle the top of the cake with honey and sprinkle generously with the chopped walnuts. This finishing touch adds a lovely gloss and nutty crunch, perfectly matching the cake in the picture.
Presenting this gorgeous, multi-layered honey cake is a moment of pure satisfaction. The effort poured into each step culminates in a dessert that is not only visually impressive but deeply comforting and delicious. Be sure to capture a photo of the finished masterpiece and the beautiful layers within each slice.