

Rich Brownie Tart with a Molten Chocolate Surprise
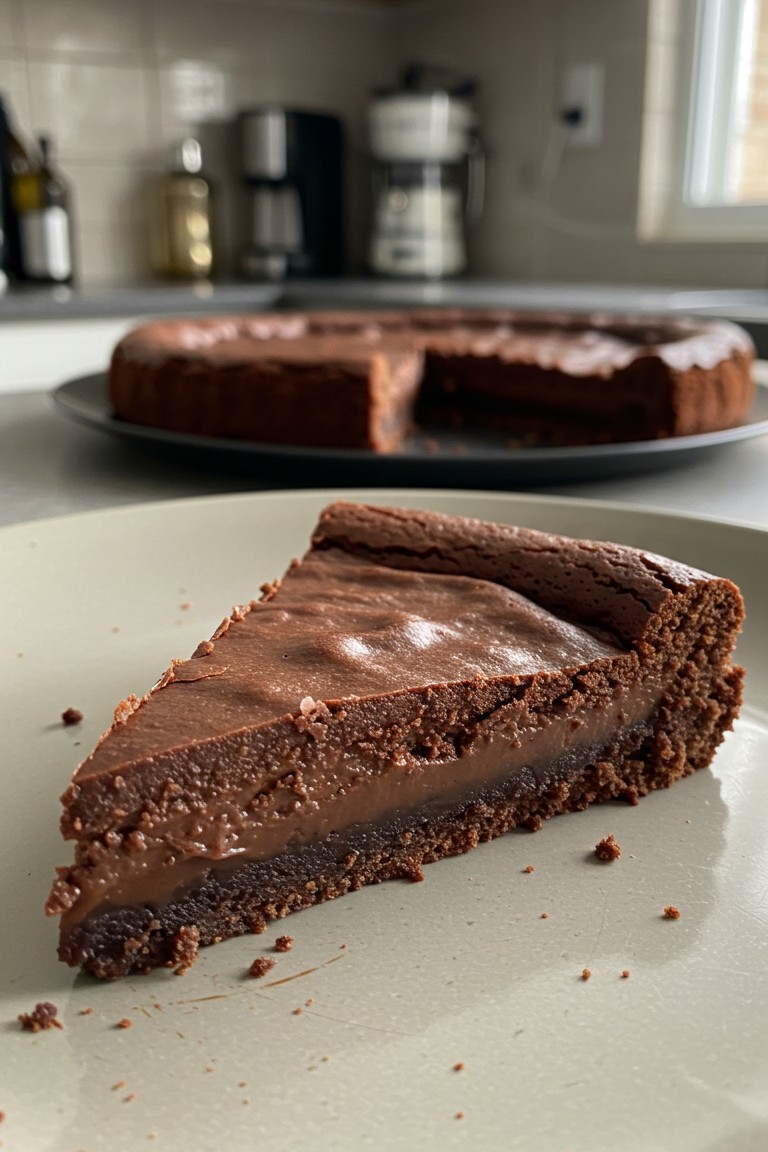
This dessert is pure chocolate happiness! Just look at that slice of tart — it’s got two irresistible layers that are calling your name. The base is like a rich, brownie cake, sturdy enough to hold the real star: a silky, molten chocolate filling that practically melts at first glance. And that delicate, paper-thin crust on top? Absolute perfection. Making this mix of textures at home is easier than you’d think — and with this guide, you’ll nail it on the first try.
Essential Kitchen Tools
Gathering the right equipment makes the whole process smooth and enjoyable from start to finish.
- 🥣 Two mixing bowls (one medium, one larger)
- Saucepan A small saucepan
- Whisk A wire whisk
- 🥄 A flexible spatula (silicone is great)
- 🥧 One 9-inch (23 cm) round tart pan, ideally one with a removable bottom for easy serving
- 🔥 A conventional oven
Halal Ingredients for a Perfect Tart
Sourcing quality halal ingredients is the first step toward an exceptional flavor experience.
For the Brownie Base:
- 🧈 ½ cup (113g) unsalted butter (halal-certified)
- 🍚 ½ cup (100g) granulated white sugar
- 🥚 1 large egg
- 🍦 1 tsp alcohol-free vanilla extract (halal)
- 🌾 ⅓ cup (43g) all-purpose flour
- 🍫 ¼ cup (21g) unsweetened cocoa powder
- 🧂 ¼ tsp salt
For the Molten Filling:
- 🍫 7 ounces (200g) good-quality dark chocolate (70% cacao or higher, halal), finely chopped
- 🧈 ½ cup (113g) unsalted butter (halal-certified), cubed
- 🍚 ½ cup (100g) granulated white sugar
- 🥚 3 large eggs
- 🍦 1 tsp alcohol-free vanilla extract (halal)
- ✨ A pinch of flaky sea salt, for garnish
Assembling the Chocolate Masterpiece
The process is divided into three parts: building the base, mixing the filling, and the final bake.
Part 1: Fashioning the Brownie Base
This first layer has the texture of a classic fudge brownie, providing a firm yet tender shell.
- Prepare the Oven and Pan. The oven should be preheated to 350°F (175°C). The tart pan needs a light coating of grease on the bottom and up the sides to ensure nothing sticks.
- Melt Butter and Sugar. In the small saucepan, melt the butter over low heat. Once it’s liquid, take it off the heat and stir in the sugar and vanilla extract until they are fully incorporated.
- Add the Egg. Let the butter mixture cool for a moment. A mixture that’s too hot will cook the egg. Whisk the egg into the slightly cooled butter and sugar until the batter looks smooth and glossy.
- Fold in Dry Goods. Add the flour, cocoa powder, and salt directly into the saucepan. Use a spatula to gently fold everything together. The key is to mix just until the last streak of flour disappears. Over-mixing is the enemy of a tender texture, as it can make the base tough.
- Press and Pre-Bake. Scrape the thick batter into the prepared tart pan. With clean fingers or the back of a spoon, press the batter evenly across the bottom and up the sides of the pan. This forms the shell. Bake this base for 15 minutes. It will look set but is not yet fully cooked. Place the pan aside.
Part 2: Preparing the Gooey Chocolate Heart
This filling is what gives the tart its signature gooey, rich center.
- Melt the Chocolate. A bain-marie, or water bath, is the gentlest method. It involves setting a heatproof bowl over a pot of barely simmering water (the bowl shouldn’t touch the water). Place the chopped dark chocolate and butter cubes in the bowl. Stir them periodically until they have melted into a smooth, seamless liquid. This prevents the chocolate from becoming grainy or burnt.
- Whisk the Eggs. In a separate, larger bowl, whisk the eggs with the sugar and vanilla extract. Whisk vigorously for about a minute until the mixture lightens in color and becomes slightly frothy.
- Temper for a Silky Texture. This next step, tempering, is vital for a smooth filling. While constantly whisking the egg mixture, pour the warm melted chocolate into the eggs in a very slow, thin stream. This gradual introduction of heat raises the eggs’ temperature slowly, preventing them from scrambling and ensuring the filling stays velvety.
- Fill the Tart. Pour the liquid chocolate filling into the pre-baked brownie base, using a spatula to spread it into an even layer.
Part 3: The Final Bake
This last step sets the dessert, forming the different textures seen in the finished slice.
- Bake to Perfection. Slide the tart into the 350°F (175°C) oven. Let it bake for 20 to 25 minutes.
- Look for the Signs. The tart is done when the outer edge of the filling is set and looks slightly puffed. The center, however, must still have a noticeable jiggle or wobble when the pan is gently nudged. This underdone center is what becomes the molten layer once cooled. The delicate, crackly skin on top, a signature feature in the photo, will have formed during this time.
- The Cooling Period. Remove the tart from the oven and let it cool completely on a wire rack. This can take a couple of hours. Resisting the urge to slice into it immediately is essential, as this cooling time allows the filling to set to its perfect, fudgy consistency.
Once cool, the tart can be garnished with a tiny sprinkle of flaky sea salt, which brilliantly enhances the deep chocolate notes. Each slice presents that beautiful cross-section of textures, just as promised.
There’s a special kind of pride in putting together a dessert that looks and tastes this incredible. It’s a wonderful treat to present to friends and family, so be sure to share the results of this delicious baking project.