
Ultimate Layered Chocolate Peanut Butter Bars
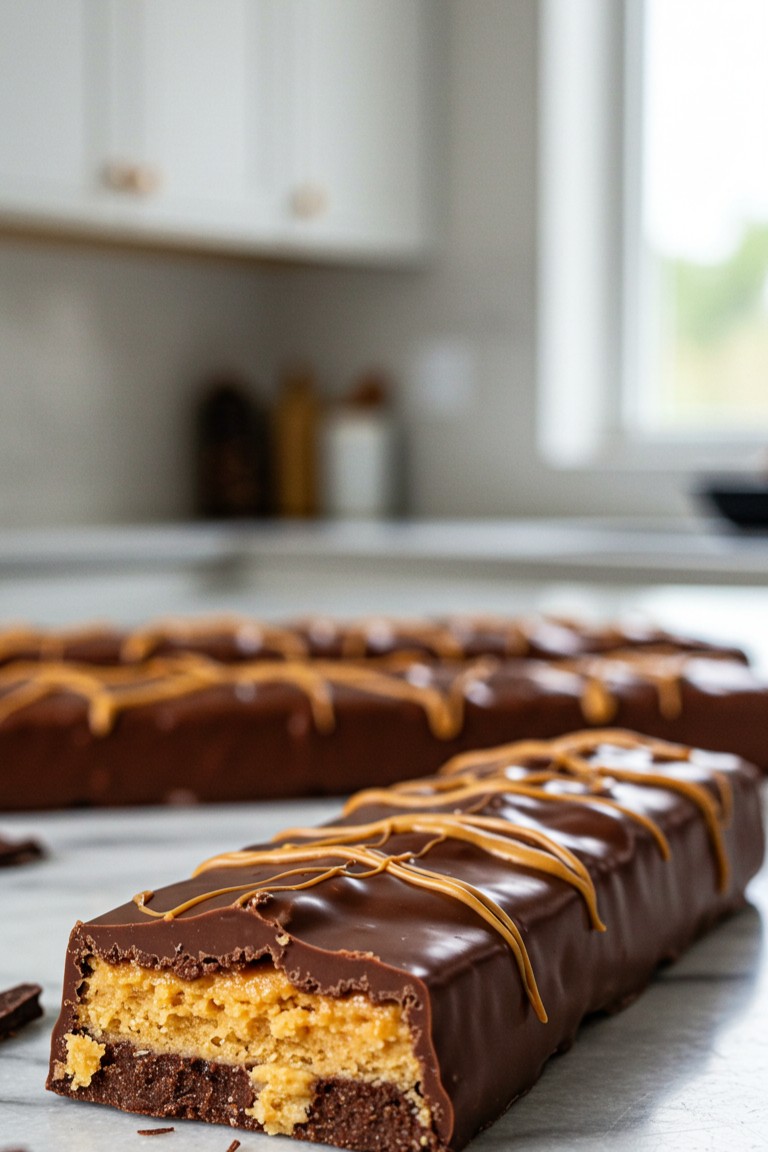
It feels truly rewarding to transform simple pantry staples into a spectacular homemade treat. This recipe guides one through the delightful process of assembling these gorgeous, multi-layered chocolate peanut butter bars. The final result is a confection with a firm, dark chocolate cookie base, a thick and creamy peanut butter center, and a complete coating of rich milk chocolate. A delicate, golden-brown peanut butter drizzle provides the finishing touch, just as pictured.
This guide breaks down every part of the process, making it approachable for any home baker ready to explore the world of homemade candy bars.
Kitchen Essentials
Before beginning, it’s helpful to gather all the necessary tools and ingredients. Having everything ready makes the process smooth and enjoyable.
Essential Equipment
- 🥣 Two medium mixing bowls
- 🥄 A sturdy rubber spatula
- 🧑🍳 An 8×8-inch (20×20 cm) square baking pan
- 📜 Parchment paper
- 🌪️ A food processor (or a zip-top bag and a rolling pin)
- 🔪 A long, sharp knife
- 🍴 A fork for dipping
Halal Ingredients
- 🍪 2 cups chocolate sandwich cookie crumbs (about 20-22 cookies)
- 🧈 ½ cup unsalted butter, melted (from a halal-certified brand)
- 🥜 1 cup creamy peanut butter
- 🍚 1 cup powdered sugar
- 🧂 ¼ teaspoon salt
- 🍫 1 ½ cups milk chocolate chips (from a halal-certified brand)
- 🥥 1 tablespoon coconut oil or vegetable shortening
Assembling the Bars, Layer by Layer
Patience is a key ingredient here. Allowing each layer to chill and set properly is what yields those perfect, distinct layers seen in the finished bars.
For the Rich Chocolate Base
This layer is the dark, crumbly foundation of the bar.
- Prepare the Pan: Line the 8×8-inch pan with parchment paper, leaving some overhang on two opposite sides. These “handles” will make it much easier to lift the entire block out later.
- Make the Crumbs: Place the chocolate sandwich cookies into a food processor and pulse until they become fine crumbs. A fine crumb has a consistent, sandy texture with no large cookie pieces remaining. If a food processor isn’t available, place the cookies in a sealed zip-top bag and crush them with a rolling pin.
- Combine: In a medium bowl, stir the melted butter into the cookie crumbs until the mixture is thoroughly moistened and resembles wet sand.
- Press and Chill: Tip the buttery crumb mixture into the prepared pan. Use the back of a spoon or the bottom of a glass to press it down into a very firm, even layer. This firm pressure is what prevents the base from crumbling apart. Place the pan in the refrigerator for at least 30 minutes to set.
For the Creamy Peanut Butter Filling
Next comes the thick, fudgy peanut butter layer that sits right in the middle.
- Mix the Filling: In another mixing bowl, combine the creamy peanut butter, powdered sugar, and salt. Mix with a spatula until everything comes together into a thick, dough-like consistency. It will be stiff, which is exactly right.
- Add the Layer: Remove the pan with the chilled base from the refrigerator. Dollop the peanut butter mixture over the chocolate base. Spread it out carefully and evenly, pressing it all the way to the edges. A tip for easy spreading is to slightly wet the spatula to prevent the filling from sticking.
- Chill Until Firm: This is a very important step. Return the pan to the refrigerator for at least one hour, or to the freezer for 30 minutes. The peanut butter layer must be completely firm before cutting. This ensures clean, sharp edges on each bar.
The Smooth Chocolate Coating
This step envelops the bars in the glossy chocolate shell seen in the photo.
- Cut the Bars: Once the layers are firm, use the parchment paper handles to lift the entire block out of the pan and onto a cutting board. Use a long, sharp knife to cut the block into 10-12 rectangular bars.
- Melt the Chocolate: Place the milk chocolate chips and coconut oil in a microwave-safe bowl. The coconut oil is the secret to a smooth, glossy coating that sets well. Microwave in 20-second bursts, stirring well after each one, until the chocolate is completely melted and smooth. Be careful not to overheat it.
- Coat Each Bar: Place one peanut butter bar on the tines of a fork and hold it over the bowl of melted chocolate. Use a spoon to pour chocolate over the entire bar, making sure every side is covered. Gently tap the fork on the side of the bowl to let any excess chocolate drip off.
- Set the Coating: Carefully slide the coated bar from the fork onto a fresh sheet of parchment paper. Repeat with the remaining bars. Place them in the refrigerator for about 15-20 minutes, just until the chocolate shell is firm to the touch.
The Finishing Peanut Butter Drizzle
The final flourish is the elegant peanut butter drizzle that makes these bars so visually appealing.
- Prepare the Drizzle: Take one tablespoon of the remaining creamy peanut butter and melt it in the microwave for 10-15 seconds. It should be liquid and pourable, but not hot.
- Decorate the Bars: Using a small spoon, a fork, or a small piping bag, drizzle the melted peanut butter back and forth over the tops of the chocolate-coated bars. This action is what forms the thin, zig-zagging lines.
- Final Chill: Return the bars to the refrigerator one last time for 10 minutes to allow the drizzle to set.
The bars are now complete! They can be stored in an airtight container in the refrigerator for up to a week.
There’s immense satisfaction in seeing these beautiful, professional-looking bars and knowing they were made right in one’s own kitchen. Sharing them with family and friends is an even greater joy, so be sure to show off the wonderful results of this baking adventure.