

Bakery-Style Fudgy Walnut Brownies You Can Make at Home
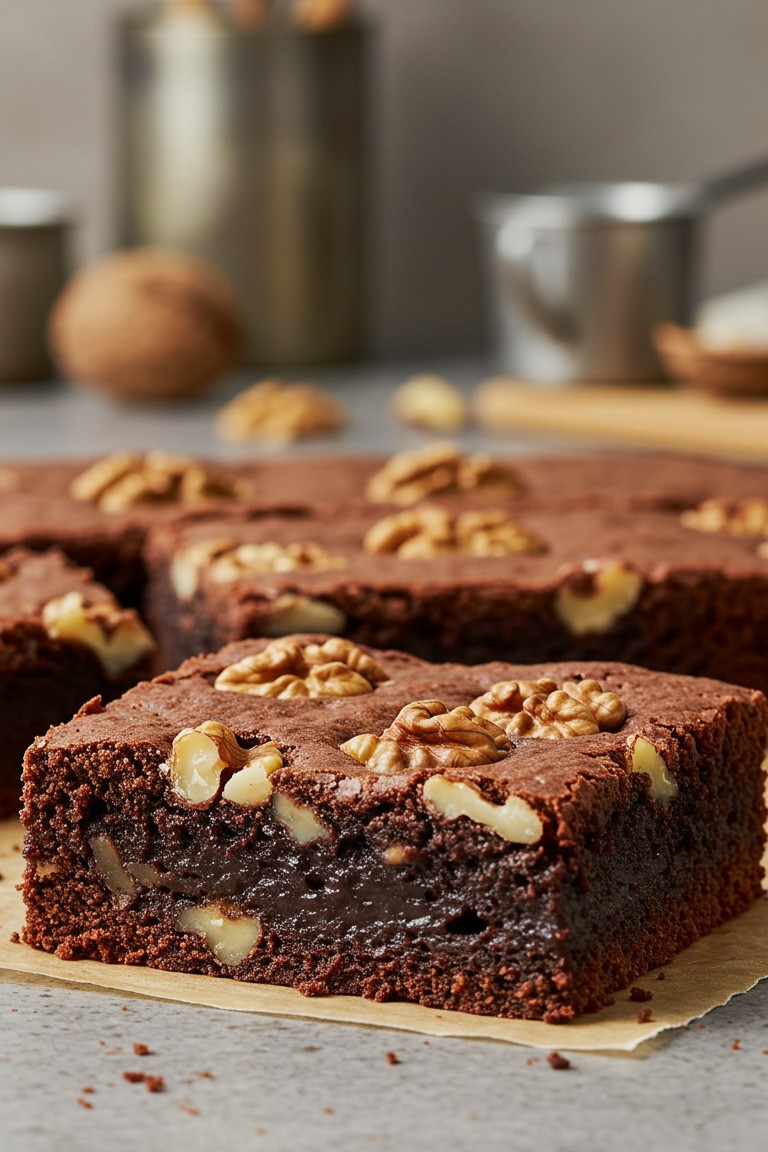
The ideal brownie is a masterpiece of textures and rich chocolate flavor. The one in the photograph is a stunning example, with its unbelievably fudgy and dense interior, a signature crackled top, and a generous amount of walnuts baked right in and arranged on top. It’s the kind of dessert that brings pure joy, and it’s entirely achievable at home. This recipe is a fantastic starting point for anyone new to baking, breaking down the method into simple, clear instructions for assembling these decadent chocolate squares.
Kitchen Essentials
- 🥣 One large and one medium mixing bowl
- Saucepan
- 🥢 Whisk
- 🥄 Silicone or rubber spatula
- 🍰 8×8 inch (20×20 cm) square baking pan
- 📜 Parchment paper
- ⏲️ Oven
Halal Ingredients
- 🍫 180g (1 cup) Halal dark or semi-sweet chocolate, chopped into small pieces
- 🧈 115g (½ cup) Unsalted butter
- 🍚 200g (1 cup) Granulated sugar
- 🥚 2 Large eggs, at room temperature
- 🍦 1 tsp Alcohol-free vanilla extract
- 🌾 65g (½ cup) All-purpose flour
- ☕ 30g (¼ cup) Unsweetened cocoa powder
- 🧂 ¼ tsp Salt
- 🌰 150g (1 ½ cups) Walnuts, with about 100g roughly chopped and 50g left as whole halves
Step-by-Step Instructions
- First, get the oven and pan ready. Preheat the oven to 175°C (350°F). Take the square baking pan and line it with parchment paper. A helpful trick for beginners is to leave some paper hanging over two opposite sides. These will act as handles later, making it very easy to lift the whole block of brownies out of the pan once they have cooled.
- In the small saucepan, combine the chopped butter and the chopped dark chocolate. Place it over very low heat. The key here is to melt them slowly and gently, stirring constantly with a spatula. This prevents the chocolate from scorching, which can happen quickly. Once everything is smooth and glossy, remove the pan from the heat and set it aside to cool down for a few minutes.
- While the chocolate mixture cools, take the large mixing bowl. Add the sugar and the two room-temperature eggs. Using the whisk, beat them together with energy for about two minutes. The mixture should become pale, thick, and foamy. This step is the secret to obtaining the thin, crackly top seen in the photo, so don’t rush it! After whisking, stir in the vanilla extract.
- Now, it’s time to combine the mixtures. Slowly stream the warm (not hot!) melted chocolate and butter into the foamy egg and sugar mixture, whisking gently as it’s poured. It’s important that the chocolate has cooled a bit, otherwise, it could cook the eggs. Keep mixing until the batter is uniform and has a beautiful sheen.
- In the medium bowl, whisk together the all-purpose flour, cocoa powder, and salt. Mixing the dry ingredients separately first ensures that the salt and cocoa are evenly distributed throughout the flour, leading to a consistent flavor in every bite.
- Add the combined dry ingredients to the wet chocolate mixture in the large bowl. Switch from the whisk to the spatula. It’s now time to fold the batter. This technique is gentle and prevents the brownies from becoming tough. To fold, cut the spatula down through the center of the batter, scrape it along the bottom of the bowl towards you, and then lift and fold it over the top. Give the bowl a quarter turn and repeat. Continue just until there are no more visible streaks of flour. Do not overmix! Stopping at this point is essential for the dense, fudgy texture.
- Gently fold in the 100g of roughly chopped walnuts.
- Pour the finished brownie batter into the parchment-lined pan. Use the spatula to spread it into an even layer, making sure it reaches all the corners. Now, take the remaining 50g of walnut halves and arrange them on top of the batter. The photograph shows them placed neatly over the spots where the brownies will be sliced, which gives them a professional and appealing look.
- Place the pan in the preheated oven and bake for 25 to 30 minutes. To check for doneness, insert a toothpick into the center. For perfect fudgy brownies, the toothpick must come out with moist, sticky crumbs attached. If it comes out with wet batter, they need a few more minutes. If it comes out completely clean, they are slightly over-baked and will be more cake-like.
- This next step requires patience, but it is the most important one for achieving that gooey center. Once removed from the oven, the brownies must be left to cool completely in the pan on a wire rack. This can take at least an hour or two. Cutting into them while warm will cause them to fall apart. Cooling allows the center to set properly.
- Once fully cooled, use the parchment paper handles to lift the entire brownie slab out of the pan. Place it on a cutting board. For the clean, sharp-edged squares shown in the picture, use a large, sharp knife. Wiping the blade clean with a damp cloth between each cut prevents dragging and makes for perfect portions.
The rich aroma that fills the kitchen is just a preview of the deliciousness ahead. These brownies are a wonderful treat to share, and seeing the results of this baking project is sure to bring a smile. Don’t hesitate to snap a picture of your finished batch and show off those beautiful, fudgy squares.