
Perfect Raspberry Cheesecake Squares
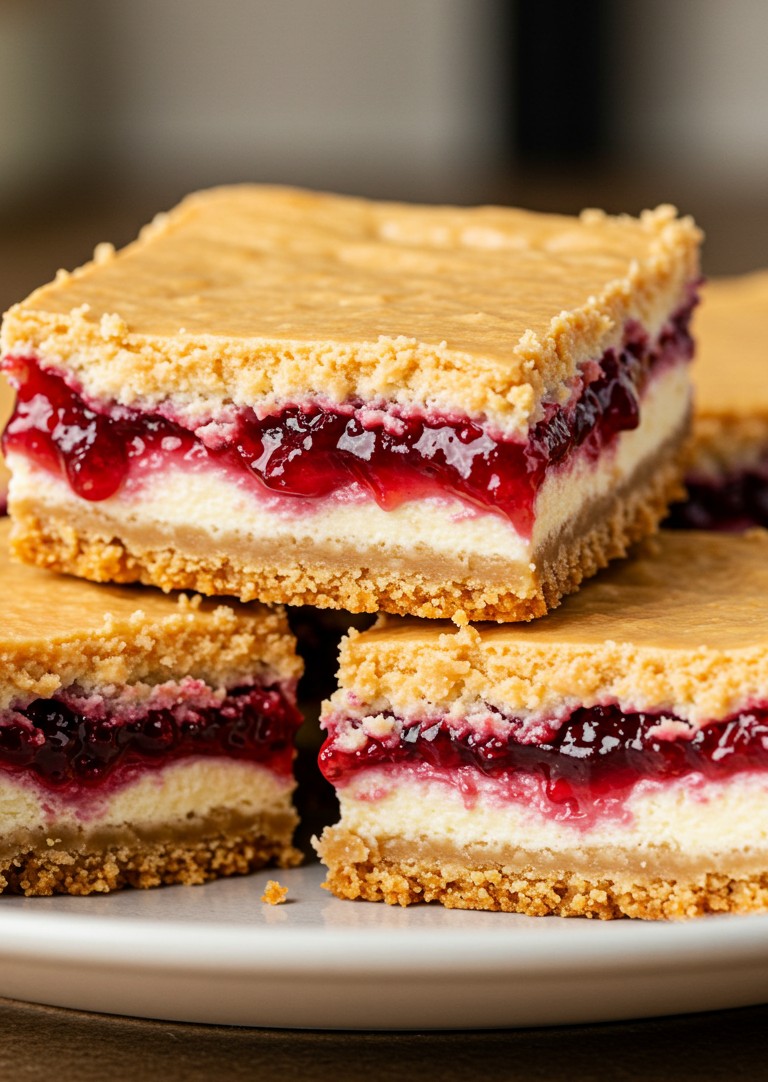
These delightful Raspberry Cheesecake Squares offer a stunning visual and a symphony of textures and flavors. As seen in the image, the bars present a beautifully layered profile: a sturdy, golden-brown crumb base provides the foundation. Resting upon this is a generous, smooth, off-white cheesecake filling, baked to a perfect density. A vibrant, glossy layer of deep red raspberry preserve cuts through the richness, showcasing discernible fruit pieces. The entire confection is crowned with an equally golden-brown, cohesive, and evenly baked top crust, matching the hue and fine crumb texture of the base. Each square is meticulously cut, revealing the inviting strata within. This guide will assist in preparing these exact treats at home.
What You’ll Need
Here are the tools and ingredients required to assemble these impressive bars.
Essential Kitchen Equipment:
- 📏 9×13 inch (23×33 cm) Baking Pan
- 📜 Parchment Paper
- 🥣 Large Mixing Bowl (for crust)
- 🥣 Medium Mixing Bowl (for cheesecake filling)
- 🥄 Measuring Cups & Spoons
- 🔪 Pastry Blender or Two Knives (for crust)
- 👋 Electric Mixer (handheld or stand)
- Spatula
- 🔪 Sharp Knife (for cutting)
- 🍽️ Serving Plate (like the light-colored, matte-finish plate shown)
Halal Ingredients:
- 🧈 1 cup (226g) Unsalted Butter (halal), cold and cut into cubes (plus extra for greasing)
- 🍚 2 ½ cups (300g) All-Purpose Flour
- 🍬 ¾ cup (150g) Granulated Sugar (for crust/topping)
- 🧂 ¼ teaspoon Salt
- 🧀 16 oz (452g) Cream Cheese (halal), softened to room temperature
- 🥚 2 large Eggs (halal), at room temperature
- 🍬 ¾ cup (150g) Granulated Sugar (for cheesecake filling)
- 🍋 1 teaspoon Lemon Zest (optional, for brightness)
- 🍦 1 teaspoon alcohol free Vanilla Extract
- 🍓 1 ½ cups (approx. 450g) Raspberry Preserves or Jam (halal), good quality with fruit pieces
Bringing Your Raspberry Cheesecake Squares to Life
Follow these steps methodically to achieve the layered perfection visible in the image.
Preparing the Crust and Topping
The golden-brown base and top layers, both featuring a fine crumb texture, begin here.
- Preheat the Oven: Set the oven to 350°F (175°C).
- Prepare the Pan: Lightly grease the bottom of the 9×13 inch baking pan with a little butter. Line the pan with parchment paper, allowing some overhang on two opposite sides. This overhang will act as handles to easily lift the bars out later.
- Mix Dry Ingredients for Crust: In a large mixing bowl, combine the all-purpose flour, ¾ cup of granulated sugar, and salt. Whisk them together briefly.
- Cut in the Butter: Add the cold, cubed butter to the flour mixture. Using a pastry blender or two knives in a crisscross motion, cut the butter into the flour until the mixture resembles coarse crumbs. This means working the butter in until the largest pieces are about the size of small peas. This technique helps ensure a tender, crumbly texture for the base and topping.
- Reserve Topping: Set aside 1 ½ cups of this crumb mixture in a separate bowl. This will be used for the top crust layer.
- Press the Base Crust: Take the remaining crumb mixture and press it firmly and evenly into the bottom of the prepared baking pan. Use the bottom of a measuring cup or your fingers to get a compact, level base. This forms the sturdy foundation seen in the image.
- Pre-bake the Base: Bake the base crust for 15 minutes, or until it is lightly golden. This partial baking helps it stay crisp. Remove from the oven and let it cool slightly while preparing the filling.
Mixing the Cheesecake Filling
The goal here is a smooth, creamy, off-white cheesecake layer, just like the one in the photograph.
- Beat Cream Cheese: In a medium mixing bowl, place the softened cream cheese. Using an electric mixer on medium speed, beat the cream cheese until it is completely smooth and free of lumps. Scraping down the sides of the bowl with a spatula occasionally ensures everything is well incorporated. Using room temperature cream cheese is crucial for a lump-free texture.
- Add Sugar and Flavorings: Gradually add the ¾ cup of granulated sugar to the beaten cream cheese, mixing until well combined and smooth. Beat in the lemon zest (if using) and vanilla extract.
- Incorporate Eggs: Add the room temperature eggs one at a time, beating on low speed just until each egg is blended into the mixture. Over-mixing at this stage can incorporate too much air, potentially leading to cracks during baking. Mix only until the yolk disappears.
Assembling the Layers
This is where the distinct strata come together.
- Pour Cheesecake Filling: Gently pour the prepared cheesecake filling over the slightly cooled, pre-baked base crust. Spread it evenly using a spatula, ensuring it reaches all corners. This will form the thick, white layer.
- Add Raspberry Preserve Layer: Spoon the raspberry preserves over the cheesecake filling. Carefully spread it into an even layer using the back of a spoon or an offset spatula. Aim for full coverage to achieve that vibrant red band seen in the finished bars. The image shows a generous layer with visible fruit texture.
- Apply Top Crust: Take the 1 ½ cups of reserved crumb mixture. Sprinkle it evenly over the raspberry preserve layer. Gently press it down just slightly to help it adhere and form a cohesive top crust similar to the one pictured, which is flat and even.
Baking to Perfection
- Bake the Bars: Place the assembled pan back into the 350°F (175°C) oven. Bake for 30-35 minutes.
- Check for Doneness: The bars are done when the edges of the cheesecake layer appear set and the center is almost set (it should only have a very slight jiggle when the pan is gently nudged). The top crumb layer should be golden brown, matching the color of the base.
Cooling and Slicing
Patience during cooling is key for neat, well-defined squares.
- Cool at Room Temperature: Remove the pan from the oven and place it on a wire rack. Let the bars cool completely at room temperature, which usually takes about 1-2 hours. This gradual cooling helps prevent the cheesecake layer from cracking.
- Chill Thoroughly: Once cooled to room temperature, cover the pan loosely with plastic wrap and transfer it to the refrigerator. Chill for at least 4 hours, or preferably overnight. This chilling process is essential for the cheesecake to firm up properly, allowing for the clean, distinct layers visible in the image when cut.
- Slice and Serve: Once thoroughly chilled, use the parchment paper overhangs to lift the entire block of bars out of the pan and onto a cutting board. Using a large, sharp knife, cut the block into neat squares. For the cleanest cuts, wipe the knife blade with a damp cloth between each slice. The image shows generously sized square portions.
Enjoying Your Masterpiece
Arrange the Raspberry Cheesecake Squares on a plate, perhaps stacking a few as shown in the enticing photograph, with a few stray crumbs adding to the homemade charm. The combination of the buttery crumb, rich cheesecake, and tangy raspberry is truly a delightful experience.
A Sweet Farewell
With these steps, anyone can fashion these beautiful and delicious Raspberry Cheesecake Squares. The process itself offers a quiet satisfaction, leading to a wonderfully rewarding treat. Feel encouraged to embark on this baking journey and then share the joy of these homemade delights with others.