
Pink Petal Booties for Tiny Toes
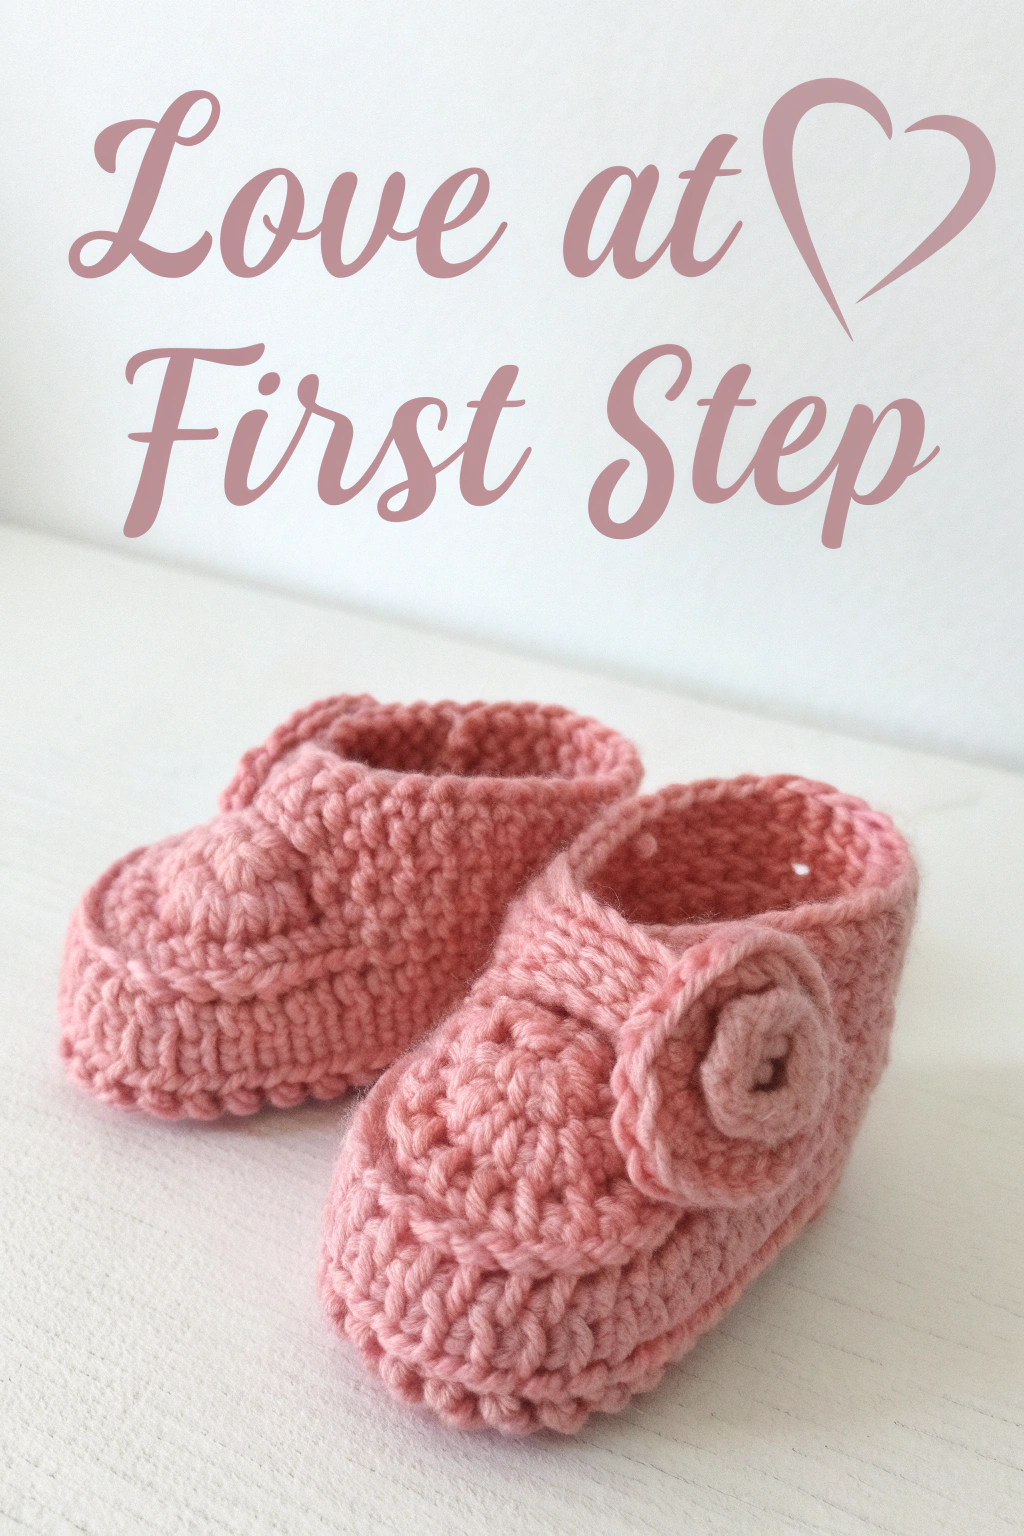
Have you ever looked at a pair of darling baby booties and thought, “I wish I could make those”? Well, good news! Today, we’re going to walk through how to fashion the absolutely adorable dusty rose pink crocheted baby booties you see in the image. These little treasures are perfect for gifting or for your own little one, and making them is a wonderfully rewarding journey. The main body of these booties is fashioned with a soft, textured stitch, a distinct strap with horizontal ribbing crosses the instep, and a charming rolled rose embellishment adorns the side of each one. Let’s gather our supplies and begin this sweet project together!
Gather Your Treasures: What You’ll Need
Before we start, let’s make sure we have all our tools and materials ready. Having everything on hand makes the process smooth and enjoyable.
- 🧶 Yarn: DK weight yarn in a soft, dusty rose pink (about 50g should be plenty for a newborn size). A soft acrylic or cotton blend is ideal for baby items.
- 🪡 Crochet Hook: A 4.0mm (G/6) crochet hook, or the size recommended for your chosen yarn.
- ✂️ Scissors: For snipping yarn.
- 🧵 Tapestry Needle: A blunt-ended needle with a large eye, for weaving in those yarn tails and sewing on the embellishment.
- ✨ Stitch Markers (optional): These can be super helpful for beginners to mark the first stitch of a round or important points.
Getting Started: Basic Stitches You’ll Use
If you’re new to crochet, don’t worry! We’ll go over the basic stitches needed for these booties. These stitches are the building blocks of so many wonderful projects.
- Slip Knot: This is how you’ll get the yarn onto your hook to begin. Form a loop with your yarn, lay the tail end over the working yarn (the yarn coming from the ball), then use your hook to pull the working yarn through the loop. Gently pull the ends to tighten it onto your hook – not too tight, just snug!
- Chain (ch): The foundation of most crochet. Yarn over your hook (wrap the yarn from back to front over the hook) and pull that yarn through the loop already on your hook. That’s one chain!
- Slip Stitch (sl st): A very flat stitch used for joining rounds or moving your yarn without adding much height. Insert your hook into the designated stitch, yarn over, and pull the yarn through the stitch and the loop on your hook all in one motion.
- Single Crochet (sc): A lovely, short, and sturdy stitch.
- Insert your hook into the stitch (or chain space) where you want to place it.
- Yarn over your hook.
- Pull the yarn through the stitch. You will now have two loops on your hook.
- Yarn over your hook again.
- Pull the yarn through both loops on your hook. That’s one single crochet!
- Half Double Crochet (hdc): A stitch that’s a little taller than a single crochet, giving a nice plush texture.
- Yarn over your hook before inserting it into the stitch.
- Insert your hook into the designated stitch.
- Yarn over your hook again.
- Pull the yarn through the stitch. You will now have three loops on your hook.
- Yarn over your hook one last time.
- Pull the yarn through all three loops on your hook. That’s one half double crochet! This stitch forms the main texture of the bootie body.
- Working in Rounds: Instead of going back and forth in rows, we’ll be working in a spiral or joined circles to form the three-dimensional shape of the booties. We will join most rounds with a slip stitch.
- Increasing (inc): To make the fabric wider (like for the sole), we need to add stitches. An increase typically means working two stitches into the same stitch from the previous round.
- Decreasing (dec): To shape areas like the toe, we need to reduce the number of stitches. A common decrease for single crochet is sc2tog (single crochet two together):
- Insert hook into the first stitch, yarn over, pull up a loop (2 loops on hook).
- Insert hook into the next stitch, yarn over, pull up a loop (3 loops on hook).
- Yarn over and pull through all 3 loops on the hook. You’ve turned two stitches into one!
- Working in the Back Loop Only (BLO): When you look at the top of a crochet stitch, you’ll see two loops forming a ‘V’. For BLO, you insert your hook under only the loop that is furthest away from you (the back loop). This technique produces the distinct horizontal ridges on the instep strap of these booties and the neat edge where the sole meets the body.
Let’s Make These Darling Booties! (Make Two)
We’ll construct one bootie, and then you’ll repeat the process for the second one. Remember to take your time and enjoy the rhythm of the stitches.
Part 1: The Cozy Sole
The sole is an oval shape. (Newborn size, adjust chain length for other sizes).
- Foundation: Chain 10 (ch 10).
- Round 1:
- Work 2 sc in the 2nd ch from the hook (this is an increase).
- Sc in each of the next 7 ch.
- Work 5 sc in the last ch (this forms the curve of the toe).
- Now, working along the other side of the foundation chain: sc in each of the next 7 ch (opposite the ones you just did).
- Work 3 sc in the last ch (which was the first ch space where you put your initial 2sc).
- Join with a sl st to the first sc of the round. (24 sc)
- Tip: Place a stitch marker in the first stitch of each round to help you find it when you come back around.
- Round 2:
- Ch 1 (does not count as a stitch here and throughout).
- 2 sc in each of the first 2 sts (two increases).
- Sc in each of the next 7 sts.
- 2 sc in each of the next 5 sts (five increases around the toe).
- Sc in each of the next 7 sts.
- 2 sc in each of the next 3 sts (three increases around the heel).
- Join with a sl st to the first sc. (34 sc)
- Round 3:
- Ch 1.
- (Sc in next st, 2 sc in next st) twice.
- Sc in each of the next 7 sts.
- (Sc in next st, 2 sc in next st) five times.
- Sc in each of the next 7 sts.
- (Sc in next st, 2 sc in next st) three times.
- Join with a sl st to the first sc. (44 sc) Your sole is now complete! It should be a nice oval shape.
Part 2: Building the Bootie Walls
This is where we start to build upwards from the sole. We will use hdc for the body of the bootie for a soft and slightly textured feel.
- Round 4 (Forming the edge):
- Ch 1.
- Work 1 hdc in the back loop only (BLO) of each stitch around. This round is crucial as it forms the defined edge seen in the image where the sole meets the upper part of the bootie.
- Join with a sl st to the first hdc. (44 hdc)
- Round 5-7 (Building height):
- Ch 1.
- Work 1 hdc in each stitch around (working through both loops now).
- Join with a sl st to the first hdc. (44 hdc for each round)
- After Round 7, you will start to see the sides of the bootie taking shape.
Part 3: Shaping the Instep and Beginning the Toe
Now we’ll start to shape the top of the foot and the toe area. This involves some decreases.
- Round 8 (Starting toe decreases):
- Ch 1.
- Hdc in the first 12 sts.
- Now, we’ll make decreases for the toe. (hdc2tog, hdc in next st) 6 times. (To hdc2tog: Yarn over, insert hook in next st, yarn over, pull up loop. Yarn over, insert hook in following st, yarn over, pull up loop. Yarn over, pull through all 5 loops on hook).
- Hdc in the remaining 14 sts.
- Join with a sl st to the first hdc. (38 sts)
- Round 9 (More toe decreases):
- Ch 1.
- Hdc in the first 12 sts.
- (hdc2tog) 6 times over the toe section.
- Hdc in the remaining 14 sts.
- Join with a sl st to the first hdc. (32 sts)
Part 4: Forming the Instep Strap
The image shows a distinct strap across the instep with prominent horizontal ribbing. We will fashion this by working back and forth in rows for a section of the bootie, using single crochet in the back loop only (sc-blo) for that lovely texture.
- Row 1 of Strap:
- Ch 1. Do not turn yet.
- Sc-blo in the first 10 stitches of the current round. (10 sc-blo)
- Row 2-4 (or until desired strap width):
- Ch 1, turn your work.
- Sc-blo in each of the 10 sts across the strap.
- Repeat this row two more times (for a total of 3 rows of the strap, or adjust for the width you like). The strap in the image has about 3-4 visible ridges, meaning 3-4 rows.
- After the last row of the strap, do not fasten off.
Part 5: Completing the Cuff
Now we will attach the strap to the other side of the bootie opening and complete the cuff.
- Connecting the Strap & Cuff Round 1:
- Ch 1 (do not turn if you just finished the last strap row).
- Carefully align the end of your strap with the stitches on the opposite side of the bootie opening. You’ll be skipping the toe stitches. Count 10 stitches from where the strap began on the other side, and you’ll slip stitch your strap to the 10th stitch to bridge the gap over the instep.
- More precisely: After your last strap row, ch 1. Skip the central 12 stitches of the previous full round (Round 9) which form the toe opening. Sl st into the next stitch on the main body of the bootie to join the strap.
- Now, continue working around the ankle opening: sc in each stitch around the remaining part of the bootie’s ankle opening (these will be the stitches from Round 9 that were not part of the strap or the skipped toe stitches). This will include the stitches along the back/heel and the side where the strap started.
- When you reach the other side of the strap, sc along the side edge of the strap rows to neaten it, then continue sc across the top 10 stitches of the strap itself. Sc down the other side edge of the strap.
- Join with a sl st to the first stitch of this cuff round. (You should have approximately 20-22 stitches around the cuff opening, plus the 10 stitches of the strap itself. This part can be a little fiddly; the goal is to make a neat opening).
- Alternative for simpler joining: After finishing the strap rows, fasten off, leaving a long tail. Sew the end of the strap to the corresponding point on the other side of the bootie opening. Then, reattach yarn at the back of the heel to work the cuff rounds.
- Cuff Round 2 (Finishing edge):
- Ch 1.
- Work 1 sl st in each stitch around the entire cuff opening for a neat, simple finish.
- Join with a sl st to the first sl st.
- Fasten off and weave in all ends securely using your tapestry needle.
Part 6: The Charming Rose Swirl Embellishment
This sweet rose adds such a lovely touch. It’s made from a simple crocheted strip that is then rolled up.
- Make the Strip:
- Ch 26.
- Row 1: Work 3 hdc in the 3rd ch from hook. (Work 3 hdc in each ch across to the end). This will cause the strip to naturally start to curl.
- Fasten off, leaving a long tail for sewing (about 10-12 inches).
- Assemble the Rose:
- Starting from one end, tightly roll the crocheted strip into a spiral, mimicking a rose shape. The 3hdc in each stitch will help it frill out.
- Use the long tail and your tapestry needle to sew through the base of the rolled strip to secure its shape. Make a few stitches back and forth through all the layers at the bottom to hold the rose together.
- Attach to Bootie:
- Position the rose on the outer side of the bootie, where the instep strap meets the main body, as seen in the image.
- Using the remaining yarn tail (or a new piece if needed), carefully sew the rose embellishment onto the side of the bootie.
Congratulations! You’ve completed one bootie. Now, repeat all steps to make a matching one.
Tips for Happy Hooking
- Tension is Key: Try to keep your stitches consistent. If they’re too tight, your hook will be hard to insert; too loose, and the fabric might be floppy. It takes practice!
- Count Your Stitches: Especially on the sole and decrease rounds. This prevents unexpected shaping issues. Stitch markers are your best friends here.
- Weave in Ends Neatly: Use your tapestry needle to weave yarn tails back and forth through the inside of your stitches to secure them. This makes your finished pieces look professional.
- Don’t Be Afraid to Unravel: If you make a mistake, it’s okay! Crocheters call it “frogging” (because you “rip-it, rip-it”). It’s all part of the learning process.
Your Tiny Treasures Await!
Look at those sweet little booties you’ve brought to life! There’s such a special feeling in holding something you’ve fashioned with your own two hands, especially when it’s destined for tiny feet. Imagine the warmth and love that’s stitched into every loop.
Hopefully you’ve enjoyed this journey into making these pink petal booties. Give this project a try – you might just discover a new passion. We’d absolutely love to see your finished booties! Share a picture of your adorable footwear; it’s always inspiring to see what others have lovingly put together. Happy hooking!