
Lush Pistachio Dream Cake
Some desserts are a feast for the eyes before they even reach the palate, and this Pistachio Dream Cake is one of them. It is built with two vibrant green layers, a rustic and generous coating of chopped pistachios, and a luxurious, deeply swirled crown of cream cheese frosting. This bake is a wonderfully rewarding project that makes fundamental pastry skills feel simple and approachable, perfect for anyone new to homemade desserts. The steps below will guide anyone in putting together this impressive cake, destined to be the highlight of any table.
What You’ll Need
Before beginning, it’s a good idea to gather all the necessary equipment and ingredients. This preparation makes the whole process smooth and enjoyable.
Kitchen Equipment
- 🥣 Two 8-inch round cake pans
- 🌬️ Stand mixer or electric hand mixer
- 🥄 Rubber spatula
- 🍴 Measuring cups and spoons
- 🧊 Wire cooling rack
- 🎂 Offset spatula or flat knife
Halal Ingredients
- 🥜 1 ½ cups shelled, unsalted pistachios
- 🍚 2 ½ cups all-purpose flour
- 🥄 2 teaspoons baking powder
- 🧂 ½ teaspoon salt
- 🧈 1 cup unsalted butter (halal), softened to room temperature
- 🍬 1 ¾ cups granulated sugar
- 🥚 4 large eggs, at room temperature
- 🥛 1 cup whole milk
- 🍦 1 teaspoon alcohol free vanilla extract
- 💚 A few drops of green food coloring (optional, for extra vibrancy)
- 🧀 8 ounces cream cheese (halal), softened to room temperature
- powdered sugar
- 🍋 1 teaspoon fresh lemon juice
Step-by-Step Guide to Baking
This process is broken down into manageable parts: preparing the nuts, mixing the cake batter, baking the layers, whipping up the frosting, and finally, assembling the cake.
1. Prepare the Pistachios
The key to this cake is, of course, the pistachios. They are used in two ways: ground into the batter for flavor and chopped for the beautiful coating.
Start with 1 ½ cups of shelled, unsalted pistachios. Take ½ cup and process it in a food processor until it becomes a fine, flour-like powder. Set this aside. Take the remaining 1 cup of pistachios and chop them finely by hand or with a few quick pulses in the food processor. The goal is small, uniform pieces for coating the sides of the cake. Set this portion aside separately.
2. Mix the Green Cake Batter
With the pistachios ready, it’s time to put together the cake batter.
- Begin by preheating the oven to 350°F (175°C). Grease and flour two 8-inch round cake pans. A simple way to do this is to lightly coat the inside with butter, then dust with flour, tapping out any excess. This prevents the cake from sticking.
- In a medium bowl, whisk together the flour, baking powder, salt, and the finely ground pistachios from the previous step. Whisking dry ingredients together is called sifting and it helps distribute everything evenly for a consistent bake.
- In a large bowl with a stand mixer or electric hand mixer, perform a technique called creaming. Beat the softened butter and granulated sugar together on medium-high speed for about 3-5 minutes. The mixture will become pale, light, and fluffy. This step is very important as it whips air into the batter, which is the secret to a tender, soft cake.
- Add the eggs one at a time, beating well after each addition until it’s fully incorporated. Remember to scrape down the sides of the bowl with a spatula to ensure everything is mixed in.
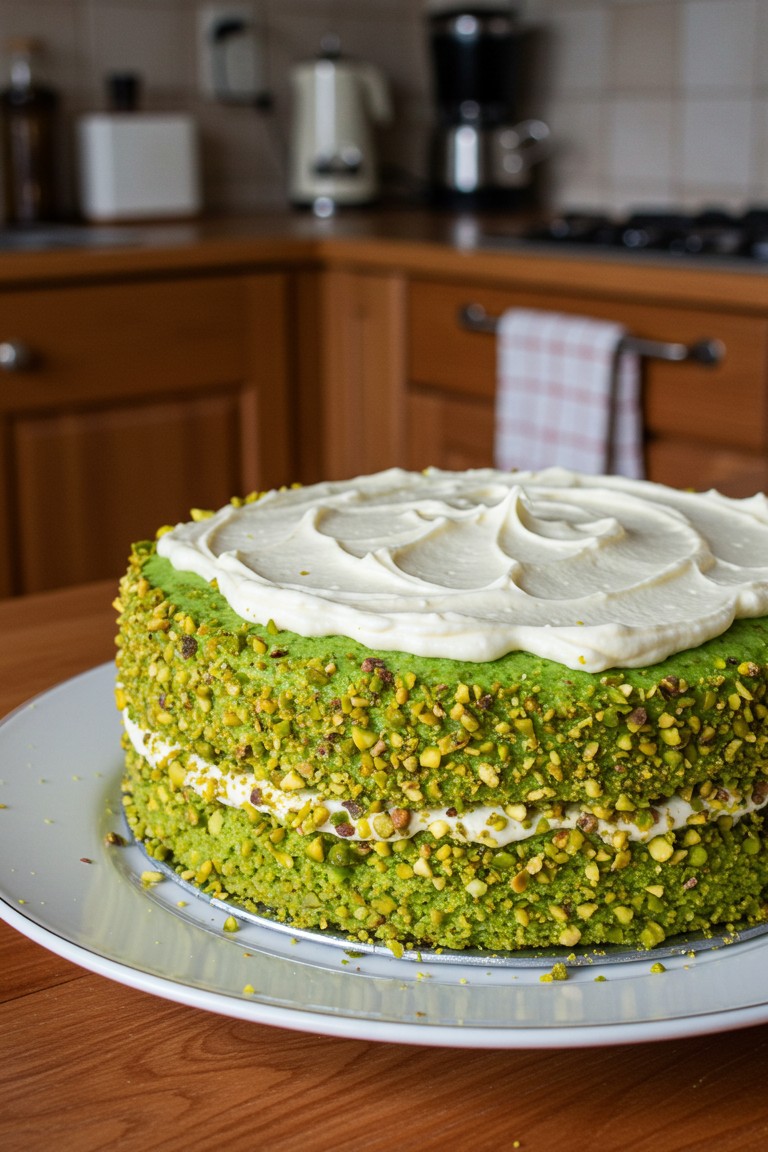
- Mix in the vanilla extract. If using food coloring to get that wonderfully vibrant green seen in the picture, add a few drops now and mix until the color is uniform.
- Now, it’s time to combine the wet and dry ingredients. To avoid overmixing (which can make a cake tough), add the dry mixture in three parts, alternating with the milk in two parts. Start and end with the dry ingredients. Mix on low speed only until just combined after each addition.
- Divide the batter evenly between the two prepared cake pans and smooth the tops with a spatula.
3. Bake and Cool the Layers
- Place the pans in the preheated oven and bake for 30-35 minutes. The cakes are done when a wooden toothpick inserted into the center comes out clean, with no wet batter attached.
- Let the cakes cool in their pans on a wire rack for about 15 minutes. Then, carefully invert them onto the rack to cool completely. Allowing them to cool fully is crucial before frosting; otherwise, the frosting will melt.
4. Whip Up the Cream Cheese Frosting
While the cake layers cool, prepare the thick, tangy frosting that perfectly complements the nutty pistachio flavor.
- In a large bowl, beat the softened cream cheese and softened butter together with an electric mixer until smooth and creamy.
- Gradually add 4 cups of powdered sugar, one cup at a time, mixing on low speed until it’s all incorporated. Once all the sugar is in, add the lemon juice and beat on high speed for 2 minutes until the frosting is light, fluffy, and thick, just like the swirls on the finished cake.
5. Assemble the Pistachio Dream Cake
This is the final, rewarding part where everything comes together.
- Place one cake layer on a serving plate. Spread about 1 cup of the cream cheese frosting evenly over the top.
- Carefully place the second cake layer on top of the frosted layer.
- Now for the signature nutty sides. Hold the cake with one hand and use the other to gently press the finely chopped pistachios onto the sides. It helps to do this over a large baking sheet to catch any nuts that fall. Continue until the entire side of the cake is covered.
- Spoon the remaining frosting onto the top of the cake. Using an offset spatula or the back of a spoon, spread it out, making beautiful, deep swirls and peaks to match the presentation in the photograph. The texture of the frosting is thick enough to hold these lovely shapes.
The magnificent pistachio cake is now complete. Let it set in the refrigerator for at least 30 minutes before slicing, which helps the frosting firm up for cleaner cuts.
Sharing a slice of this homemade dessert is a wonderful experience. Feel free to show off the results of this baking adventure—it’s a testament to the delicious possibilities waiting in one’s own kitchen.