
Pistachio-Topped Golden Cream Knafeh
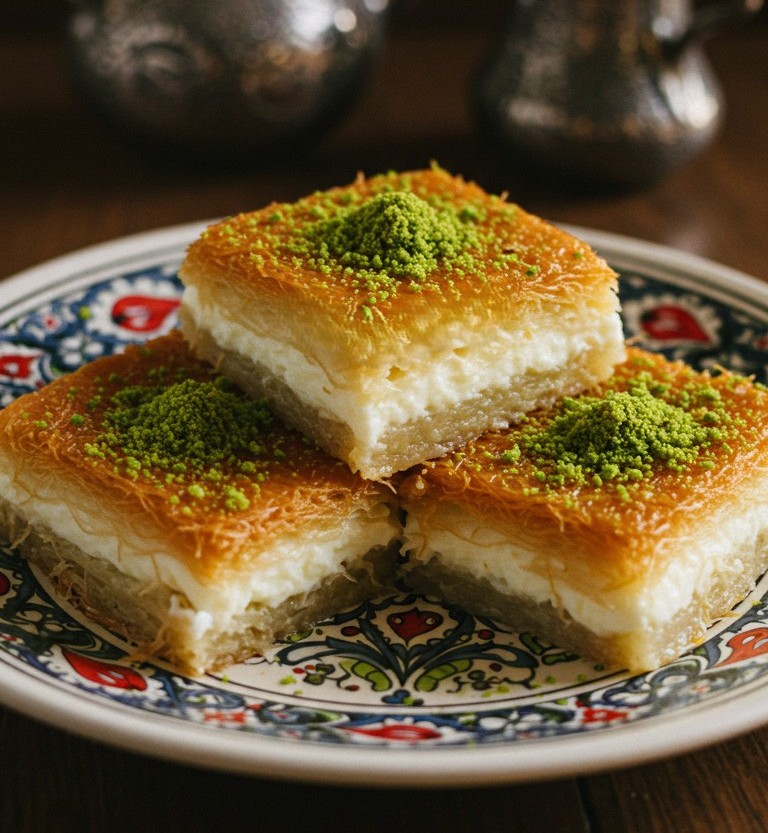
Embark on a delightful culinary journey to prepare these exquisite Cream-Filled Knafeh Squares. This popular Middle Eastern dessert, with its beautiful layers and contrasting textures, is a true showstopper. The image showcases three perfectly assembled Knafeh squares on a decorative plate, featuring golden-brown shredded pastry, a luscious white cream filling, and a vibrant pistachio garnish. Preparing this at home is wonderfully rewarding, filling the kitchen with sweet aromas and anticipation. This guide will walk anyone, even absolute beginners, through each step to fashion these delicious treats.
What You’ll Need
Here are the halal ingredients and kitchen tools required for this recipe:
Ingredients:
- 🍬 2 cups granulated sugar (for syrup)
- 💧 1 cup water (for syrup)
- 🍋 1 teaspoon fresh lemon juice (for syrup)
- 🌹 1 teaspoon rose water OR 🍊 1 teaspoon orange blossom water (for syrup, optional)
- 🥛 4 cups halal whole milk (for cream filling)
- 🍚 ½ cup semolina (farina) OR ½ cup cornstarch (for cream filling)
- 🥄 ¼ cup granulated sugar (for cream filling)
- 🍦 ½ cup halal heavy cream OR ½ cup halal thick cream (qashta/ashta, for cream filling)
- 🧈 1 cup (2 sticks) halal unsalted butter, melted, OR 1 cup ghee
- sợi 1 lb (approx. 450g) halal kataifi dough (shredded phyllo pastry), thawed if frozen
- 💚 ½ cup finely ground halal pistachios (for garnish)
Kitchen Equipment:
- Small saucepan (for syrup)
- Medium saucepan (for cream filling)
- 🥣 Large mixing bowl
- 📏 Measuring cups and spoons
- 🔪 Sharp knife
- 🎂 9×13 inch baking pan or a similar sized oven-safe dish
- 🥄 Whisk
- 🥄 Spatula
Let’s Get Baking: Step-by-Step Guide
Follow these instructions carefully to assemble and bake your stunning Knafeh Squares.
Preparing the Sweet Syrup (Attar)
The syrup needs to cool down, so it’s best to make it first.
- Combine the 2 cups of sugar and 1 cup of water in the small saucepan.
- Place the saucepan over medium heat. Stir the mixture gently until the sugar completely dissolves.
- Once the sugar has dissolved, bring the mixture to a boil. Then, reduce the heat to low and let it simmer for about 10-12 minutes. Simmering means keeping the liquid just below boiling, with tiny bubbles gently rising to the surface. The syrup should thicken slightly but remain pourable.
- Stir in the 1 teaspoon of lemon juice. This helps prevent the syrup from crystallizing (turning sugary again).
- Remove the saucepan from the heat. If using, stir in the rose water or orange blossom water for a traditional floral aroma.
- Set the syrup aside to cool completely while preparing the rest of the Knafeh.
Making the Creamy Filling (Ashta)
This creamy filling is the heart of the Knafeh.
- In the medium saucepan, combine the 4 cups of milk, ½ cup of semolina (or cornstarch), and ¼ cup of sugar.
- Whisk these ingredients together well before placing the saucepan on the heat to ensure there are no lumps.
- Place the saucepan over medium heat. Bring the mixture to a gentle simmer, whisking constantly. Whisking constantly means stirring with a whisk without stopping, vigorously reaching all parts of the pot, especially the bottom. This is crucial to prevent the mixture from sticking to the bottom of the pan and to avoid lumps, resulting in a smooth cream.
- Continue to cook and whisk until the mixture thickens considerably, to a consistency like a very thick pudding. This might take about 5-10 minutes. It should be thick enough to coat the back of a spoon heavily.
- Once thickened, remove the saucepan from the heat. Stir in the ½ cup of heavy cream or thick cream (qashta/ashta). This adds extra richness.
- Set the cream filling aside to cool slightly, allowing it to firm up a bit more as it cools. It can be covered with plastic wrap pressed directly onto the surface to prevent a skin from forming.
Assembling the Knafeh
This is where the layers come together.
- If the kataifi dough is in a large block, gently pull it apart with your fingers in the large mixing bowl to separate the strands. The goal is to have fine, fluffy strands. If the strands are very long, they can be roughly chopped or cut with kitchen shears into shorter pieces (about 1-2 inches long).
- Pour the 1 cup of melted butter or ghee over the shredded kataifi dough in the bowl.
- Using your hands, gently but thoroughly mix the butter/ghee into the kataifi strands. Ensure every strand is well-coated. This step is key for achieving the golden-brown color and crispy texture seen in the image.
- Take a little more than half of the buttered kataifi dough and press it firmly and evenly into the bottom of the 9×13 inch baking pan. Make sure to build up a slight edge around the sides if possible. This forms the bottom golden-brown pastry layer. Pressing firmly is important for a neat base.
- Spoon the prepared cream filling (ashta) over the kataifi base. Spread it evenly with a spatula, leaving about a ½-inch border around the edges. This prevents the cream from oozing out too much during baking. The image shows a generous, even layer of white cream.
- Take the remaining kataifi dough and sprinkle it evenly over the top of the cream filling, covering it completely. Gently pat it down, but not too firmly, to allow the pastry to puff a little. This will become the top golden-brown pastry layer.
Baking to Golden Perfection
- Preheat the oven to 375°F (190°C). Preheating the oven means turning it on to the correct temperature for about 15-20 minutes before putting the Knafeh inside, so it’s hot and ready to bake evenly from the start.
- Place the baking pan in the preheated oven.
- Bake for 35-45 minutes, or until the top of the Knafeh is a deep golden-brown color, just like the pastry in the image. The edges should also look golden and slightly pulled away from the sides of the pan. Keep an eye on it, as oven temperatures can vary. If the top browns too quickly, the oven temperature might be too high.
Soaking and Garnishing
The final touches make all the difference!
- Once the Knafeh is baked to a beautiful golden brown, carefully remove it from the oven.
- Immediately, while the Knafeh is still hot, slowly and evenly pour the cooled sweet syrup (attar) all over the surface. The hot Knafeh will sizzle as it absorbs the cool syrup. Use as much syrup as preferred; some like it sweeter than others. The pastry will soak it up, becoming wonderfully moist and sweet.
- Let the Knafeh sit and absorb the syrup for at least 30 minutes to an hour before cutting and serving. This also allows it to cool down a bit, making it easier to slice.
- Once ready to serve, cut the Knafeh into squares, as shown in the image.
- Garnish each square generously with the finely ground pistachios.
Serving Suggestions
These Pistachio-Topped Golden Cream Knafeh squares are delightful served warm or at room temperature. The contrast of the warm, crispy, syrupy pastry with the cool, smooth cream filling is truly irresistible.
These homemade Knafeh Squares are more than just a dessert; they are an experience. Take pride in having fashioned such a beautiful and traditional sweet. Feel free to share pictures of your lovely Knafeh – it’s always a joy to see home baking successes!