

Stash Your Pens in Style
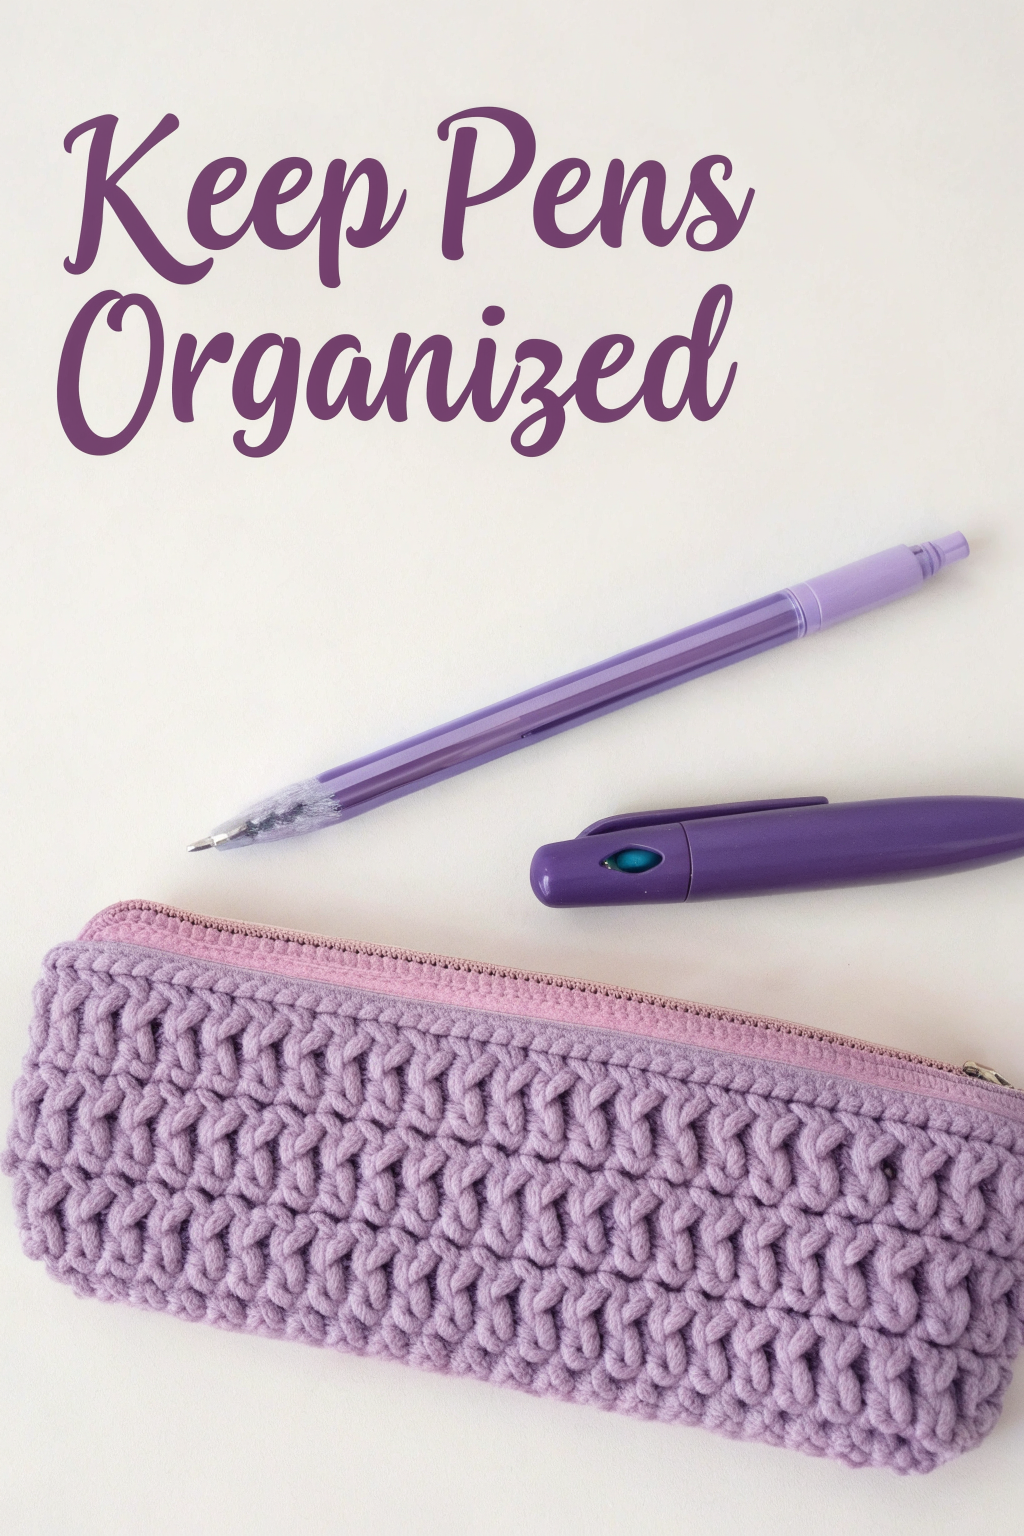
Isn’t there something wonderfully satisfying about tucking your favorite pens and pencils into a pouch you’ve brought to life with your own two hands? Looking at the image, we see a gorgeous lavender crocheted pencil case, boasting a rich, woven-like texture. That beautiful purple pen and darker purple click-pen certainly look right at home! This project is perfect for adding a touch of handmade charm to your desk or bag.
This guide will walk you through making your very own textured pencil case, just like the one pictured. While that intricate Alpine stitch pattern looks complex, we’ll break it down step-by-step, making it approachable even if you’re newer to crochet. Get ready to transform a skein of yarn into a practical treasure!
What You’ll Need to Gather
- 🧶 Worsted weight yarn (Category 4) in a lovely lavender shade, similar to the case in the image (you’ll need about 100-150 yards). The yarn in the photo has a smooth, consistent ply.
- 🪡 Crochet Hook size H/8 (5.0 mm) – or the size recommended on your yarn label.
- ✂️ Sharp scissors.
- 🧵 Tapestry needle (this is a large-eyed blunt needle, perfect for yarn).
- 📏 Ruler or measuring tape.
- 🤐 A 7-inch (18 cm) zipper. The image shows one with light pinkish-purple or mauve zipper tape and a metallic silver-colored pull.
- 🧷 Stitch markers (these are optional, but can be little lifesavers for keeping track!).
- 🪡 A regular sewing needle and thread (choose a thread color that matches your zipper tape) for attaching the zipper.
Getting Familiar: Stitches & Terms
Before we dive in, let’s get comfortable with the language of crochet and the stitches we’ll use. These are the building blocks!
- Slip Knot (sl kn): This is how most crochet projects begin! It’s a special adjustable loop you put on your hook.
- Chain (ch): The foundation of many projects. To make a chain, you yarn over your hook (wrap the yarn over) and pull that yarn through the loop already on your hook. That’s one chain!
- Single Crochet (sc): A lovely, short, and dense stitch.
- Insert your hook into the indicated stitch or space.
- Yarn over and pull up a loop (you’ll have 2 loops on your hook).
- Yarn over again and pull through both loops on your hook. That’s one single crochet!
- Double Crochet (dc): A taller stitch, about twice the height of a single crochet.
- Yarn over your hook.
- Insert your hook into the indicated stitch or space.
- Yarn over and pull up a loop (you’ll have 3 loops on your hook).
- Yarn over and pull through the first 2 loops on your hook (2 loops remaining).
- Yarn over again and pull through the remaining 2 loops on your hook. That’s one double crochet!
- Treble Crochet (tr): An even taller stitch, which helps give our case its wonderful texture.
- Yarn over your hook twice.
- Insert your hook into the indicated stitch or space.
- Yarn over and pull up a loop (you’ll have 4 loops on your hook).
- Yarn over and pull through 2 loops (3 loops remaining).
- Yarn over and pull through 2 loops again (2 loops remaining).
- Yarn over and pull through the final 2 loops on your hook. That’s one treble crochet!
- Front Post Treble Crochet (FPTR): This is the star stitch that gives the case its distinctive raised, woven appearance! Instead of working into the top ‘V’ of a stitch, you work around the vertical ‘post’ (the main body) of a stitch from a previous row, approaching it from the front of your work.
- Yarn over your hook twice (just like for a regular TR).
- Now, locate the DC stitch from two rows below that the pattern indicates. Insert your hook from the front of your fabric to the back, going around the entire vertical post of that DC stitch, and then bring your hook tip back out to the front again. The post of the stitch is now lying across your hook.
- Yarn over and pull a loop through (you’ll have 4 loops on your hook).
- Complete the stitch as a normal Treble Crochet: Yarn over and pull through 2 loops (3 loops left). Yarn over and pull through 2 loops (2 loops left). Yarn over and pull through the final 2 loops. You’ve just made a beautiful, raised FPTR!
- Turning Chain (tch): At the end of a row, you’ll often turn your work to start the next row. The turning chain is a set number of chain stitches you make at the beginning of the new row to bring your yarn up to the correct height for the stitches you’re about to make. For SC, it’s usually 1 ch (which often doesn’t count as a stitch). For DC, it’s often 3 chs (which often does count as the first DC of the row).
Making Your Textured Pencil Case Panel
The pencil case body is worked as one flat rectangular piece, which we’ll then fold and seam. The finished panel should measure approximately 8 inches (20 cm) wide and 7 inches (18 cm) tall. We’ll aim for an odd number of stitches across for this particular Alpine stitch pattern to work out neatly. Let’s aim for 27 stitches.
A Note on Gauge: Gauge refers to how many stitches and rows fit into a certain measurement (e.g., a 4×4 inch square). For this pencil case, exact gauge isn’t as critical as for a fitted garment. However, if your piece is coming out much larger or smaller, you might adjust your hook size. With worsted weight yarn and an H/8 (5.0mm) hook, you should be in the ballpark.
Let’s Begin!
Foundation Chain: Chain 28 loosely. (This gives us 27 stitches plus one for the turning chain base).
Row 1 (Setup – Wrong Side – WS): Work 1 SC into the 2nd chain from your hook. Then, work 1 SC into each remaining chain across. You should have 27 SC stitches. Turn your work. (Tip: Counting your stitches at the end of each row is a great habit, especially for beginners!)
Row 2 (Setup – Right Side – RS): Chain 3 (this ch-3 counts as your first DC stitch for this row and any similar rows). Work 1 DC into each SC stitch across (starting from the second SC, as your ch-3 is the first DC). You should have 27 DC stitches (counting the initial ch-3). Turn.
Row 3 (Relief – WS): Chain 1 (this ch-1 does not count as a stitch). Work 1 SC into each DC stitch across. You should have 27 SC stitches. Turn.
Row 4 (Texture – RS – Alpine Row 1): This is where the magic begins!
- Chain 3 (this counts as your first DC). This first DC sits above the first SC of Row 3.
- *Now, look at the DC stitches from Row 2. You will work 1 FPTR around the post of the second DC stitch of Row 2 (the first DC of Row 2 is directly under your current ch-3).
- Next, skip the SC stitch on Row 3 that sits directly behind the FPTR you just made (it’s important to skip this stitch, or your count will go off!). Work 1 DC into the next SC stitch on Row 3.*
- Repeat the sequence from * (FPTR around next available DC from Row 2, skip SC behind it, DC in next SC on Row 3) across the row.
- You will end this row by working 1 DC into the very last SC stitch of Row 3. (You should have 27 stitches: the starting ch-3 [as a DC], then 13 sets of [FPTR, DC]. Total: 1 + (13 x 2) = 27 stitches). Turn. (Take your time with this row; it sets up the whole pattern!)
Row 5 (Relief – WS): Chain 1 (does not count as a st). Work 1 SC into each stitch across (making sure to work into the top of the ch-3 from the previous row as your last SC). You should have 27 SC stitches. Turn.
Row 6 (Texture – RS – Alpine Row 2 – Offset): This row offsets the raised stitches, creating that beautiful woven look.
- Chain 3 (counts as your first DC). Work 1 DC into the first SC stitch of Row 5 (the one at the base of your ch-3).
- *Now, look at the stitches from Row 4. You will work 1 FPTR around the post of the next DC stitch from Row 4. (This DC will be a plain DC from Row 4, nestled between two FPTRs of that row – this is how we get the offset).
- Then, skip the SC stitch on Row 5 that sits directly behind the FPTR you just made. Work 1 DC into the next SC stitch on Row 5.*
- Repeat the sequence from * across the row.
- You will end this row by working 1 DC into each of the last two SC stitches of Row 5. (You should have 27 stitches: ch-3 [as DC], 1 DC, then 12 sets of [FPTR, DC], then 1 final DC. Total: 1 + 1 + (12 x 2) + 1 = 2 + 24 + 1 = 27 stitches). Turn.
Continue the Pattern: Repeat Rows 3 through 6 until your panel measures approximately 6.5 inches (16.5 cm) from the starting edge. You should aim to finish after completing a Row 3 or a Row 5 (an SC row, which will be on the Wrong Side). This ensures your next rows, which are for the zipper edge, start on the Right Side.
Finishing Rows for Zipper Edge: After your last pattern repeat (ending on an SC row, WS facing you, ready to turn for an RS row): Next Row (RS): Ch 1 (does not count as a st), SC in each st across. (27 SC) Turn. Final Row (WS): Ch 1 (does not count as a st), SC in each st across. (27 SC) Fasten off your yarn, leaving a nice long tail (about 15-20 inches / 38-50 cm) for seaming the side of your pouch.
Assembling Your Pencil Case
Your beautiful textured panel is complete! Now let’s give it its pouch form.
- Folding: Lay your finished panel flat. The side currently facing you should be the Wrong Side (the less textured side). Fold the panel in half so that the bottom edge (your initial foundation chain) meets the top edge (your final SC row). The Right Sides (textured sides) should now be together on the inside. Your panel is now about 8 inches wide and 3.5 inches tall.
- Seaming the Sides:
- Thread the long yarn tail you left onto your tapestry needle. If your tail is at the top, start seaming from the top opening down to the fold on one side. If it’s at the bottom, seam from the fold up to the opening.
- Line up the stitches of the two side edges carefully. Using a whip stitch (passing your needle through both layers of fabric from one side to the other, looping over the edge) or a mattress stitch (which gives a more invisible seam), neatly sew one side edge closed. Make your stitches firm but not too tight, so the seam doesn’t pucker.
- When you reach the end of the side, make a couple of small securing stitches and weave the yarn end into the seam allowance on the inside to hide it. Snip any excess.
- For the other open side, take a new length of your lavender yarn (about 15 inches), thread it onto your tapestry needle, and seam it closed in the same way. Secure and weave in this end too.
- Turn Right Side Out: Gently turn your pouch so the textured Right Side is now on the outside. Admire your work – it’s looking like a pencil case! The opening is at the top.
Attaching the Zipper
This is the final touch that makes your pouch fully functional! The image shows the zipper tape (the fabric part of the zipper) is the light pinkish-purple color.
- Prepare the Zipper: Open your 7-inch zipper about halfway. This makes it easier to handle.
- Positioning: With your pouch Right Side out, take one side of the zipper tape. Align its top edge just slightly below the top crocheted edge of one side of the pouch opening. The zipper teeth should be facing up and centered along the opening. You want the very top edge of your crochet work to be visible above the zipper tape.
- Carefully pin the zipper tape in place from the outside, ensuring your pins go through the zipper tape and the top edge of the crocheted fabric.
- If your zipper tape ends are a bit long for the 8-inch wide pouch (since the zipper itself is 7 inches), you’ll tuck these ends neatly towards the inside of the pouch at each end of the opening.
- Sewing – First Side:
- Thread your regular sewing needle with a length of thread that matches your zipper tape (the light pinkish-purple). Knot the end.
- Starting from the inside of the pouch, bring your needle out through the zipper tape and the crochet fabric near one end of the pinned zipper.
- Using small, neat stitches (a backstitch is very secure, or a neat running stitch will also work), sew the zipper tape to the inside edge of the pouch opening. Try to catch just the top layer or edge of the crocheted fabric so your sewing stitches are not too obvious from the outside. Work your way all along one side of the opening.
- Sewing – Second Side:
- Now, carefully align the other side of the zipper tape with the other top edge of the pouch opening. This is a crucial step for a neat finish: Before pinning, close the zipper a little to ensure both sides of the pouch line up evenly and the zipper will close smoothly without any puckering or twisting. Adjust as needed.
- Once you’re happy with the alignment, pin this second side of the zipper tape in place.
- Sew this second side of the zipper tape just as you did the first, again working from the inside.
- Finishing Zipper Ends: At both ends of the zipper, where the tape might extend slightly, make sure these ends are folded neatly to the inside of the pouch and secured with a few extra hand stitches. This keeps everything tidy. Check that your zipper pull, which is metallic in the image, moves smoothly.
Your Beautifully Handcrafted Pouch!
And there you have it! A stunning, textured pencil case, brought into being by your own hands, ready to hold your pens, crochet hooks, or makeup brushes. That gorgeous Alpine stitch, which seemed so intricate, has yielded a truly special item. The subtle lavender hue and the contrasting pinkish-purple zipper tape give it such a lovely, gentle appeal.
Don’t hesitate to try this with different yarn colors next time, or perhaps add a little charm to the zipper pull for extra personality. The satisfaction of using something you’ve meticulously pieced together is immense.
We’d absolutely love to see your finished pencil cases! Share a photo of your unique piece – it’s always inspiring to see how different hands interpret a pattern. Happy stitching!