
Stitch Your Own Adventure Backpack
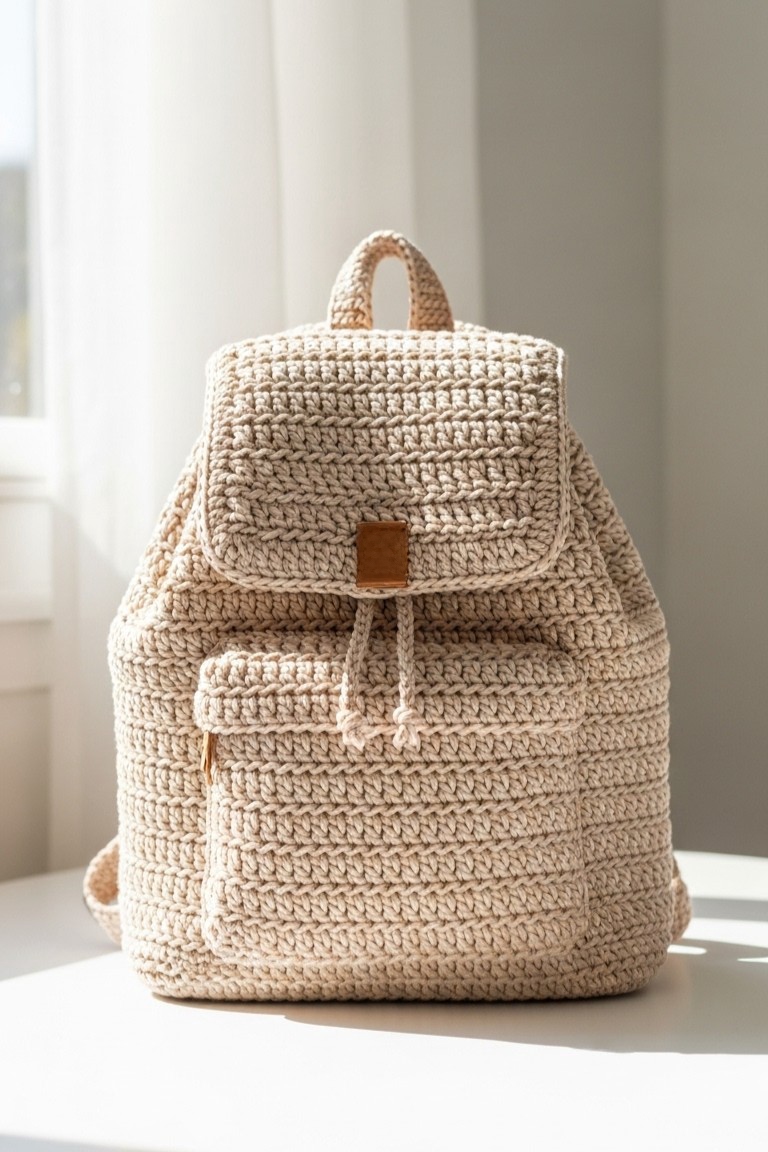
There’s something truly special about a handmade bag. This beautiful crocheted backpack, with its sturdy form and clean, neutral color, isn’t just a stylish accessory; it’s a project waiting to happen. Imagine packing your essentials into a backpack you fashioned with your own two hands! This guide will walk you through every step of the process, turning a simple ball of yarn into this gorgeous, practical piece. Even if you’ve never picked up a hook before, you can absolutely do this.
What You’ll Need
Here are the tools and materials required to build your backpack. The yarn choice is key to getting that robust structure you see in the picture.
- 🧶 Yarn: 2-3 spools of 5mm cotton macrame cord or a super bulky T-shirt yarn in a sandy beige color.
- 🪡 Crochet Hook: A 6.0mm (J-10) hook will work well with the thick cord.
- ✂️ Scissors: A sharp pair for clean cuts.
- 🪡 Darning Needle: A large-eye needle is essential for weaving in the thick cord ends.
- 🟫 Leather Tag: One small, square leather tag for that professional finishing touch on the flap.
- 🤐 Zipper: One 5-6 inch (12-15 cm) zipper in a matching beige or neutral color for the front pocket.
- 🧵 Sewing Needle & Thread: A standard sewing needle and thread (in a color that matches your zipper/yarn) to attach the zipper.
Learning the Stitches
This pattern uses a few basic stitches. Let’s get familiar with them. We will be using US crochet terms.
- Chain (ch): This is the foundation of almost all crochet projects. You will make a slip knot, put it on your hook, and then use the hook to grab the yarn (this is called a “yarn over”) and pull it through the loop on your hook. That’s one chain!
- Single Crochet (sc): This is a short, dense stitch that gives the backpack its solid and sturdy body. To make one, insert your hook into a stitch, yarn over, pull a loop through, yarn over again, and pull through both loops on your hook.
- Half Double Crochet (hdc): This stitch is slightly taller than a single crochet and is perfect for the textured flap. To begin, yarn over before you insert your hook into a stitch. Then, insert the hook, yarn over, pull a loop through (you’ll have three loops on your hook), yarn over one last time, and pull through all three loops.
- Working in the Back Loop Only (blo): When you look at the top of a stitch, you’ll see a “V” shape. This “V” is made of a front loop (closer to you) and a back loop (further from you). To work in the back loop only, you simply insert your hook under only that back loop when making your stitch. This is what produces the distinct horizontal ridges on the flap and pocket.
Assembling Your Backpack
Take a deep breath and let’s begin! We’ll build this piece by piece, starting from the bottom and working our way up.
Part 1: The Rectangular Base
The backpack stands on a firm, flat base.
- Start by chaining 25. This will determine the width of your backpack.
- Row 1: Turn your work. Starting in the second chain from the hook, make one single crochet (sc) in each chain across. You should have 24 stitches.
- Row 2-10: Chain 1 (this does not count as a stitch, it just gives you height) and turn your work. Make one sc in each stitch across.After 10 rows, you will have a solid rectangle. This is the foundation. Do not fasten off the yarn.
Part 2: Building the Body
Now, we’ll begin working in rounds to build the walls of the backpack.
- Round 1: Chain 1. Now, work sc stitches evenly around the entire perimeter of your rectangular base. You’ll work into the stitches on the long sides and into the ends of the rows on the short sides. Aim for about one stitch per row-end to keep it from puckering. Place an extra stitch in each of the four corners to help the bag turn upwards smoothly.
- Round 2 onwards: From here, just continue working one sc in each stitch around and around. The bag will naturally start to form its height. There’s no need to join at the end of each round; just keep going in a spiral. This continuous motion gives the body its seamless look.
- Continue for about 35-40 rounds, or until the bag reaches your desired height. The bag in the photo has a substantial height, so don’t be afraid to keep going!
Part 3: The Textured Front Pocket (Revised)
This pocket has a lovely ribbed texture and a functional zipper.
- Separately, chain 15.
- Row 1: Starting in the second chain from the hook, make one half double crochet (hdc) in each chain across (14 stitches).
- Row 2-8: Chain 1 and turn. Make one hdc in the back loop only (blo) of each stitch across. This is the key to that ridged texture.
- Once your pocket-sized rectangle is complete, fasten off. Weave in the final end neatly at the top of the pocket. Leave the beginning yarn tail long, as you will use this for sewing.
- Attach the Zipper: Take your zipper, sewing needle, and matching thread. Carefully hand-sew the zipper along the top edge of the pocket rectangle. Ensure your stitches are neat and secure, attaching the fabric of the zipper tape to the crocheted fabric.
- Attach the Pocket to the Bag: Position the completed pocket on the front of the backpack body, centered and a few inches up from the base. Use your darning needle and the long yarn tail from the beginning to sew the pocket securely onto the bag along the sides and bottom. The top edge, with the zipper now attached, remains unsewn from the bag’s body, creating the functional opening.
Part 4: The Main Flap
The flap uses the same textured stitch as the pocket.
- Chain 21.
- Row 1: Starting in the second chain from the hook, make one hdc in each chain across (20 stitches).
- Row 2-12: Chain 1 and turn. Make one hdc in the back loop only (blo) of each stitch across.
- Once the flap is the right size to fold over the backpack’s opening, fasten off, leaving a very long tail.
- Before attaching it, sew your small leather tag onto the front of the flap, centered near the bottom edge.
- Use the long tail and your darning needle to sew the top edge of the flap firmly to the top-back of the backpack body.
Part 5: The Finishing Touches
These final details complete the backpack.
- The Drawstring: Make a simple chain that is about 1.5 times the width of the bag’s opening. Weave this chain in and out of the stitches two or three rounds down from the top opening. Tie the ends in a simple knot.
- The Top Handle: Attach your yarn at the top-center of the bag’s back, just behind where the flap is joined. Chain 1, and make about 6-8 sc stitches across. Chain 1, turn, and work 2-3 more rows of sc. This will form a thick, sturdy tab. Fold it into a loop and sew the end down securely.
- The Straps (Make 2):
- Chain 7.
- Work rows of sc back and forth until the strap is your desired length (a good starting point is about 28-30 inches).
- Fasten off, leaving a long tail.
- Sew one end of each strap to the back of the backpack, just below the top handle.
- Sew the other end of each strap to the bottom corners of the backpack’s back panel. Be sure to sew them on very securely, as they will bear the most weight.
And there you have it. Step back and admire the wonderful backpack you’ve just put together. It’s more than just yarn and stitches; it’s a testament to your patience and skill. Now, all that’s left to do is plan an adventure to take it on. We would be thrilled to see pictures of your finished piece.