
Stitch Your Own Pocket Tissue Pouch
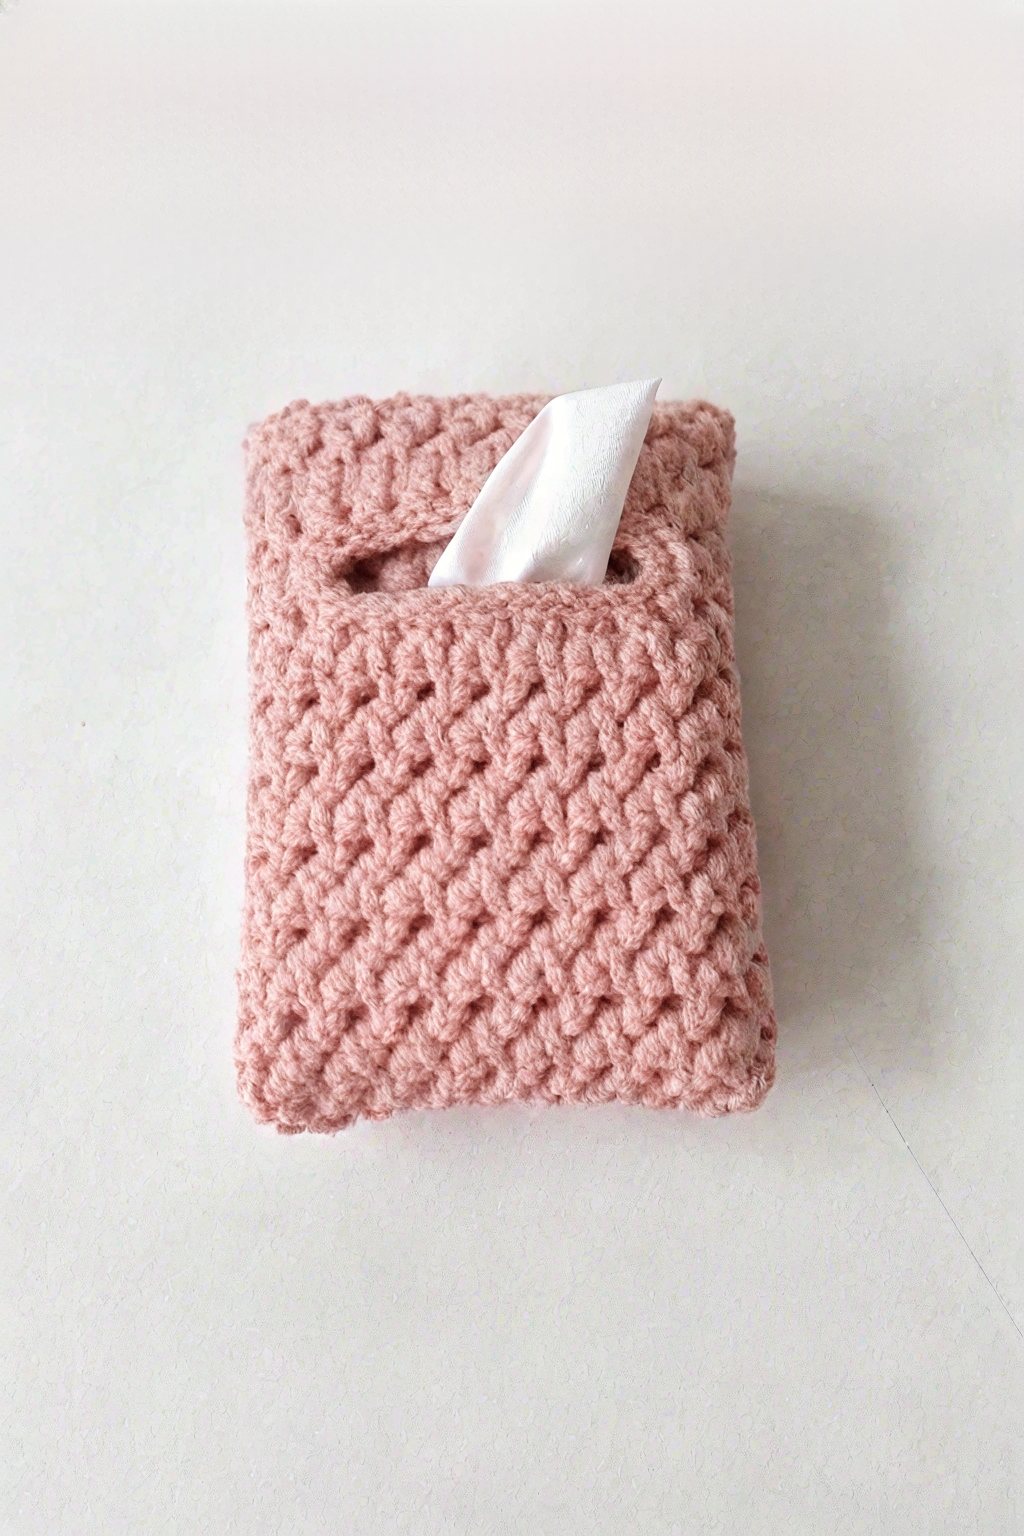
Ever find yourself digging for a tissue, only to pull out a crumpled pack? Let’s fix that with a touch of handmade charm! This project guides you in fashioning a lovely dusty pink Crochet Tissue Pouch, just like the one pictured. It features a wonderfully textured stitch pattern with distinct diagonal ridges and a neat opening at the top for easy access. Even if you’re brand new to crochet, we’ll go through every step together. Get ready to make something practical and pretty!
What You’ll Need
Gather these simple supplies to get started:
- 🧶 Worsted Weight Yarn (like the dusty pink shown, about 50 yards)
- 🪝 Crochet Hook (Size H/8 or 5.00mm recommended)
- ✂️ Scissors
- 🧵 Yarn Needle (for weaving in ends)
- 📏 Measuring Tape (optional, but helpful)
Understanding the Basics
Before we begin, let’s familiarize ourselves with the stitches and terms. Don’t worry, we’ll take it slow!
- ch: Chain Stitch. This is the foundation of most crochet projects. You’ll make a loop with your yarn (a slip knot), put your hook in, yarn over (wrap yarn around the hook), and pull the yarn through the loop. That’s one chain!
- sl st: Slip Stitch. Insert your hook into a specified stitch, yarn over, and pull the yarn through both the stitch and the loop already on your hook. It’s used for joining.
- sc: Single Crochet. Insert your hook into a stitch, yarn over, pull up a loop (you’ll have 2 loops on your hook), yarn over again, and pull through both loops. It’s a short, basic stitch.
- dc: Double Crochet. Yarn over before inserting your hook into the stitch, yarn over, pull up a loop (3 loops on hook), yarn over, pull through the first 2 loops (2 loops left on hook), yarn over again, and pull through the remaining 2 loops. It’s taller than a single crochet.
- fpdc: Front Post Double Crochet. This sounds tricky, but it’s just where you put your hook that’s different, and it helps build the texture you see in the image. Yarn over, then insert your hook from front to back to front around the vertical post (the main body) of the double crochet stitch in the row below the previous row, pushing the post forward. Then, complete the double crochet stitch as usual (yarn over, pull up a loop, yarn over, pull through 2 loops, yarn over, pull through 2 loops).
- Stitch / Stitches: Refers to the loops you work into.
- Row: A horizontal line of stitches worked back and forth.
- Turning Chain: Chains made at the beginning of a row to bring the yarn up to the correct height for the next row’s stitches.
- Yarn Over (yo): Wrapping the yarn over your crochet hook.
- Working in the row below: This means inserting your hook into a stitch from two rows down, not the row immediately beneath your current one. The fpdc uses this technique.
A Quick Tip: Try to keep your stitches consistent – not too tight, not too loose. This comes with practice!
Let’s Make the Tissue Pouch
We’ll be working a flat rectangle first, which we will then fold and seam. The textured pattern is achieved by alternating rows of single crochet with rows combining single crochet and front post double crochet. This pattern is often called the Alpine Stitch.
Starting the Pouch
- Make a Slip Knot: Form a loop with your yarn, leaving a tail a few inches long, and place it on your hook. Pull gently to tighten.
- Foundation Chain (ch): Chain 17 stitches. (This should yield a width suitable for a standard pocket tissue pack, about 3.5-4 inches wide with worsted yarn and a 5mm hook. You can adjust slightly by adding or subtracting chains in multiples of 2 if needed, plus 1 for the base chain).
Building the Body (Alpine Stitch)
Row 1 (Setup Row):
- Work 1 sc into the 2nd chain from your hook.
- Work 1 sc into each remaining chain across. You should have 16 sc stitches.
- Chain 1 (this is your turning chain – it doesn’t count as a stitch here) and turn your work.
Row 2:
- Work 1 sc into the very first stitch.
- Work 1 sc into each stitch across the row. (16 sc total).
- Chain 2 (this turning chain does count as your first dc for the next row) and turn your work.
Row 3 (Texture Row Start):
- Your turning chain counts as the first dc. Skip the very first stitch (the base of the turning chain).
- Work 1 fpdc around the post of the next sc stitch from Row 1 (the row below the previous row).
- Work 1 dc into the next stitch of the current row (Row 2).
- *Work 1 fpdc around the post of the next sc from Row 1.
- Work 1 dc into the next stitch of the current row (Row 2).*
- Repeat the sequence between the asterisks (*) across the row.
- Your last stitch should be 1 dc worked into the last stitch of the row. (16 stitches total – alternating dc and fpdc, beginning and ending with a dc, counting the turning ch as the first dc).
- Chain 1 (turning chain, does not count as a stitch) and turn.
Row 4:
- Work 1 sc into the very first stitch.
- Work 1 sc into each stitch across the row. (16 sc total).
- Chain 2 (counts as first dc) and turn.
Row 5 (Texture Row Continued):
- Your turning chain counts as the first dc. Skip the very first stitch.
- Work 1 dc into the next stitch of the current row (Row 4). Notice this row starts differently to offset the texture.
- Work 1 fpdc around the post of the next dc stitch from Row 3 (two rows below). Remember to work around the post of the dc, not the fpdc from that row.
- *Work 1 dc into the next stitch of the current row (Row 4).
- Work 1 fpdc around the post of the next dc from Row 3.*
- Repeat the sequence between the asterisks (*) until you have two stitches left in the row.
- Work 1 dc into each of the last two stitches. (16 stitches total).
- Chain 1 (turning chain, does not count as a stitch) and turn.
Repeating the Pattern: Continue repeating Rows 2 through 5 until your rectangle is long enough to fold over a tissue pack, leaving a slight overlap at the top opening. This will likely be around 18-22 rows total, or approximately 6 inches long. End your work after completing a Row 4 (a single crochet row). Do not fasten off yet if you plan to seam with the same yarn.
Tip: The fpdc stitches push the fabric forward, forming the diagonal ridges you see in the image. Make sure you are consistently working them around the posts of the dc stitches from two rows below, skipping the stitches directly behind them in the current row to maintain the stitch count.
Assembling the Pouch
- Folding: Lay your finished rectangle flat. Fold the bottom edge up towards the top, leaving about 1-1.5 inches of the top edge unfolded. This top flap forms the opening seen in the image.
- Seaming: Now, you need to join the sides. You can continue using your hook and working yarn if you didn’t fasten off.
- Align the stitches of the folded edges carefully.
- Option 1 (SC Seam): Chain 1. Working through both layers of the aligned side edges, insert your hook and make sc stitches evenly along the first side, joining them together. When you reach the corner, fasten off (cut the yarn leaving a 6-inch tail, yarn over, and pull the tail through the loop on your hook).
- Option 2 (Yarn Needle Seam): Fasten off, leaving a long tail (about 12-15 inches). Thread this tail onto your yarn needle. Using a simple whip stitch or mattress stitch, sew the aligned side edges together. Secure the end.
- Repeat the seaming process on the other side edge.
- Finishing: Weave in all loose yarn tails securely using your yarn needle, hiding them within the stitches on the inside of the pouch. Trim any excess yarn.
Your Finished Piece!
There you have it! A beautifully textured, handmade tissue pouch, fashioned by you. Pop in a standard pack of pocket tissues – it should fit snugly. The top opening allows you to easily pull one out whenever needed.
Feel the wonderful texture your stitches produced. This little pouch is not just practical; it’s a small piece of textile art you brought into existence. What a wonderful feeling!
Why not try making another one in a different color? These make lovely little gifts too. We’d love to see your completed pouches – feel free to share photos! Happy stitching!